Premiere Rush Guided Workflow — Settings
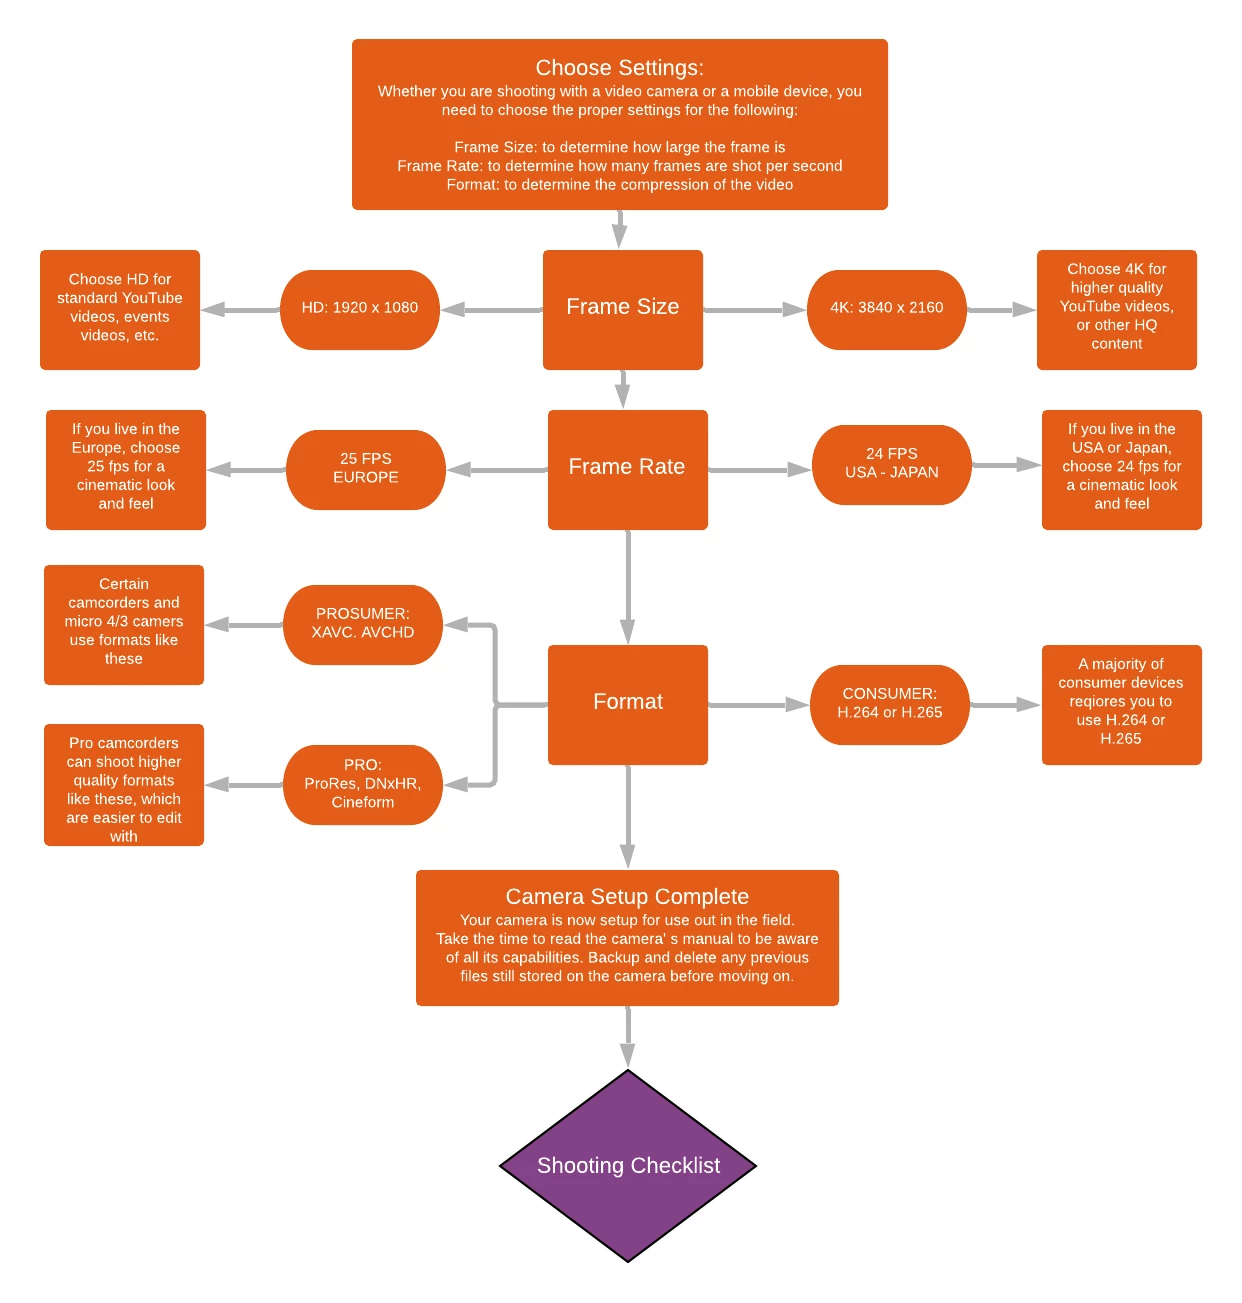
 Now that you've made the choice between a camera and your phone, and you've taken basic stock of what you have to work with regarding the shoot, it's time to focus on the settings for your device, be it camera or phone. Even though it is tedious and not really a creative process, these settings will either make or break your shoot, so focus on the details, become very familiar with your camera's menus and settings, and then choose the correct settings for a good general setup.

Summary:
With this task, it is important to ask yourself these questions:
- Which frame size do you shoot in?
- Standard HD: 1920 x 1080
- Most commonly used frame size by content creators and broadcasters.
- Content creators needing faster upload times prefer it.
- Content creators that have underpowered computers or laptops prefer it, as it is easier to edit with.
- Standard HD: 1920 x 1080
- Standard UHD (AKA "4K") 3840 x 2160
- Content creators concerned with showing larger, higher quality videos use this size.
- Content creators mindful that UHD increases viewership via the YouTube algorithm
- Content creators that have more powerful computers that can handle the higher compression that comes with large frame sizes in H.264 or H.265 formats.
- Non-standard HD I: 1080 x 1920 (not pictured in the diagram)
- Content creators creating Instagram Stories or IGTV content
- Also known as "Portrait" aspect ratio.
- Non-standard HD II: 1080 x 1080
- Content creators creating Instagram posts.
- This is a square ratio.
- Some phones allow for square video shooting.
- Non-standard HD III: Varies
- Content creators can also shoot in other frame sizes for other social media properties, if the camera allows it.
- If the camera does not have a setting for your social media property, choose a frame size that is slightly larger than what you'll need.
- Scaling down footage from a larger frame sized file has higher quality than scaling up footage from a smaller frame sized file.
- At what frame rate will you shoot in?
- Watch this excellent explainer regarding frame rates by Gene Nakata, AKA "Potatojet."
- Shoot 24 fps
- In most cases, shoot with this frame rate.
- 24 fps is the de facto frame rate you should shoot in, as it is the frame rate Hollywood feature films have used for around 100 years now. If you live in the USA or Japan, this is definitely the frame rate you want to use.
- Shoot 25 fps
- 25 fps is the European standard frame rate.
- If you live in Europe, your camera might not shoot 24 fps. Choose 25 fps.
- Certain "vlogger" camera do not shoot 24 fps, they shoot 30 fps by default, and do not offer 24 fps. Check to see if the European standard is menu choice. If so, choose to shoot 25 fps rather than 30 fps. Some YouTube content creators use this method.
- Shoot 30 fps
- In some cases shooting 30 fps (technically 29.97 fps), might make sense.
- News, sports, and reality shows are often shot at this frame rate.
- Slightly smoother than 24 fps.
- Not as "cinematic" a look.
- Shoot 60 fps or 120 fps
- Shoot only certain clips with these frame rates if you wish to have a smoother slow motion effect.
- 120 fps is often only available at HD frame sizes, so keep that in mind when choosing your frame size setting.
- Often used when acquiring slow motion cut away (AKA "B-roll) shots.
- Not recommended for standard editing, only for slow motion shots.
- Which format should you choose?
- ProRes/DNxHD or HR/GoPro Cineform
- Some cameras or devices shoot editing codecs like ProRes natively; this is the best possible scenario for editing with footage right out of the camera.
- These editing codecs are much, much larger than H.264 files. Plan to record straight to SSD drives.
- GoPro recommends transcoding all GoPro H.264 files to CineForm prior to editing with any NLE.
- H.264
- Most mobile devices, DSLRs, and many mirrorless cameras usually do not give you a choice, you must shoot in the H.264 format.
- Some mirrorless cameras allow you to shoot in a higher quality 10 bit H.264 format. It's a better image, but performance will be worse.
- It is the most difficult format (sometimes called a "codec") to edit with, especially for mobile devices.
- H.265
- Some mobile devices and drones shoot H.265 files, which are highly compressed and can be difficult to edit with on even powerful systems.
- Consider transcoding highly compressed H.265 drone files and H.264 camera files in Adobe Media Encoder if you have a Creative Cloud subscription (a third party utility will also probably be OK) prior to importing files to Premiere Rush.
- Personally, I like to transcode H.264 and H.265 files to ProRes LT or similar.
- If transcoding is not possible, keep in mind that the performance of these mobile formats is slower because they are so highly compressed.
- It is worth the effort to transcode files as the editing experience becomes much smoother.
- XAVC and other variants
- Many modern "prosumer" cameras shoot with some variant of XAVC format.
- Similar performance issues as H.264 and H.265.
- Transcode files if they are too difficult to edit with, if possible.
- ProRes/DNxHD or HR/GoPro Cineform
Still confused or didn't see the settings in your camera didn't match these? Let us know and we'll assist you with the settings. Now that you've got all your settings correct in camera, let's now look at a checklist of video gear that might be useful to you at the shoot.
Any questions? Create a post below.
Additional Resources: Customizing Pro Camera Settings in Premiere Rush
< Shooting— Shooting Checklist >


