 Adobe Community

Copy link to clipboard
Copied
 Hi.
Hi.
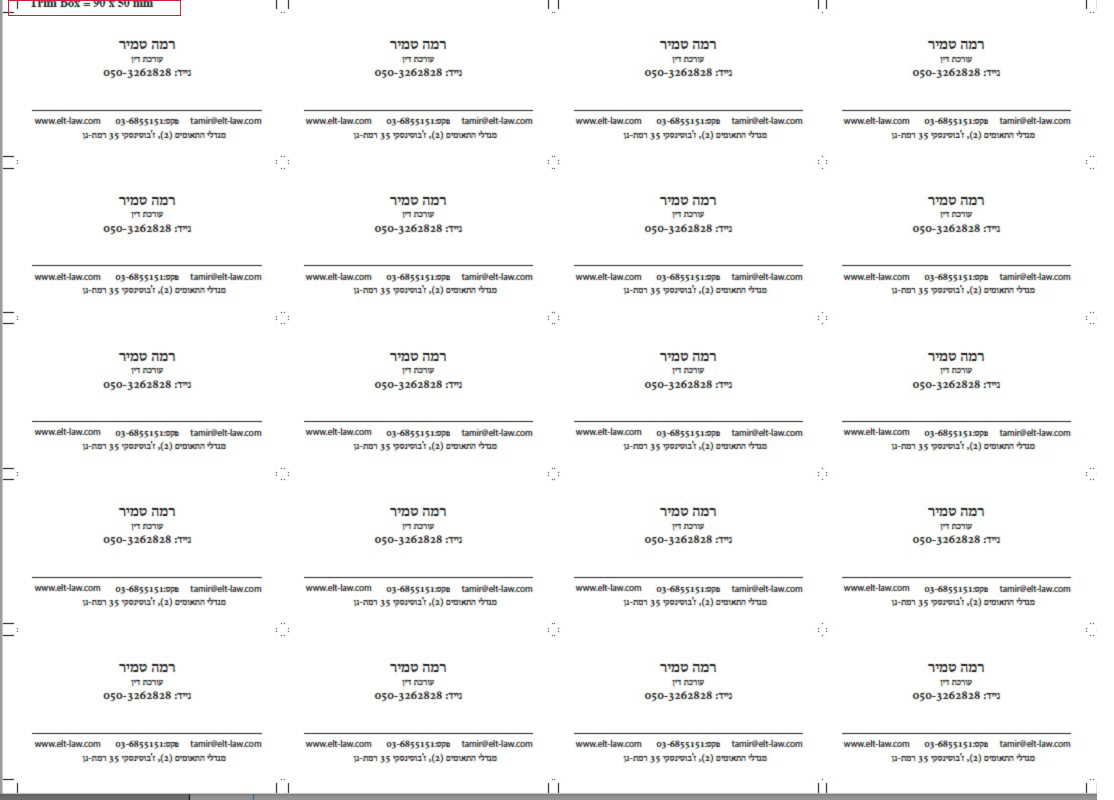
I have a 50 * 90 mm business card
And I want to duplicate it so that it goes into the page (through the "quite imposing" plug-in).
After the duplication I created a new sheet with 20 tickets,
I want the top corner of the sheet to say "trim size"
So that the employee who cuts the cards knows what final size he needs to cut it.
How can I do it?
Please note that I have licenses for pitstop and for quite imposing
But none of their support knew how to give me an automatic solution. (In pitstop you can paste the trim size on the document But after imputation the number is deleted.)
It's clear to me that I can always type manually but I'm looking for an automated script.
It is important to emphasize that each time the size of the card varies from work to work.
Attached file with the target.
Thanks!


 1 Correct answer

OK, it has taken me a while as I am new to scripting, however I now have a fallback plan. I originally wanted to add the trim info into document properties metadata using PitStop Pro, however there appears to be a maintenance issue which Enfocus are now aware of…
Step 1: So the fallback plan is to add the trim box info as metadata using an Acrobat Pro javascript. Before imposition, run the following script on the 1up file. The script could be run in any number of ways, I tested with an Acrobat Ac
... 61
Replies
61
61
Replies
61
Copy link to clipboard
Copied
Thank you!!
Copy link to clipboard
Copied
Hey Stephen_A_Marsh
I've been using the program for a few days, (to write the trimsize)
And it works well.
Sometimes there is the problem that needs to be done to cut and paste to see the text.
It's a bit cumbersome and I wanted to ask if you have any idea why this is happening.
Thanks!
Copy link to clipboard
Copied
Yes, this is what I was referring to in my post #16…
I believe that this is due to QuiteImposing creating a mask of the business card before the step/repeat.
I have not had the time to try to answer why a manual cut-n-paste of the selected text slug works and why this does not work when incorporated into the action list.
I was originally looking for a way to store the trim info as metadata, then apply the metadata as a text object after imposition, however I hit a brick wall on that approach which could be worth revisiting sometime in the future.
Copy link to clipboard
Copied
Could I please remind you in a few weeks
Maybe you'll have time / idea?
Copy link to clipboard
Copied
I thought I had it fixed but on further testing it still needs work!
Copy link to clipboard
Copied
Hey. Thanks. I will wait patiently.
I have another question.
I have a document with some business cards,
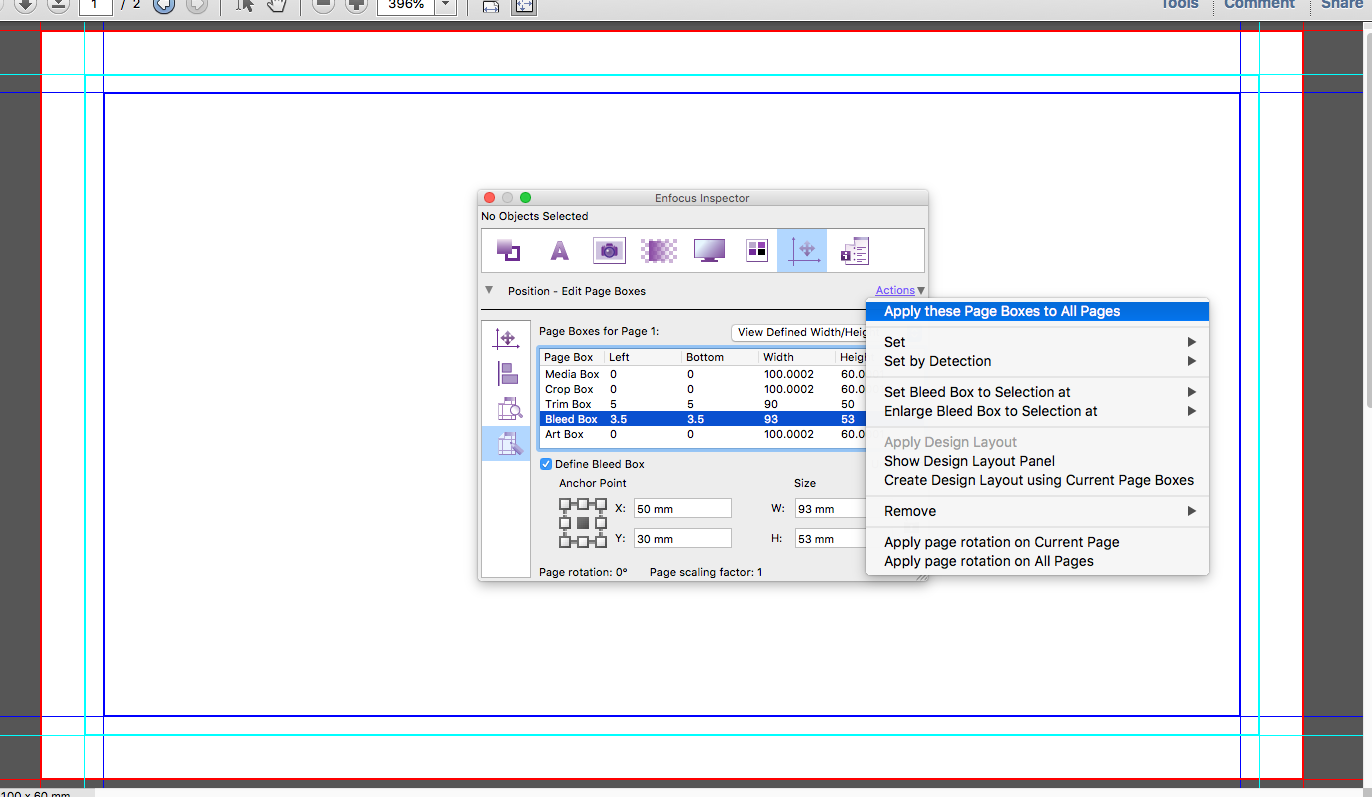
And I want to set their trim size to 50 * 90
And the bleed size to 53 * 93
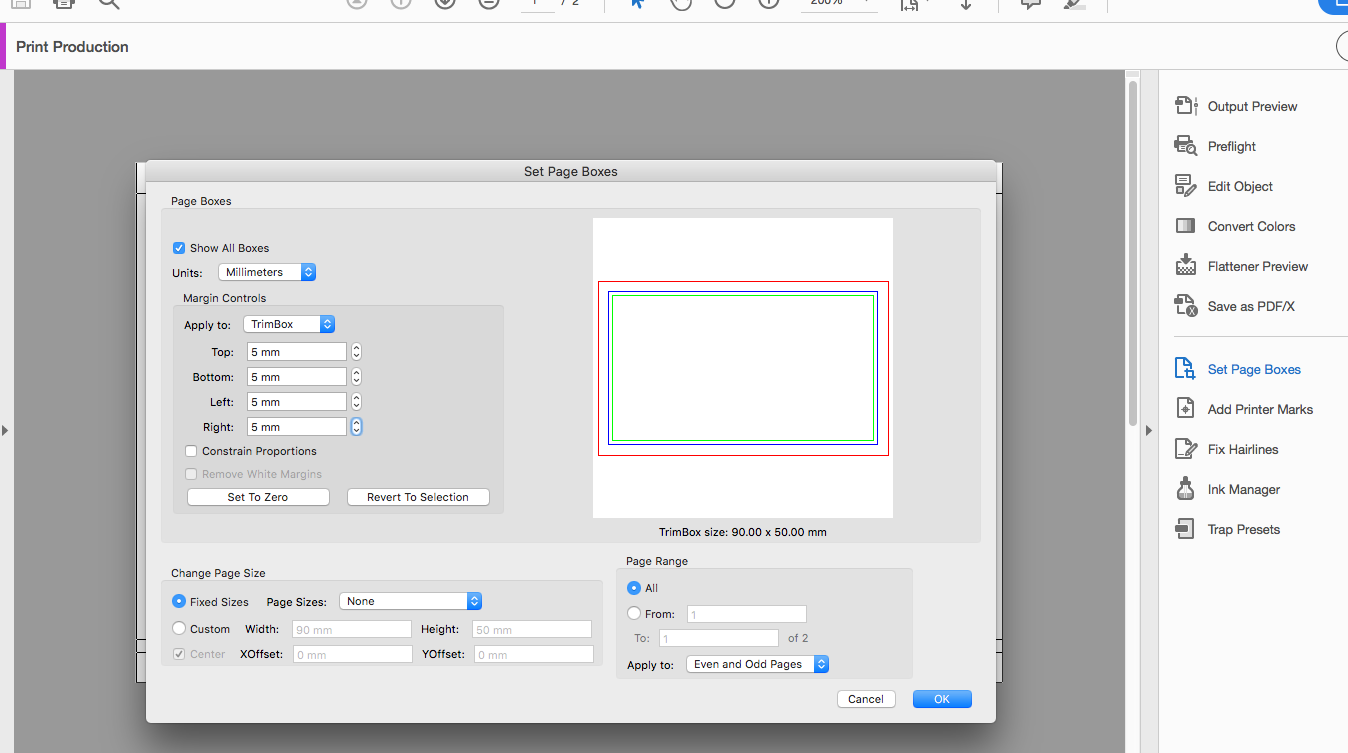
I know how to do this using the Inspector window.
The question is how can one do this in one action of all pages?
Attached 2 files.
Copy link to clipboard
Copied
I can’t download your demo files as Dropbox states that they are still uploading...
EDIT: OK, I can now see that they are placed in the middle of an A4 page, but all 4 pages are consistent, so all you would need to do is add in the same top/bottom and side values for setting the trim and bleed info.
_____________
To keep this directly on topic for Adobe software, Acrobat Pro can do this using the Print Production Tools > Set Page Boxes:
While with Enfocus PitStop Pro you can also apply the page boxes from the current page to all other pages from the inspector:
Other options:
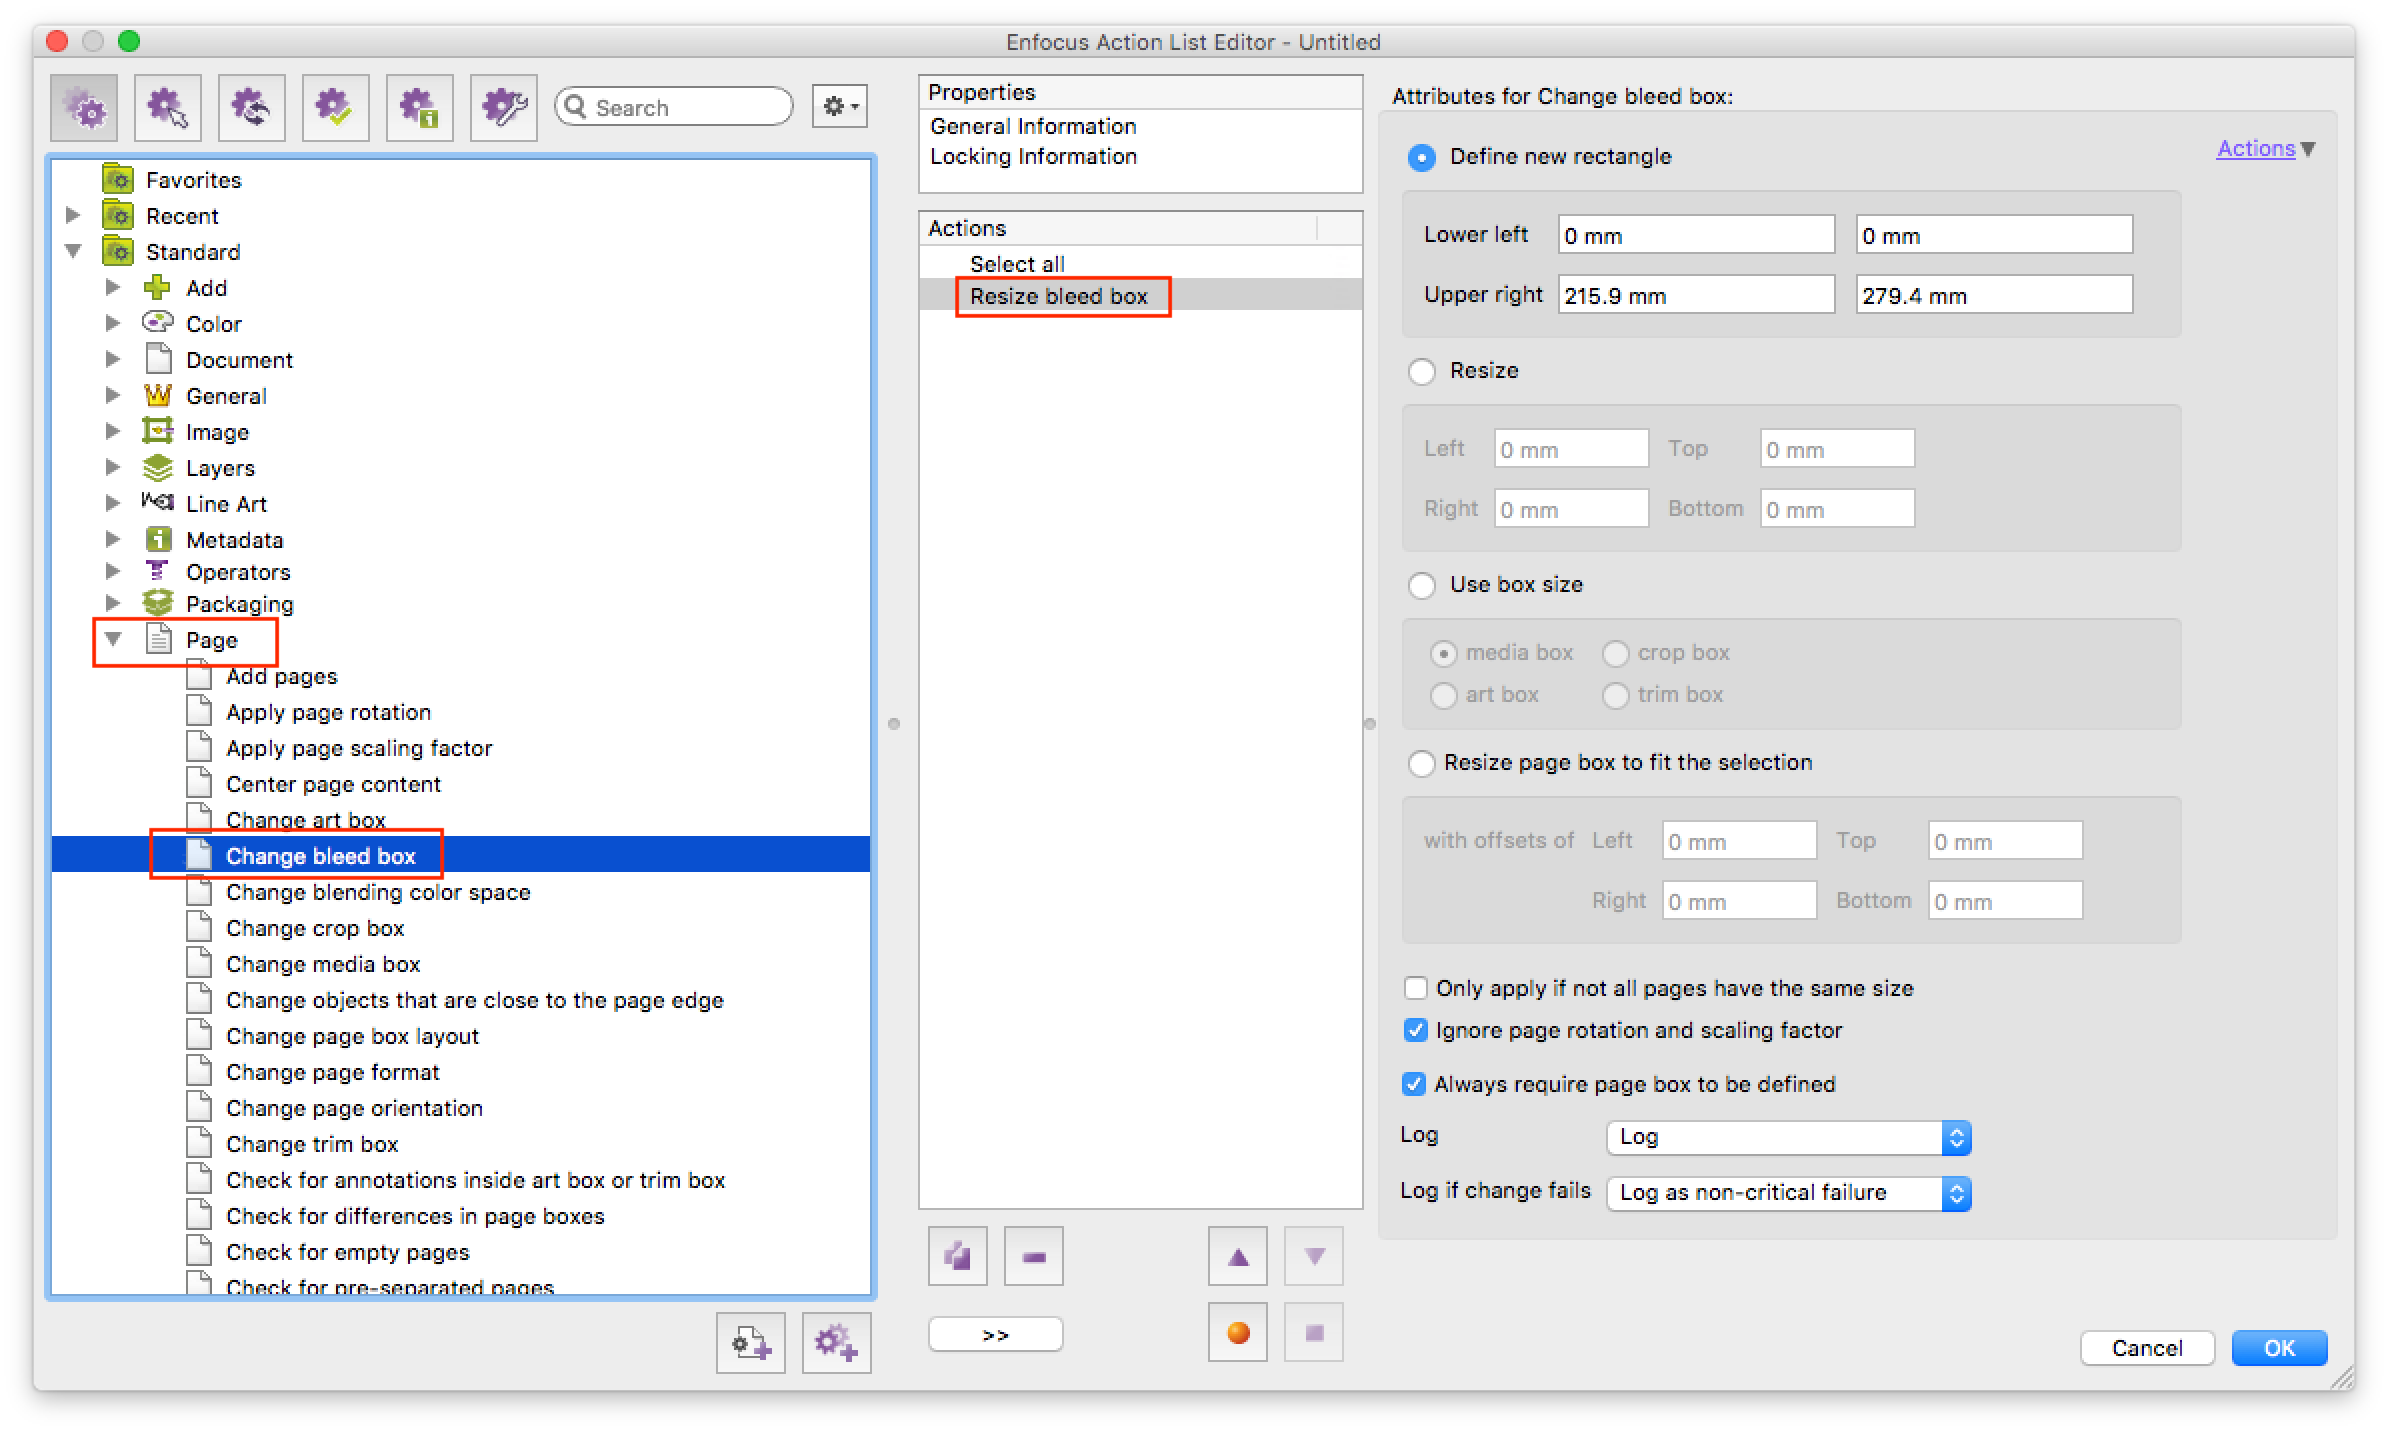
Using Acrobat Pro, one can create a preflight fixup to set the trim to say 5mm in from the mediabox. Then one can create an other fixup to set to bleed offset by say 1.5mm from the trimbox or using absolute values. Then using a preflight profile, one can include both fixups to all pages. One could even create a preflight droplet that one could drag PDF files onto for processing.
Using PitStop Pro, one can create an action list to set the bleed and trim boxes and apply to all pages. If one had PitStop Server, the same action list could be used to automatically batch edit multiple files from a nominated hot folder.
Copy link to clipboard
Copied
Hi.
I wanted to ask.
Have you had time to improve the code of adding the trimsize?
Thanks!
Copy link to clipboard
Copied
I have looked and played with the action list steps, but have not had a breakthrough. It works on some files automatically, other files require a manual cut/paste of the text that is selected after running the second action. It is certainly a puzzle, just one that I can’t crack at this time.
Copy link to clipboard
Copied
OK, it has taken me a while as I am new to scripting, however I now have a fallback plan. I originally wanted to add the trim info into document properties metadata using PitStop Pro, however there appears to be a maintenance issue which Enfocus are now aware of…
Step 1: So the fallback plan is to add the trim box info as metadata using an Acrobat Pro javascript. Before imposition, run the following script on the 1up file. The script could be run in any number of ways, I tested with an Acrobat Action, then settled on installing it into the File menu instead:
//Add trim size to document title.js
//Acrobat Pro javascript
//https://forums.adobe.com/message/10778492
//https://forums.adobe.com/thread/1246108
function TrimInfo(){
var aRect = this.getPageBox("Trim");
var width = aRect[2] - aRect[0];
var height = aRect[1] - aRect[3];
this.info.title = ("Trim: " + Math.round(width*0.3528) + " mm x "
+ Math.round(height*0.3528) + " mm");
}
app.addMenuItem ({cName: "Add trim size to title", cParent: "File", cExec: "TrimInfo()" });
The installation path would be similar to:
C:\Program Files (x86)\Adobe\Acrobat DC\Resource\Javascripts\
/Applications/Adobe Acrobat DC/Adobe Acrobat.app/Contents/Resources/JavaScripts
Then one would run the script from the foot of the File menu:
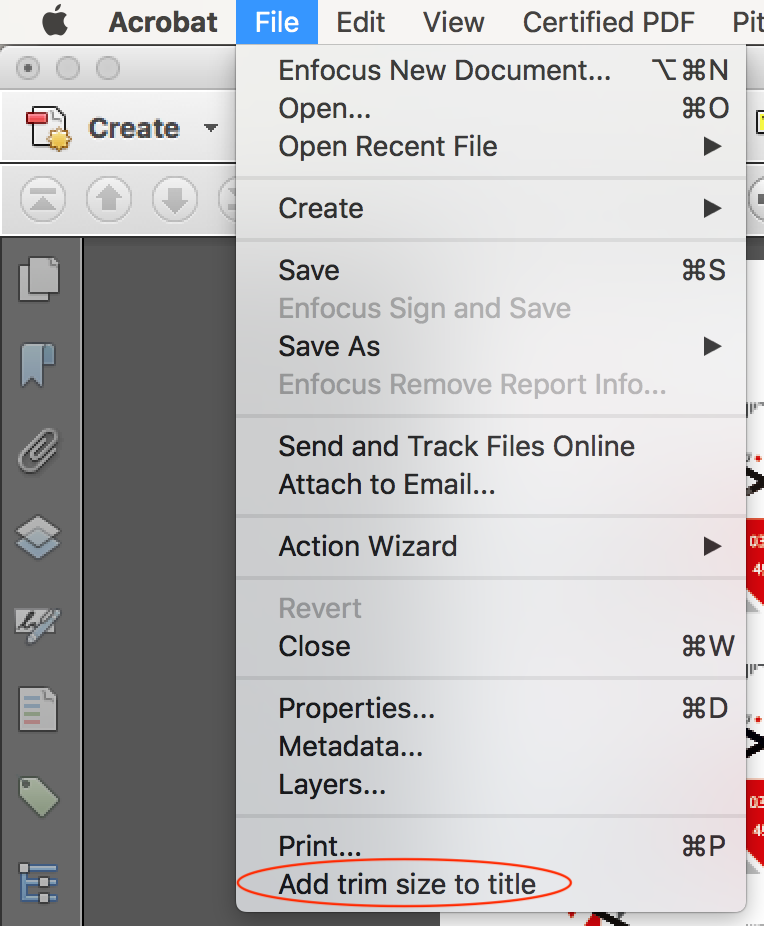
Note: it is presumed that the input file is either a single page or if multi-page, that all pages have the same trimbox size.
Step 2: After imposing with Quite Imposing Plus, a simple PitStop Pro Action List then adds the text from the document properties as a text slug on the upper left of the file.
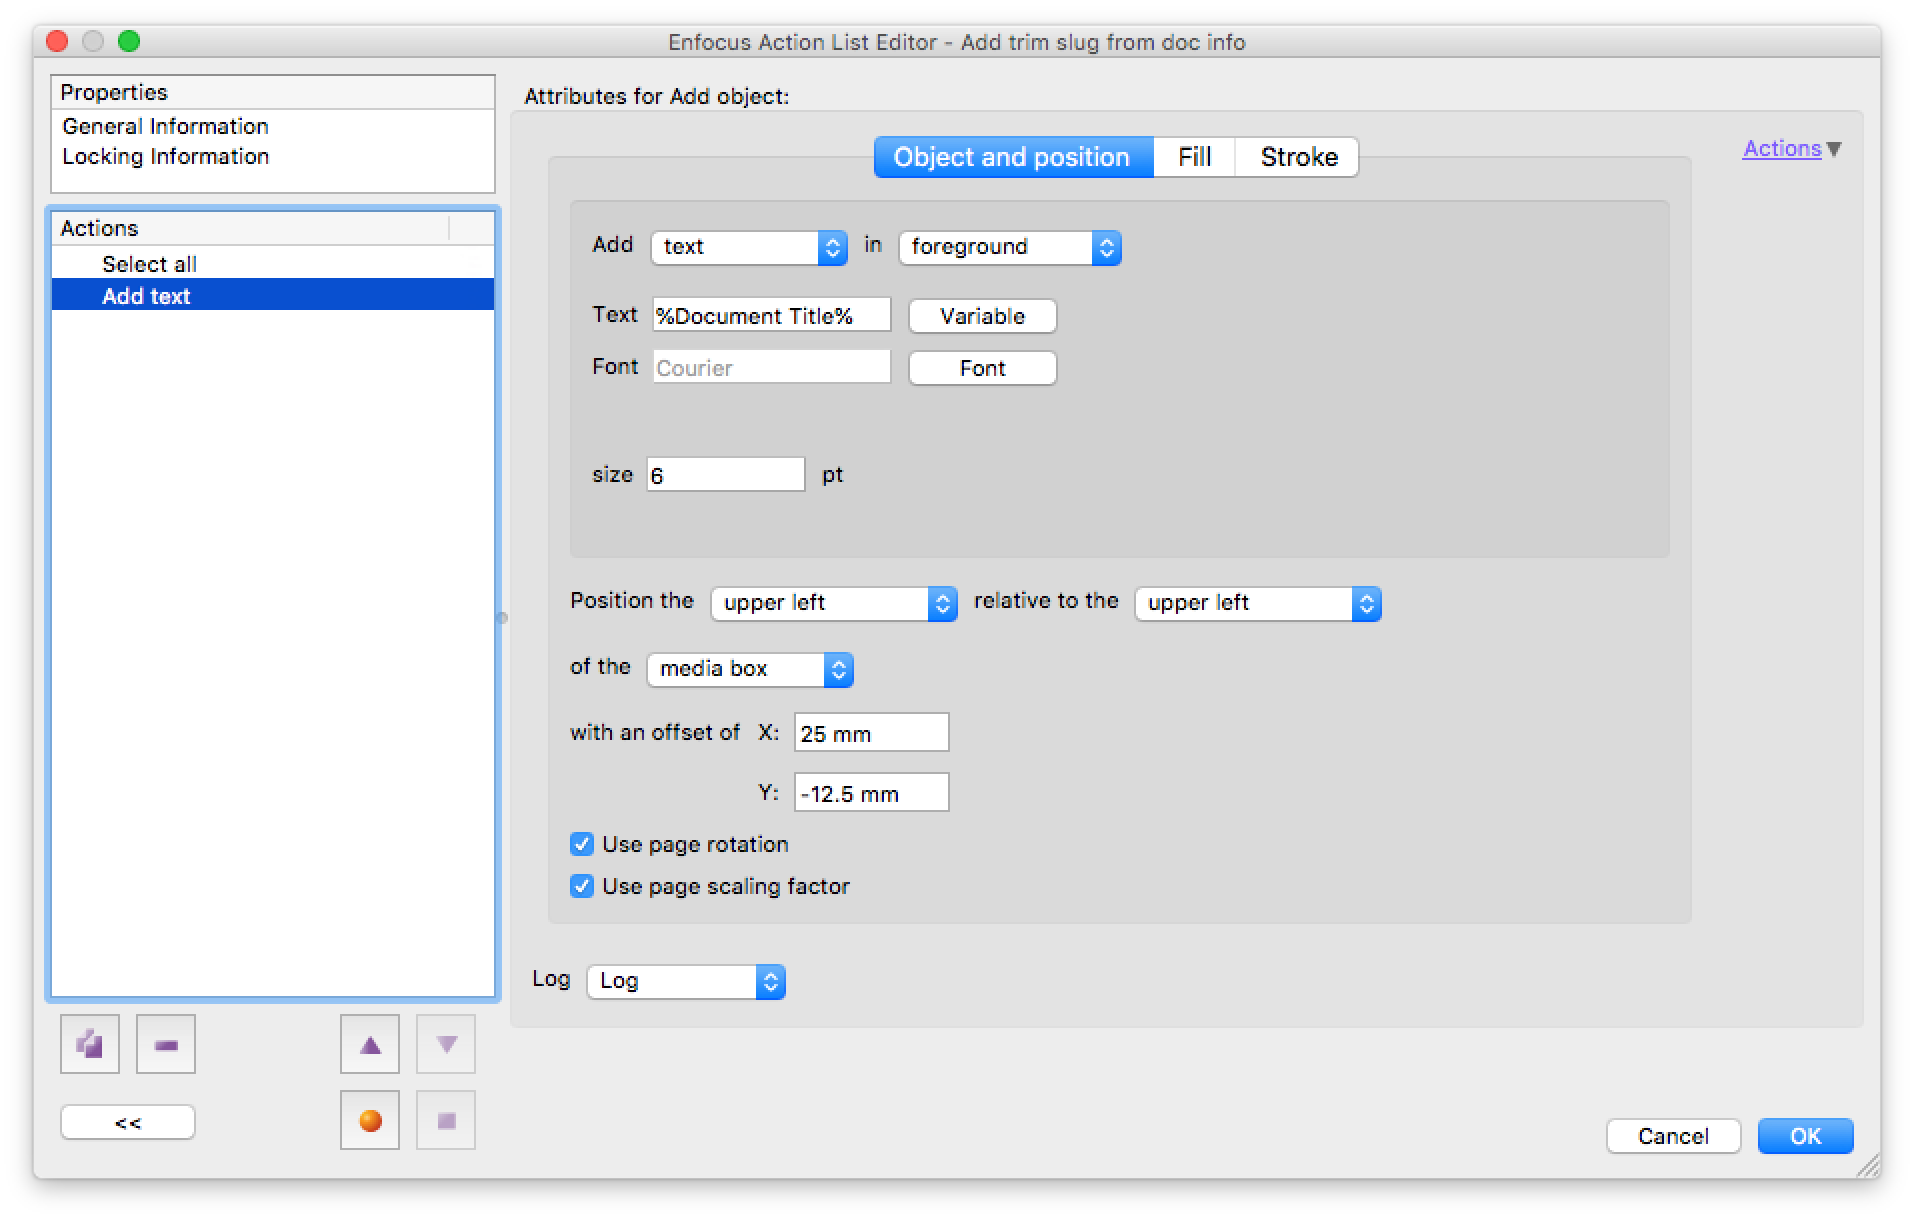
The final result:

Enjoy!
P.S. If anybody can share code to add the text slug using an Acrobat script, then that would be fantastic!
Copy link to clipboard
Copied
Thank you!!! It works great !!!
Hope more users enjoy it, it works great!
Copy link to clipboard
Copied
Hey Stephen. How are you?
I have 2 requests.
1. I saw on the internet that there is a command in the pitstop
"Rasterize page content kepping text"
I can not find her in action on the Pitstop.
2. After I do expansion bleeds through the "extended bleed"
Of 1.5 mm (for example) it does not recognize the bleed area.
I know that you can set it up through a software inspector,
But I'm looking to add it to the action
(I wanted to send you a link to download this action from my Dropbox and add a command to set the 1.5mm.
But I have a problem with a dropbox. So I need another way to send it to you.
I would appreciate your help!!
Copy link to clipboard
Copied
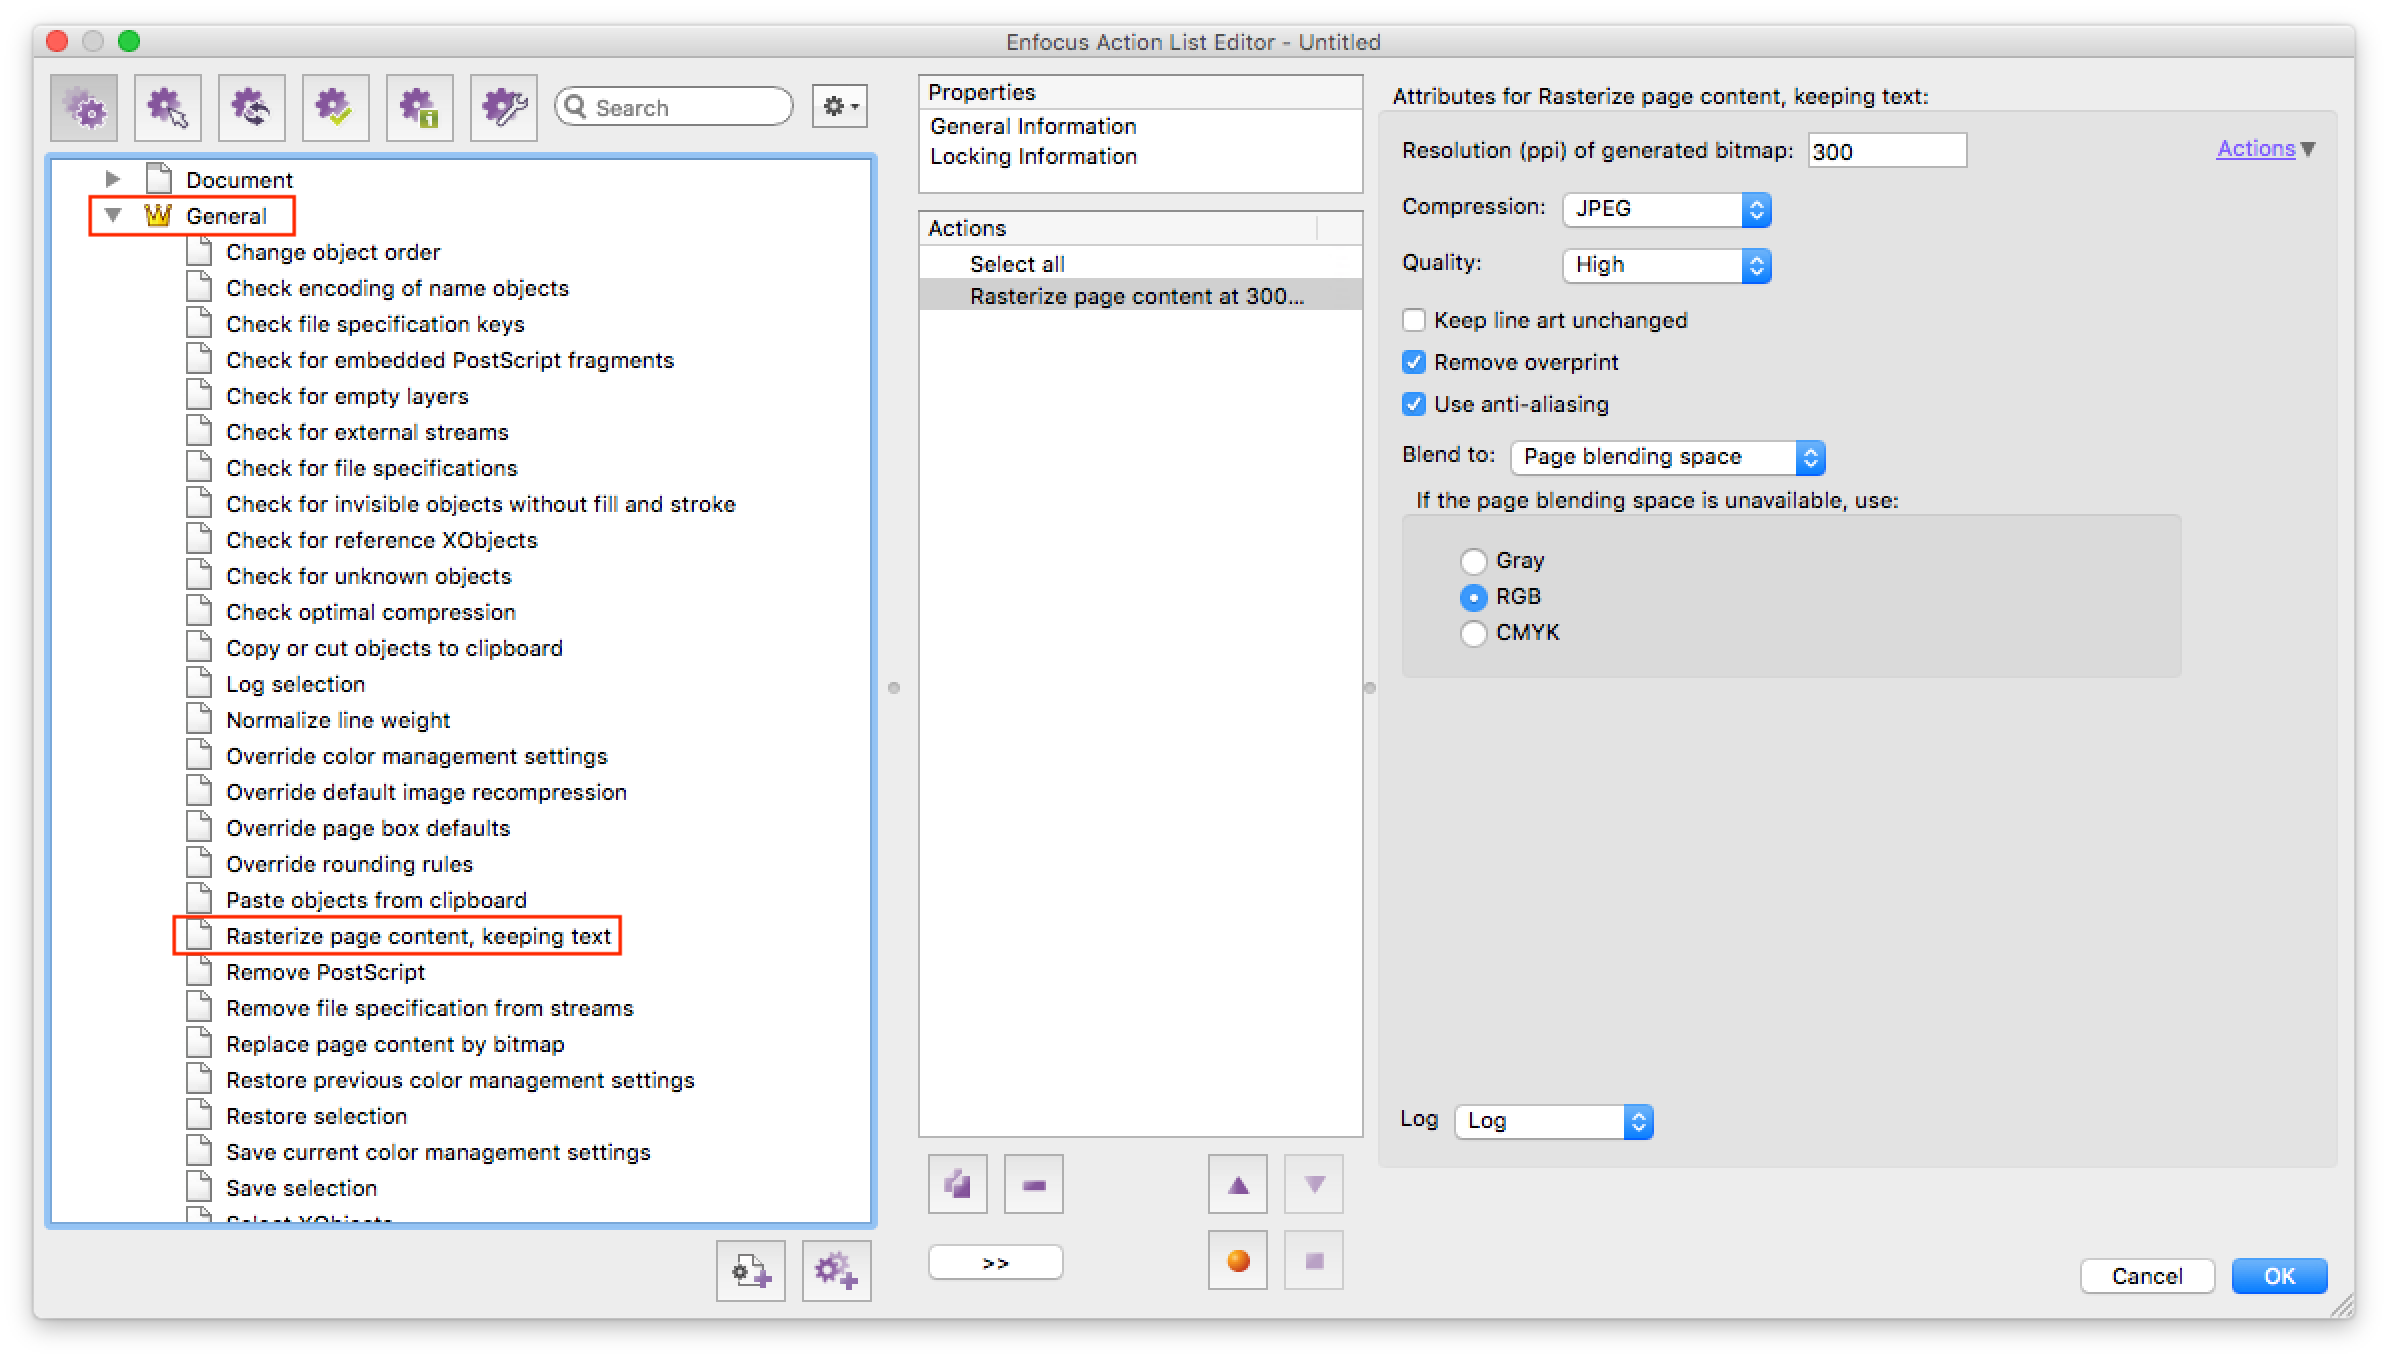
1. I’m not sure what version this was added, look under the general category as in the screenshot below:
2. You could try wetransfer.com or if you have a Creative Cloud account you can share files through it similar to DropBox.
Perhaps you are looking for this action list item:
Copy link to clipboard
Copied
Thanks
I can through the wetransfer
But to which address?
Copy link to clipboard
Copied
You can send it to yourself and then post the link on the forum… Or send me a private message.
Copy link to clipboard
Copied
How do I send
a private message?
Copy link to clipboard
Copied
Hover over my name or icon and press the “message” envelope button that appears.
Copy link to clipboard
Copied
Dov, I really did not mean to upset anyone.
Stephen,
If there is another forum you can correspond to
Or another way - I would be very happy
Copy link to clipboard
Copied
As per my post #43: Re: paste "Trimsize" after impostion
I’m not sure if this is the best forum to discuss PitStop Pro specifics though? A couple of good PitStop forums include:
PitStop Pro - Enfocus Community (Enfocus)
Official Enfocus PitStop user group (LinkedIn)
I personally spend more time at the LinkedIn group than the Enfocus Community, however, either should see you right.
P.S. Enfocus provides many video learning resources in the form of quick tips, hour-long monthly free training webinar recordings etc:
Copy link to clipboard
Copied
Hello Stephen
I have a question.
I have a reading book with page numbers below.
I want to delete them automatically.
That means I have to define a selection, erase and apply it to all pages. Do you know how to do this with action in pitstop?
thanks
[edited post formatting for readability]
Copy link to clipboard
Copied
Hello Stephen
I have a question.
I have a reading book with page numbers below.
I want to delete them automatically.
That means I have to define a selection, erase and apply it to all pages. Do you know how to do this with action in pitstop?
thanks
Sure, this should be easy to do...
PitStop action lists are all about selections… But what type of selection?
If the folios/page numbers have a unique and specific font face/size/colour etc. that is not used elsewhere, that should be enough to select and remove on all pages.
However if the text matches other text and there is a possibility that body copy will be inadvertently removed, then you may need to make a selection based on a rectangular area and whether the text is fully or party enclosed by the area.
Or you can combine both methods to be really safe, that the text must be a specific font face/size/colour and that it also must be in a specific position on the page.
It is not possible to make specific recommendations without a sample PDF with a few left and right pages to evaluate.
I’m not sure if this is the best forum to discuss PitStop Pro specifics though? A couple of good PitStop forums include:
PitStop Pro - Enfocus Community (Enfocus)
Official Enfocus PitStop user group (LinkedIn)
Copy link to clipboard
Copied
Hey Stephen
I attach a very similar example to the real file.
I would appreciate it if you would build an action
This way I can also learn ...
Dropbox - ex.pdf - Simplify your life
Thanks!
Copy link to clipboard
Copied
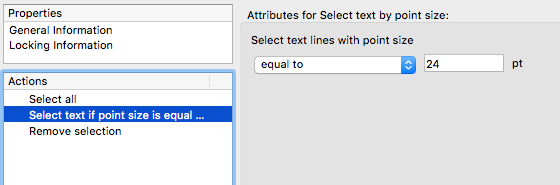
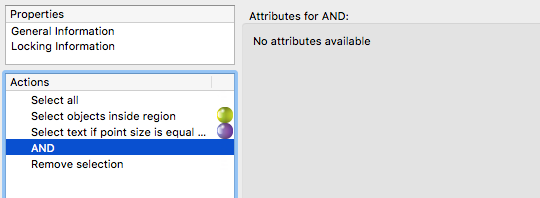
OK, knowing that the body text is 12pt and the numbering is 24pt… And presuming the file has no other text that is 24pt (unless it uses a different font and colour that would help to isolate only the page number).
Select by point size:
Or alternatively you could select only by region:
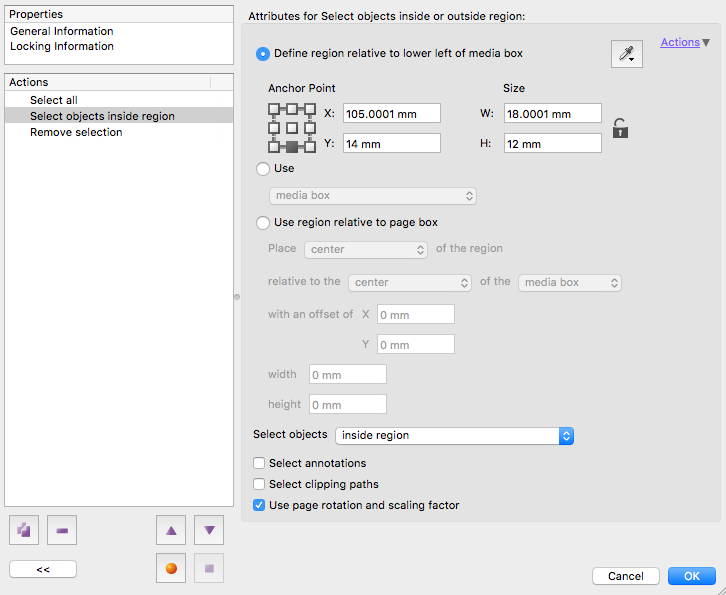
Or you could combine both methods with the AND logical operator, so that the text must be both 24pt AND also within a specific region on each page:
Copy link to clipboard
Copied
Hey Stephen.
I attach a link to an action to add page numbers to a document.
The problem is that I need the page numbers to be in a font (like: "Arial") rather than a default font.
Could you please explain to me how to do this?
Thanks!
Copy link to clipboard
Copied
Option 1: Change the font used in the Action List file to what you require:
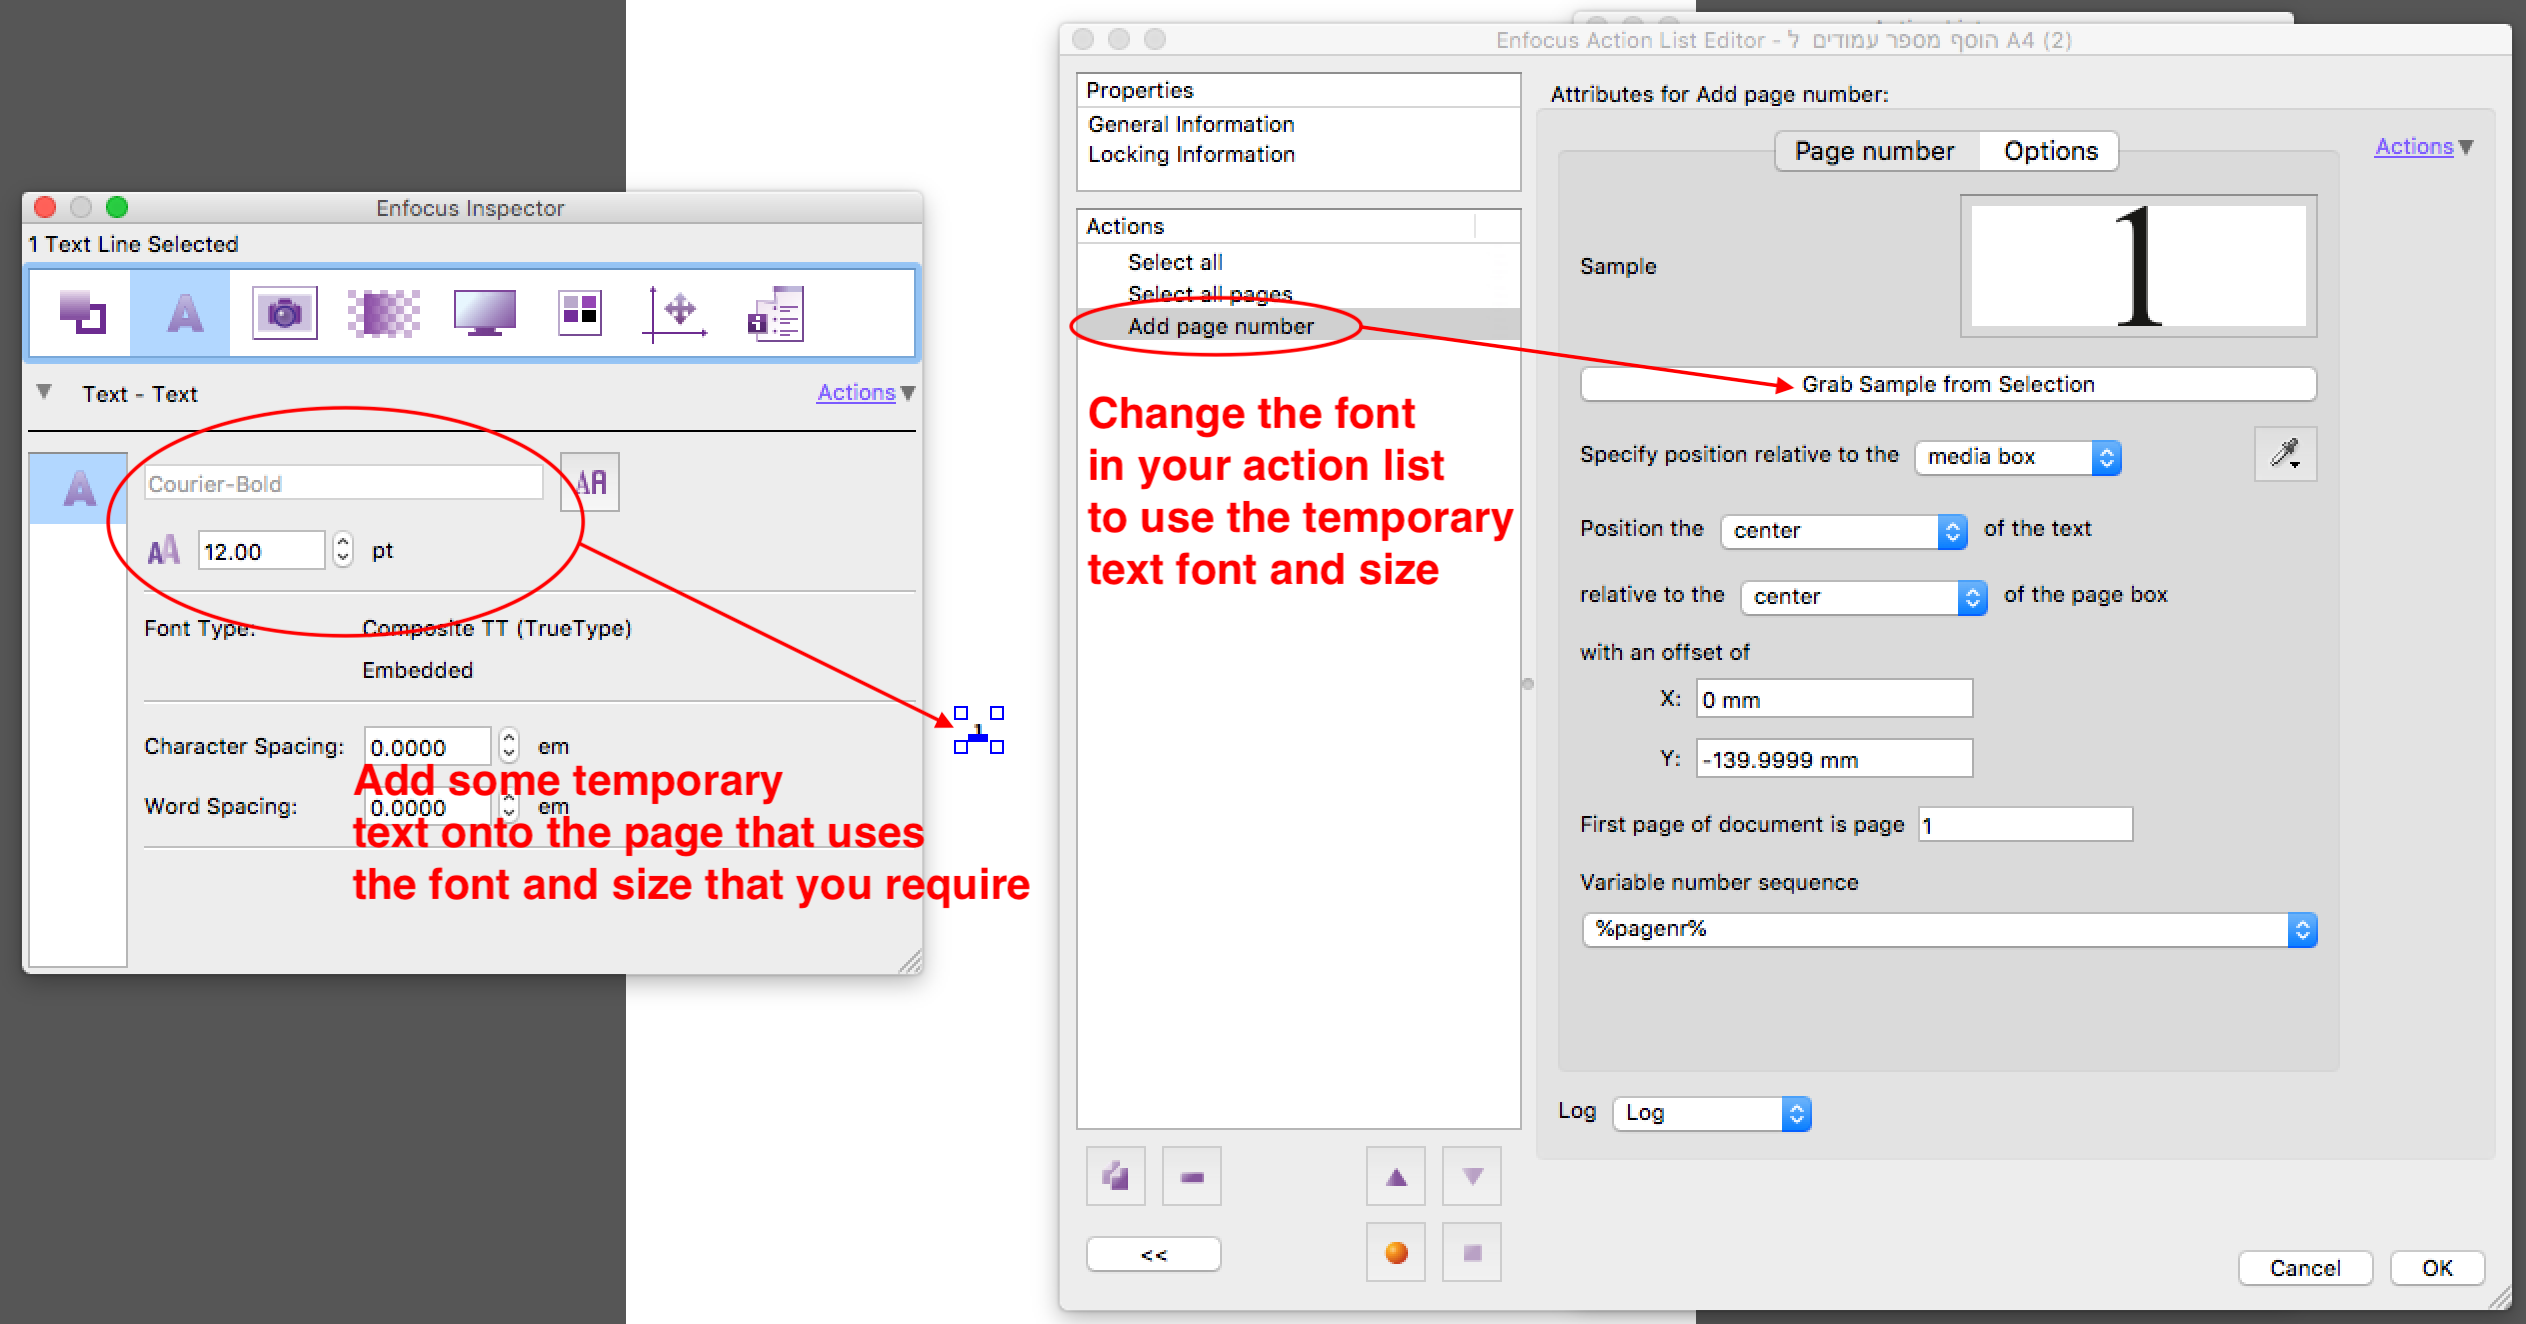
More here: Add page number
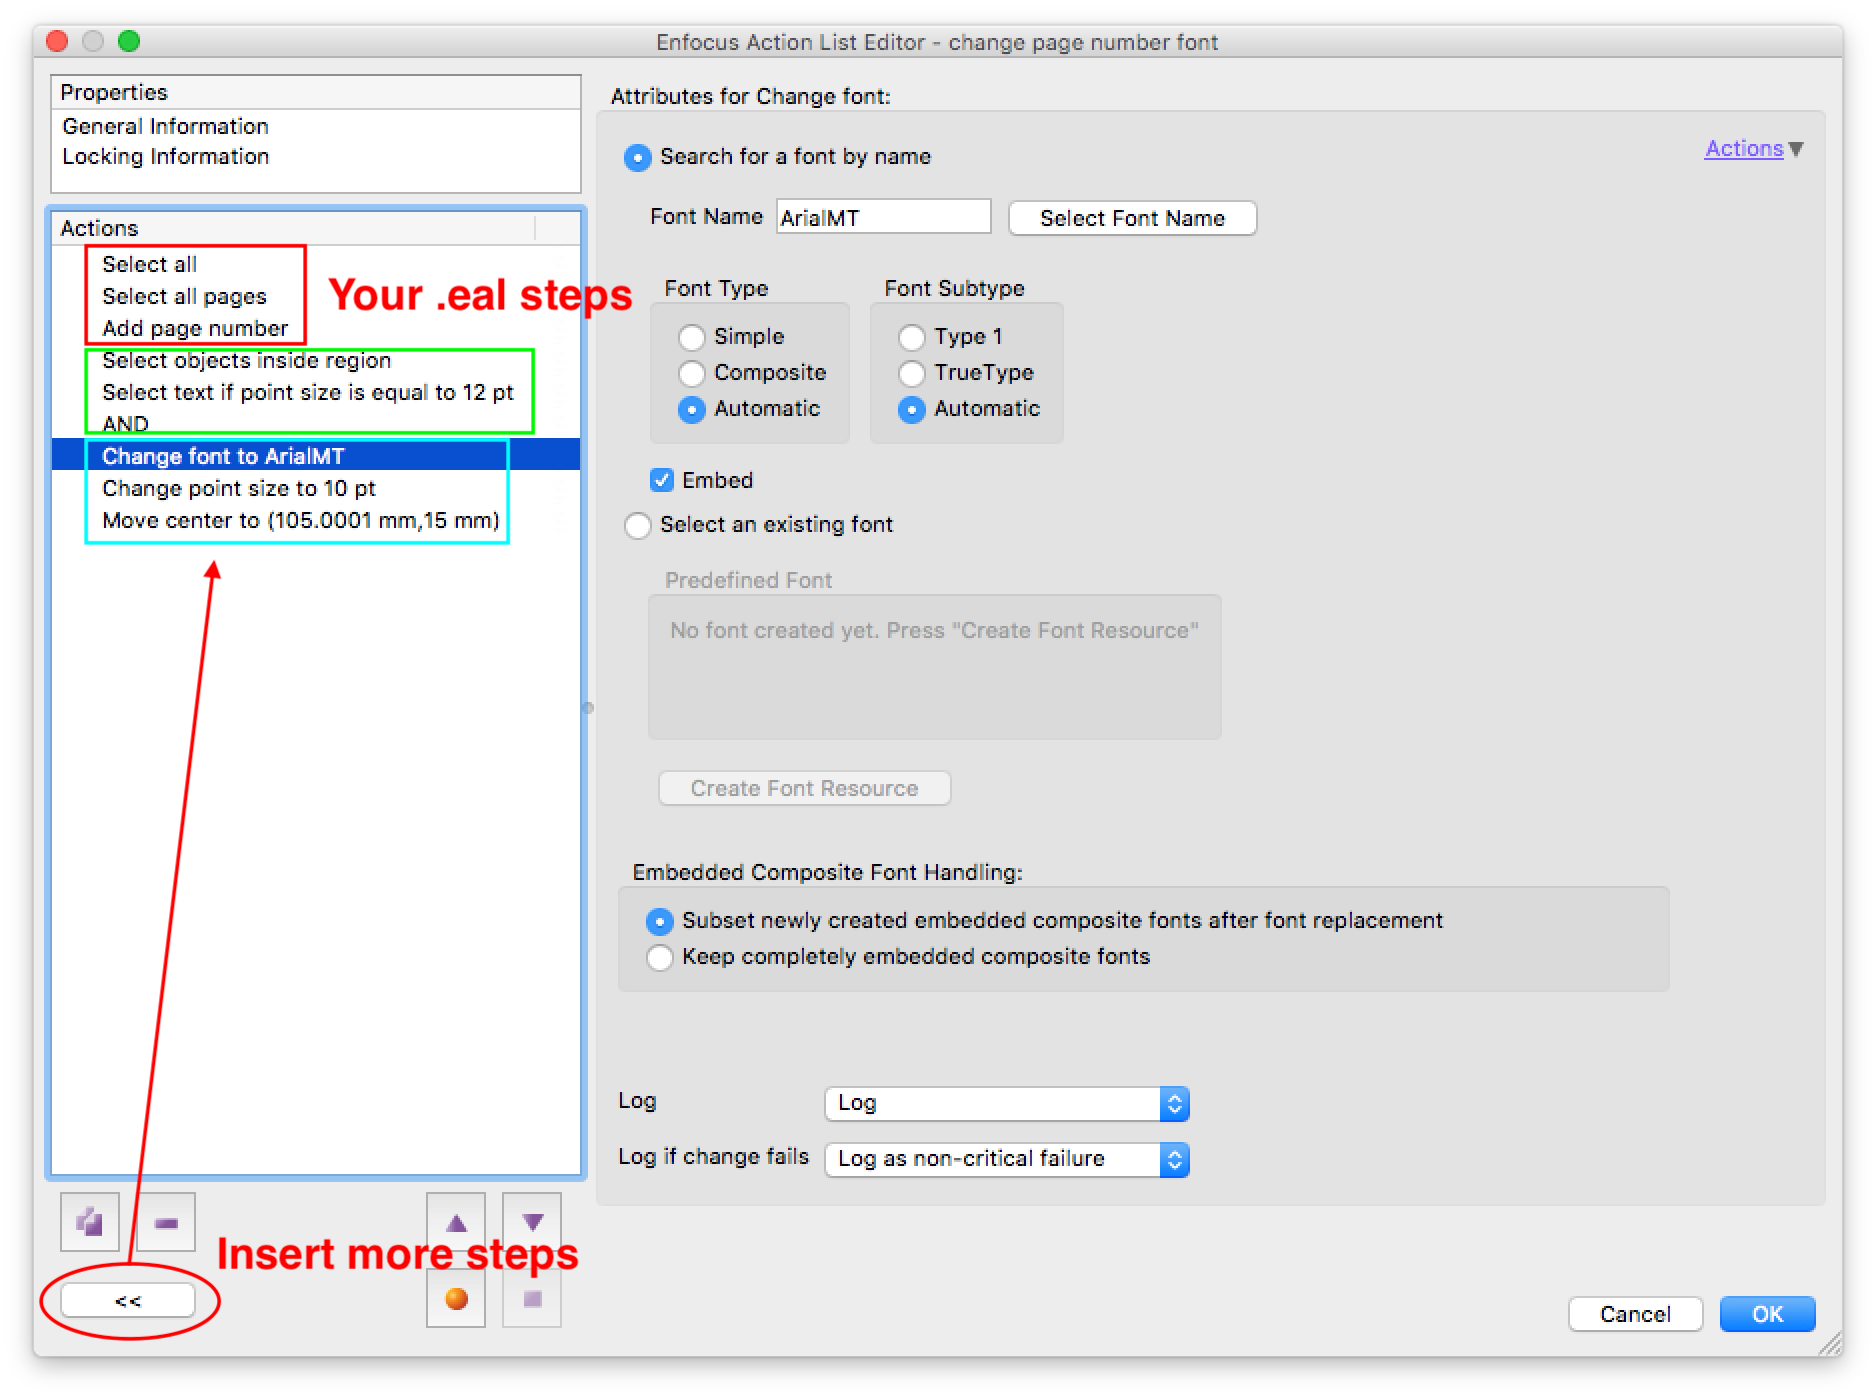
Option 2: Use the Action List and then change the font afterwards:
If you select the text added by your .eal file you will find that it is using TimesNewRomanPSMT and 12pt font size for the numbering.
So knowing this, it is very similar to my previous post #45… You need to select the page number based on font size and possibly position (optionally by font name), however instead of removing the selection – you then need to change the font name, change the font size and possibly re-centre the page number if it has moved off-centre:

 AdChoices