First, a little bit of background information.
There is a subtle difference between updating and reinstalling an iOS app.
When you update an iOS app (i.e. install a new version over an older version), your app settings and preferences are retained. On the other hand, when you first uninstall an iOS app and install a new version (or even the same version) of the app, your app settings and preferences are erased by the operating system (iOS). Note that this applies to any iOS apps, not just Adobe Acrobat Reader for iOS.
Additionally, when you uninstall Adobe Acrobat Reader for iOS, any documents that are stored locally on the device will also be removed.
To prevent unintentional data loss, it is recommended that you back up your iOS device regularly.
How to back up your iPhone, iPad, and iPod touch - Apple Support
But what if you want to back up only the documents and folders (containing documents and sub-folders) in Acrobat Reader that are locally stored on your iOS device?
Here are the steps to back up and restore documents and folders on your iPad/iPhone using the File Sharing feature with iTunes.

What you need
Tip: You can transfer a large number of documents using iTunes and a cable much faster than AirDrop.
How to transfer documents from your iPad/iPhone to your computer
Using the following steps, you can back up your documents and folders (containing documents and sub-folders).
- Connect your iPad/iPhone to your Mac/Windows computer using the cable.
- Launch iTunes (if it does not open automatically).
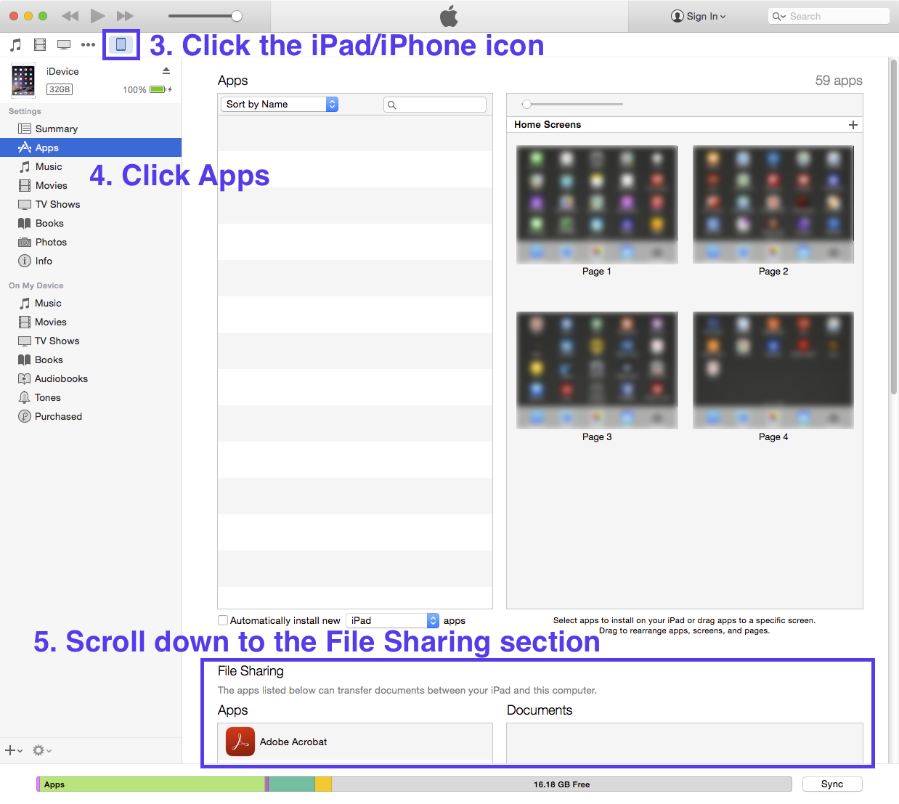
- Click the iPad/iPhone icon.
- In the screen showing your iOS device information, click Apps.
- Scroll down to the File Sharing section near the bottom of the iTunes window. If you do not see the File Sharing section, maximize the iTunes window.

(Tap/click the image above to enlarge)
For the newer versions of iTunes
|
|---|
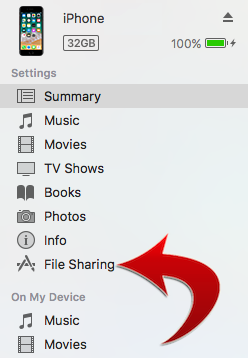
You can skip Steps 4 & 5 above and click File Sharing instead.
 |
- Select Adobe Acrobat in the Apps section (the left side of the File Sharing section).
- Select the documents and folders that you want to save to your computer.
* To select all documents and folders, hold down the Command key (for Mac) or the Control key (for Windows) and press A.
* To select an individual document or folder, hold down the Command key (for Mac) or the Control key (for Windows) and click it.
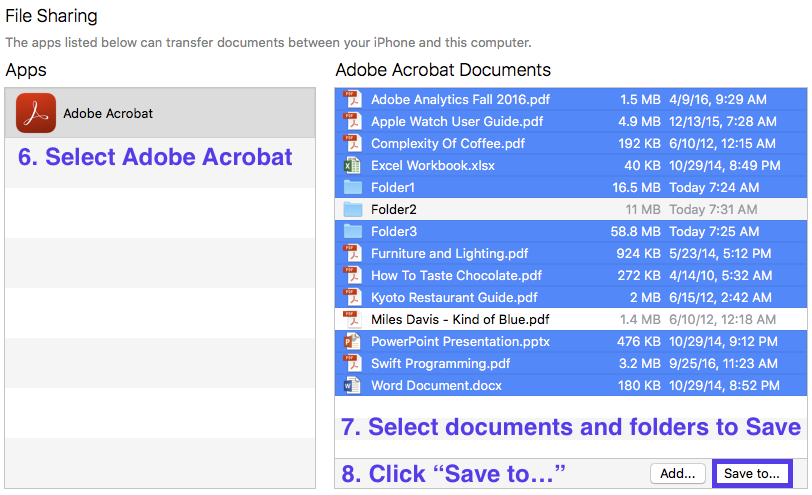
(Tap/click the image above to enlarge)
- Click the Save to... button.
- Select a destination folder on your computer. This is the location that you back up the selected documents and folders.
- Click the Save To button in the dialog. WARNING: Do not unplug the cable while documents are being transferred.
- Make sure that the selected documents and folders are saved on your computer using Finder (for Mac) or File Explorer (for Windows).
Alternatively, you can drag & drop the documents and folders from the Adobe Acrobat Documents area (the right pane) in the File Sharing section to any location (including Desktop) on your computer.
Attention iTunes for Windows users!
|
|---|
| Apple's iTunes for Windows has a defect where drag & dropping folders from the Adobe Acrobat Documents area in iTunes to any location (including Desktop) on a Windows computer does not copy the folders. A workaround is to select files and folders in the Adobe Acrobat Documents area and click the Save to... button as described in Steps 7 and 8 above. |
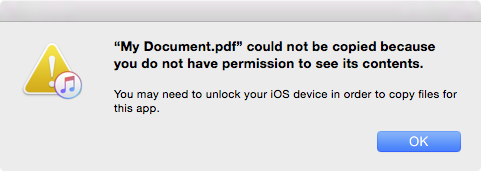
If iTunes displays the following error message and fails to copy files and folders to your iPad/iPhone, make sure to "slide to unlock" (for iOS 9 or older) or "press home to unlock" (for iOS 10) your iPad/iPhone's lock screen.

Tip: You do not need to click the Sync button to transfer documents between your iPad/iPhone and your computer. (But it certainly cannot hurt to sync your iPad/iPhone with your computer regularly.)
How to transfer documents from your computer to your iPad/iPhone
Using the following steps, you can restore your documents and folders (containing documents and sub-folders).
- Connect your iPad/iPhone to your Mac/Windows computer using the cable.
- Launch iTunes (if it does not open automatically).
- Click the iPad/iPhone button.
- In the screen showing your iOS device information, click the Apps tab. (See the first two screenshots above in this document.)
- Scroll down to the File Sharing section near the bottom of the iTunes window. If you do not see the File Sharing section, maximize the iTunes window.
(Tap/click the image above to enlarge)
For the newer versions of iTunes
|
|---|
You can skip Steps 4 & 5 above and click File Sharing instead.
|
- Select Adobe Acrobat in the Apps section (the left side of the File Sharing section).
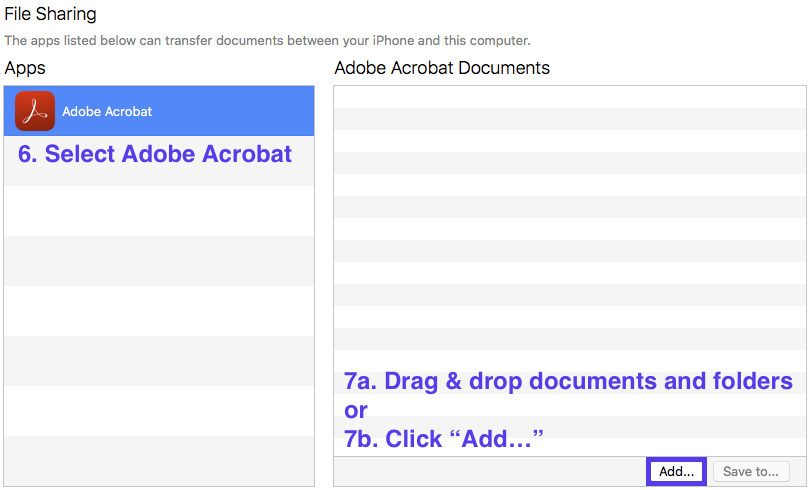
(Tap/click the image above to enlarge) - Click the Add... button.
- Select the documents and folders that you want to copy to your iPad/iPhone.
- Click the Add button in the dialog. WARNING: Do not unplug the cable while documents are being transferred.
Alternatively, you can drag & drop any documents and folders containing documents and sub-folders from Finder (for Mac) or File Explorer (for Windows) to the Adobe Acrobat Documents area (the right pane) in the File Sharing section.
If iTunes displays the following error message and fails to copy files and folders to your iPad/iPhone, make sure to "slide to unlock" (for iOS 9 or older) or "press home to unlock" (for iOS 10) your iPad/iPhone's lock screen.
Tip: You do not need to click the Sync button to transfer documents between your iPad/iPhone and your computer. (But it certainly cannot hurt to sync your iPad/iPhone with your computer regularly.)
Actually, the above steps would work with any type of files for any iOS apps that support File Sharing. 


 2
Replies
2
Replies


 AdChoices