


Copy link to clipboard
Copied
Hi,
I need to create a date and time stamp in Adobe Acrobat DC 17, could you please help with process to create date and time stamp?
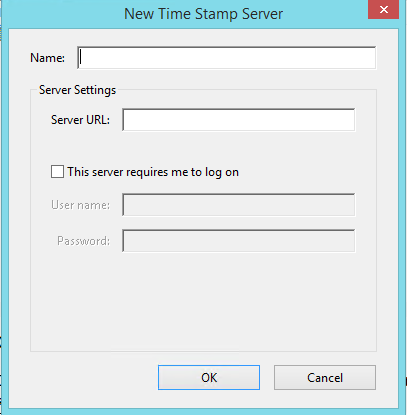
What would be the timestamp server URL, in the below screen snip?
Thanks,
Srikanth


Copy link to clipboard
Copied
Hi Srikanth,
As per the issue description mentioned above, you want to know how to configure timestamp server in Acrobat, is that correct?
To configure a timestamp server, you need the server name and the URL, which you can obtain from an administrator or a security settings file.
If you have a security settings file, install it and don’t use the following instructions for configuring a server. Ensure that you obtained the security settings file from a trusted source. Don’t install it without checking with your system administration or IT department.
1- Open the Preferences dialog box.
2- Under Categories, select Signatures.
3- For Document Timestamping, click More.
4- Select Time Stamp Servers on the left.
5- Do one of the following:
• If you have an import/export methodology file with the timestamp server settings, click the Import button . Select the file, and click Open.
• If you have a URL for the timestamp server, click the New button. Type a name, and then type the server URL. Specify whether the server requires a user name and password, and then click OK.
Thanks,
Shivam
 2
Replies
2
2
Replies
2
Copy link to clipboard
Copied
Hi Srikanth,
As per the issue description mentioned above, you want to know how to configure timestamp server in Acrobat, is that correct?
To configure a timestamp server, you need the server name and the URL, which you can obtain from an administrator or a security settings file.
If you have a security settings file, install it and don’t use the following instructions for configuring a server. Ensure that you obtained the security settings file from a trusted source. Don’t install it without checking with your system administration or IT department.
1- Open the Preferences dialog box.
2- Under Categories, select Signatures.
3- For Document Timestamping, click More.
4- Select Time Stamp Servers on the left.
5- Do one of the following:
• If you have an import/export methodology file with the timestamp server settings, click the Import button . Select the file, and click Open.
• If you have a URL for the timestamp server, click the New button. Type a name, and then type the server URL. Specify whether the server requires a user name and password, and then click OK.
Thanks,
Shivam

Copy link to clipboard
Copied
I note that there is an Adobe Qualified Timestamp. Waht's the URL for this time stamp, as I can't find it listed anywhere?
Thanks Robert

 AdChoices