 Adobe Community
- Home
- After Effects
- Discussions
- Re: Adjustment Layer - How to Exclude Layers or Is...
- Re: Adjustment Layer - How to Exclude Layers or Is...

Copy link to clipboard
Copied
I'm using the "CC Radial Fast Blur" effect in the adjustment layer. Underneath the adjustment layer is multiple layers, which I have white text on one layer and flashing lights on another. I only want the flashing lights layer to cast light rays (on the layers above it on their edges) instead of all the layers underneath the adjustment layer radiating light rays. If I precompose the adjustment layer and the flashing lights layer, it will merely move the flashing lights on top of the layers it needs to be behind. I tried duplicating layers that I didn't want to cast light rays and putting them above the adjustment layer and using the Track Matte options to try to mask out the effect on those layers, but that caused other unwanted items to appear on top. Is there a way to resolve this with no plugins? If not, what plugin should I get?


 1 Correct answer

Your workflow has several problems, and they start with CC Radial Fast Blur, and that problem is compounded when you use it on more than one layer.
All of the Radial Blurs emanate from a single x-y position. this gives you no perspective control, and when the effect is applied to multiple "lights," as in your screenshot, every light seems to be pointed away from the blur center. That produces an unrealistic lighting setup. It more closely represents a light behind a wall with a bunch of holes
... 10
Replies
10
10
Replies
10

Copy link to clipboard
Copied
Adjustment Layers work with Masks. But it all depends on the underlying layer/designs/layout etc if Masks alone will create the look/effect you are after.
If your Light Ray effect works on the source luminance then you will want to create a separate layer hierarchy to manually dial down areas where you do not want the light rays to appear while increasing the luminance of areas that require the light ray effect. You set these up seprately and then composite the TWO compositions as an additional step - one with the light rays and tweaked-for-luminance comp and the other, the 'normal' comp.
HTH
Copy link to clipboard
Copied
Copy link to clipboard
Copied
It'll be useful if you posted a screengrab of the Comp or a reference image.
Copy link to clipboard
Copied
Copy link to clipboard
Copied
Place the layers that you do not want to display the light ray above the Adjustment Layer. Use masks to separate these parts, if required.
Copy link to clipboard
Copied
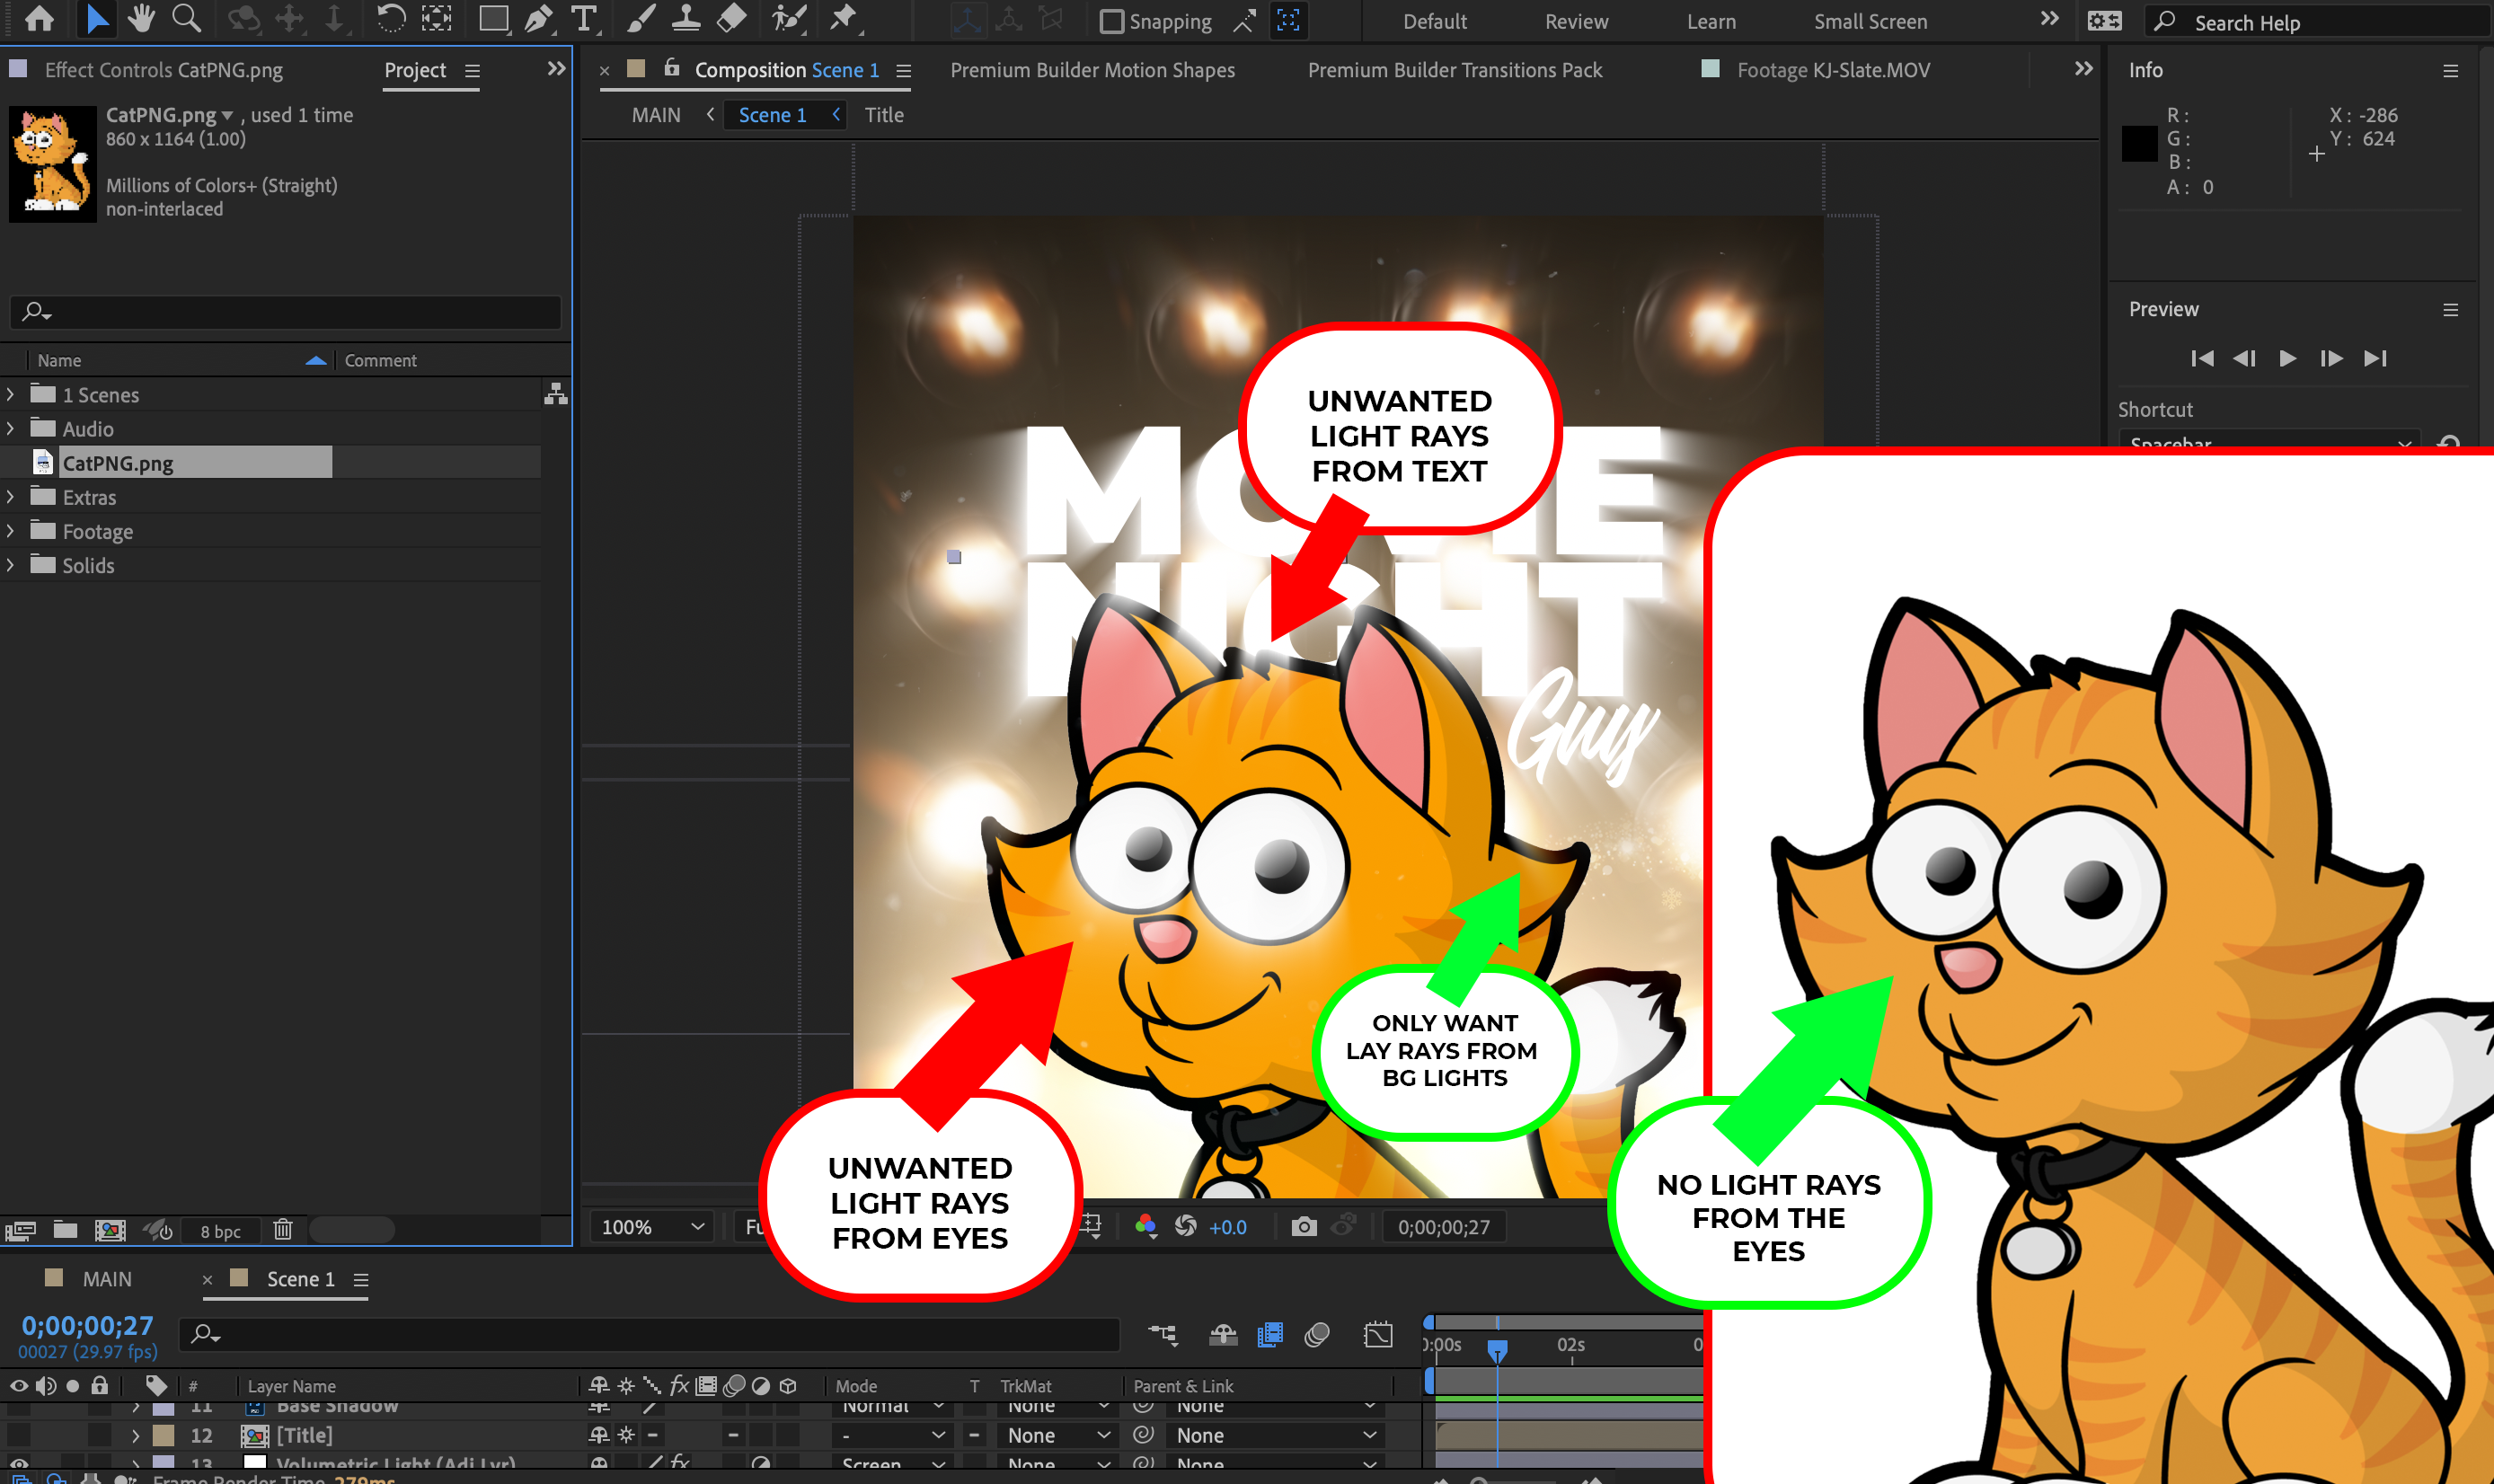
Moving the adjustment layer behind the cat and text layers eliminates the light rays displayed on/around them from the background lights. Are you saying to mask the outline of both the cat and the text for the light rays to display? It's only their edges the light rays need to display for the silhouette. Masking their outline leaves them with a permanent soft edge - even when the lights are not flashing in the background. Here's a screenshot.

Copy link to clipboard
Copied
You are approaching this the wrong way, plain and simple.You need to work with duplicate layers and pre-compositions.
- the cat needs to be a separate comp
- the lights need to be a separate comp
- you create a third comp where the cat stencils out the lights
- you place all three comps in the main comp with the stenciled layer being the top
- you apply the light rays effect directly to the stenciled light
- add additional effects to tweak the look
There is no good reason to even use an adjustment layer here and trying to do everything in a single comp will of course fail.
Mylenium
Copy link to clipboard
Copied
Thank you for looking into this.
Copy link to clipboard
Copied
Your workflow has several problems, and they start with CC Radial Fast Blur, and that problem is compounded when you use it on more than one layer.
All of the Radial Blurs emanate from a single x-y position. this gives you no perspective control, and when the effect is applied to multiple "lights," as in your screenshot, every light seems to be pointed away from the blur center. That produces an unrealistic lighting setup. It more closely represents a light behind a wall with a bunch of holes poked in the wall.

To create a spotlight, you need a single copy of the light layer with a little blur to simulate atmospheric haze, another copy with radial blur, and then probably at least one more copy with the same blur settings linked by expressions, so you don't have to fiddle with more than one control. You get something like this:

Now you have a simulated spotlight using 2D layers and a couple of effects. You need to duplicate the process if you want more than one light. It's not as simple as pre-composing and moving the pre-comps because the blur will not extend beyond the layer boundary. You'll have to group the layers.
Then you'll need to do the same thing with your text and image layers, but you'll need to generate only the edges and a black fill on a copy below the original layers, apply the blur/radial blur to them, and set the blend mode to Multiply, then use blend modes to simulate the holes the layers would make in the light beams by objects in front of the lights.
A much simpler approach would be to invest in a 3rd party plug-in like Trapcode Shine, make the layers 3D and let real lights interact with 3D layers.
Using an adjustment layer is not a good idea for this project. If you stick with a 2D blur like CC Fast Radial Blur, you'll need one copy of the effect on every layer you want to use as a light or shadow source. I don't have time to send you screenshots of the entire process, but I hope this helps.
Copy link to clipboard
Copied
I agree - I believe I took the wrong approach. Thank you.

 AdChoices