 Adobe Community
Export problem from Ai to AE
Copy link to clipboard
Copied
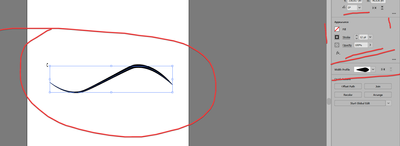
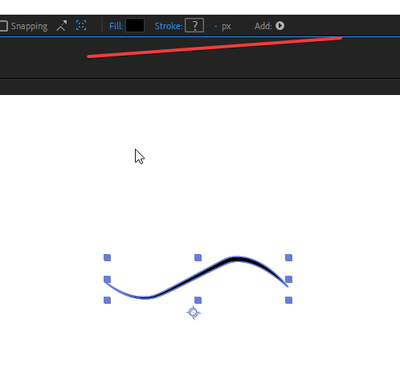
AE sees the ai.file as a fill, when shape in a Ai was created only by a stroke. I want to make an animation where the end of the figure going, not filled. This is not possible when the AE contour does not want to be perceived as a STROKE. Is it possible to set up the export properly? Or do I need to draw the same curve in AE?
I use AE 2019.1 and AI 2018 versions.
Thanks.
Copy link to clipboard
Copied
It works as it is supposed to. I suggest you read the online help on what features are supported and that doesn't include variable width strokes or art brushes. The rest is no problem. Every "logo reveal" tutorial out there can tell you how to reveal any kind of element using track mattes, masks, simple wipes and creatively using effects like Stroke or Wrote-On. I suggest you take a step back and broaden your scope to reaserach these things before delving too deep into this and navigating yourself into corners.
Mylenium
Copy link to clipboard
Copied
Thank you very much!!!
I heard your answer.
I will need to find help about exporting, read about it. After trying a little with matte, I achieved a good and similar animation. Unfortunately, I have a CC of 2019, if there was a version with Tapped Stroke (2020), then the use of matte showed itself in the best.
Copy link to clipboard
Copied
When you design an Illustrator file for video production, you should:
- turn on snap to pixel
- turn on Pixel Preview
- Check shapes at 400% or more to make sure thin lines line up with the pixel grid
- Put everything you want to animate on a separate primary layer
- Any layer you need to convert to a Shape Layer in After Effects must contain only simple strokes, solid fills, or a combination of the two (more on that later)
- Any Raptor effects you apply to any Illustrator layer should be set to 300 PPI if you intend to scale the layer in After Effects. Continuous Rasterization will not help an AI layer with Raster Effects (like drop shadow)
- All artwork must fit on the Artboard. Video Templates contain two Artboards, a big one on the bottom and a Comp Sized one on top. If you create multiple Artboards, they must follow the same format. Separate Artboards will not work.
- The Project should be set to use pixels or points as units, never inches or centimeters (one point = one pixel)
- Horizontal or vertical lines should always have a minimum width of 2 points to avoid aliasing problems causing a color shift
- You should generally position your layers in their hero position and hero size with preparing the animation so you can quickly transform the layers in After Effects to get them to animate into place
The only reason to ever convert a Vector Layer to a Shape Layer is to Extrude the layer using the C4D rendering engine, animate a fill by changing it from a solid color to a gradient, animate the vector path, or use shape layer animators on the shape.
If you want to use a vector path as a motion path, it should be on a separate layer, have a Comp Sized rectangle on the bottom with a 1-pixel stroke and no fill, and a simple path with a 1 to 2-pixel stroke and no fill applied so you can easily see it. The Comp-sized rectangle is required to get the proper position coordinates from the path when you use it as a motion path. Shape layer Anchor Points are at 0, 0 by default. Vector Layers (AI layers) that are converted to Shape layers have the Anchor Point set at half the height and width of the layer. For an HD comp, that would be 960, 540.
When you convert the vector path to a motion path by copying and pasting to a position property, the path will be offset by half the comp width and height. You can fix the problem by adding a null, parenting the moving layer to the null, then setting the null's position to 0, 0.
About 90% of the forum questions I see concerning problems with converting AI files to Shape layers involve unnecessary conversions of layers that are not designed to be converted. I hope this helps.
If you must convert an AI layer to a Shape, you must create it with the limitations in mind. Converting complex AI layers to Shape layers also increases render time. There is no increase in quality. There is no gain for any traditional animation.


