 Adobe Community
- Home
- After Effects
- Discussions
- Re: layers not showing on the timeline
- Re: layers not showing on the timeline
layers not showing on the timeline
Copy link to clipboard
Copied
Hi,
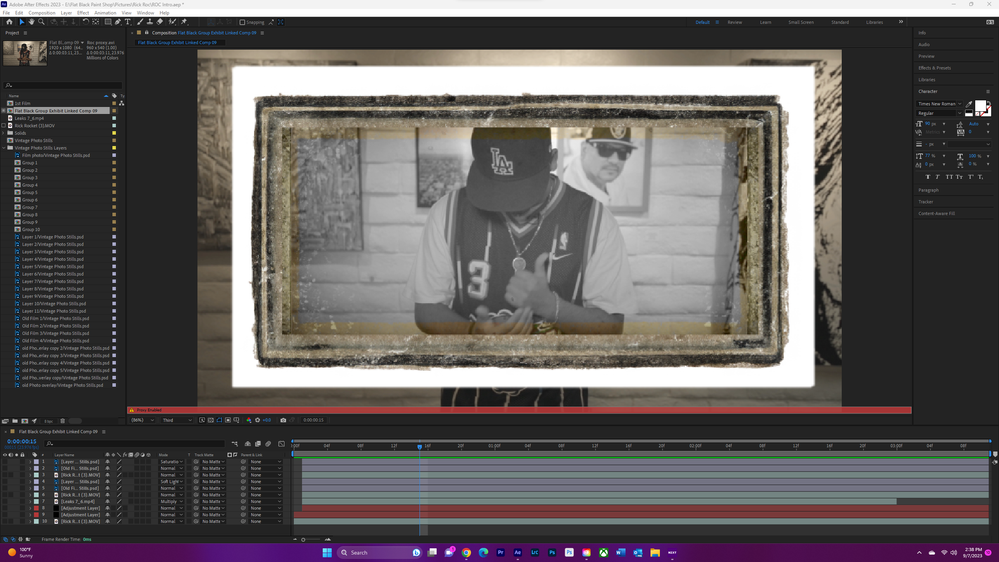
see in the screenshot below, all layers at some point disappeared of the timeline. I tried to select all and click on u" to reveal properties and try to make them appear. It did not work. I still see they are there (on the left, the file is here) and I can see the elements in the video but I cannot control the layer to add keyframes... what happened?
thank you,
Copy link to clipboard
Copied
There they are but you must extend them. if you put the playhead a few frames back in the timeline you can see them in the composition panel.
Copy link to clipboard
Copied
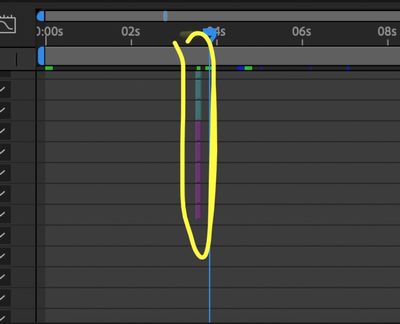
I see a few (until 4 sec... the video is 36 sec) but not all, see below ! I zoomed it to the max. I am so confused !
Copy link to clipboard
Copied
Oh, and if you need to add keyframes you must select them and then press P for position, A for anchor point, S for scale, R for rotation or T for opacity. Unless you have made a modification or added a keyframe, the letter U will work for you.
Copy link to clipboard
Copied
thank you, the thing is that some layers in the timeline are showing but none after 4 seconds (out of 36 sec) I am not sure what to do because I see the file but not in the timeline. do you know what is happening?
Copy link to clipboard
Copied
Make sure that in one of the thousands of layers you don't have the option "Solo" activated.
The next thing would be to upload a screenshot of the full screen where the problem is reflected, do not capture just a piece of your interface.
Then, if possible, upload a link where you can download your Ae project, only the project without the footage.
Copy link to clipboard
Copied
Hi Byron I'm having the same issue. Was any solution ever found for this problem?
Copy link to clipboard
Copied
Hi Byron, this is not an issue with solo,shy or with zooming out... This is an issue with After Effects, and you can reproduce it very easily if you want to.
All you have to do is duplicate one layer 1000 times. Then scroll down, and you will understand our problem.
I know that we should just precomp etc, I know all that. Sometimes we have reasons to have 1000 layers, and AE handles it wrong.
Copy link to clipboard
Copied
What are you trying to do with that comp? The first timeline screenshot shows layer 763 to 774 to all be the same image and the in and out points of the layers down to 769 appear to have their in and out point set about 1 or 2 frames apart. All the layers in that screenshot seem to be parented to layer 970. None of that makes any sense at all.
The second set of screenshots shows that you have at least 1104 layers in your composition. All of those layers also appear to be parented to layer 970.
You have far exceeded the ability of After Effects to properly display layer information. I've been working with AE for more than 25 years and I've worked on some incredibly complex compositions. I've created hours of animation, and I've never even come close to having more than 100 layers in a comp. The projects become unmanageable. A few years ago I did a presentation for a national conference where I needed to show a montage of 900 company logos flying through the street and then filling a stadium. I did it with one 900 frame image sequence imported as footage and 4 instances of particular. There might have been 10 or 20 layers in the incredibly complex comp.
Please tell us what you are trying to accomplish. Maybe we can help you figure out an efficient workflow. You are not going to be able to work with more than 1000 layers in a single comp on any system that I know of.
Copy link to clipboard
Copied
Hi Rick, I replied to melanied95, see below, I'm having the same issue. Great to hear all about your experience and history using AE. That logo project you did sounds fun. I'm wondering if you were able to help with the problem at hand, however. The project I'm working on only has a few hundred layers. I opened the project today like normal and the first 10 or so layers are missing from the timeline. They're in the comp, the keyframes I added still exist, everything shows up on screen when I render video, but nothing in the timeline right now today for some reason. You can read my reply to melanied95 to see what I did for a workaround. I only have 13 years of AE experience so although I submitted my project on time using my workaround I'm excited to hear from you what melanied95 and I should have done. Thanks so much!
Copy link to clipboard
Copied
Hi Melanied95, I'm having the same issue. I contacted Adobe for help today and ended up doing a screen share with him. I also shared screenshots with him and tried my best to illustrate the problem. The person helping me took control of my computer and tried a few things from his end. No luck, he was not able to help. He offered a few suggestions similar to other replies I see on this webpage. It was a challenging way to communicate and the problem is kind of hard to explain so unfortunately I had to try something else. This isn't the best solution, but I had to finish my project by end of today, so I just copied the layer that I wanted to edit and pasted it all the way at the top of the timeline, so it was above all of the other layers, and it worked! It also worked if I pasted the layer in the middle of two other layers that are still showing. For example based on your screenshot, if you copied 773 and pasted it right above 767, it would show up. That worked for me anyway. Give that a shot and let me know.
Copy link to clipboard
Copied
If you have a bunch of layers that don't show up, select the ones that do and Pre-compose them. When you do that your display should catch up and show you the layers that you could not see.
In practical terms, it makes absolutely no sense to have that many layers in a comp. Each comp should be a single shot or at most a couple of shots that have to be in the same comp because of a transition between them that you need to make. Look for places to cut. It's hard to convince people that AE is not a video editing app, but it isn't and was never designed to be one. The longer your comp and more layers you have in a comp, the longer it will take to render, the likelihood that the render will fail before it finishes wasting all of that render time goes up, and the more difficult it is to make changes to the comp that will give you a better product. If you are creating a 10-minute video filled with animations, different images, sound effects, different videos, you will be able to do a better job and finish the project in less time if you break the project up into 20 or 30 comps, each one expressing a different idea, and then you complete the edit from the rendered shots (sections) in Premiere Pro, or if your audio track is very simple, add all of your comps to a master comp and sequence them. Sequencing a bunch of nested comps is only a good idea if the render time is a few frames a second and not a few minutes a frame.
Copy link to clipboard
Copied
Hi Rick,
so I'm having the same issue. Just updated to version 23.6 today and after duplicating my proxy video 2x I lost the ability to change the Visibility of my layers. I've tried pre-comping them but still no change. I'm trying to do a trendy flash cut edit with vintage photos overlayed on the videos. I'm placing the same video in each pre-comp because the center of the vintage photos doesn't "Screen" once it is pre-comped. I have made 2 layers of each vintage photo. One layer for the center to screen and the Second layer for the border of the vintage photo. Sounds Tedious I know. I generated these vintage photos from PS beta and was really hoping to make one of these trending edits. I'll downgrade and restart the project over to if the problem persists.
Any help would be great!
Copy link to clipboard
Copied
One more thing....
The videos have a time remap. Do I need to comp the video before placing into it's own Pre-comp?
Copy link to clipboard
Copied
Might seem like something obvious, but the precompose idea for sections was something that I haven't think about and it was a really solid advice!
I'm working on visuals for a dance show with a big led screen in the back, so I'm using solid colors to generate light on the stage... I reached a total of 1500 layers of solid colors that turns on with the music, so I came upon this issue... (My first time in 5 years of making these kind of jobs, and my first time doing a 8 minute performance which it traduces to a lot of layers)
Copy link to clipboard
Copied
I had the same problem and this work around at least gets me back to animating. Thanks for the tip.
In my case I have a 6x22 grid of tiny compositions each with 5 or so layers of controllers. It's a very vertical timeline. I didnt have the option to nest every comp separately as I am animating the interactions between the objects. All together it is a timeline with around 1100 layers. All the conent is visible in the Composition panel but for every layer below row 965, the bar showing where the in and out points are isnt visible. The markers on those layers are still visbile. I can select the layer name and can still set the in and outs on the layers using the key commands. But you cant see the bars on the Timeline Panel for those layers.
I can only imagine this is a bug, so for now, thanks for the work around. I can select the layers I need to work with and send them above 965. When I do that, the new lowest layers become invisible in the same way. But at least I have a work around.
AE 22.2.0 (build 120)
Windows 10
Copy link to clipboard
Copied
I was having the same problem, I couldn't see the layers after 964, best thing is work with compositions but I'm not used to it, the solution I could find is to compose the layers I can already see, after that i can see the invisible layers
, good work to you
Copy link to clipboard
Copied
I had the same problem... After thousands of layers, some bars disappear. What I did was pre-compose those layers that I can still see. When I pre-composed a few hundreds, some of the layer bars appeared. Then I pre-composed some more until everything showed. I pre-composed them in groups so it will still be organized in a way that I can understand their arrangement.
Copy link to clipboard
Copied
I also ran into this same issue: I have a comp containing several hundreds of layers. Any layer past 950 is not showing in the timeline anymore even though it shows in the viewer or also in the rendered file. I'm working on a GEOlayers map animation with hundreds and even thousands of realworld data each shown as a separate animated icon. I know about precomposing and I'd love to precomp these layers more efficiently but as far as I understand the way GEOlayers works, it's not possible to precompose these so called 'label' layers because of some complex expressions. As soon as I precompose these label layers the expression get broken and they lose their geo location on the map.
So my workaround is not to move the layers further up to show the layer in the timeline as described above (which works though). An easier workaround ist to just set some of the above layers that still show in the timeline to 'shy' and activate the main shy button. This way the shy layers disappear making space for the layers below to 'move up', showing these layers again in the timeline if you have to tweak them in some way in the timeline. Hope this quick workaround helps some of you guys.
Just to make it clear: If somehow possible try to precompose your layers in an efficient way because AE is really not made for so many layers in one single comp! Things also start to get funny with so many layers in a comp. For example: As soon as I change lets say the scale of these hundreds of label layers, the view doesn't get updated anymore until I close and reopen that same project. From that point on I can use AE normally till I change some parameters of these hundreds of layers. Wish there was another workaround for that problem besides closing and reopening the project...
Copy link to clipboard
Copied
Oh my god, this was giving me such a headache!! Thank you so much!
I usually pre-comp a lot but in this particular case I have one long camera pan out of an eye that is composed of the same layer multiplied by a thousand. If I would want to precomp, I would have to transfer the camera movement to each pre-comp. But I'll be mindful to not crack the 2000 mark.
Copy link to clipboard
Copied
jonas1024 You don't have to transfer the camera. Just collapse transformations. With CT turned on 3D layers in any nested comp respond to the Lights and the Comp in the main comp.
Copy link to clipboard
Copied
AaahAAh, yes, of course! I remember this from quite some time ago! Thank you, I'll watch a tutorial! The pain of using AE only every couple of months but then really heavily. I should write a log book with rules and expressions that I keep constantly forgetting.
Copy link to clipboard
Copied
It even keeps the original Position and Anchor Point Keyframes completely whole. Genius, should have tried this before I run into a thousand layers but now I can group them nicely. Thank you!
Copy link to clipboard
Copied
If I can ask one more question:
I precomposed all the groups now. Each group contains 30-50 layers it is controlled by it's on control layer. Before I would just hide everything except the control layers. So I could see the keyframes of all groups at the same and adjust values together. Now if I move the control layers into the pre-comps I can't do this anymore. So I could leave them in the main comp, update all the expressions and reference the master comp.
But I am afraid this will slow down After Effects even more... Is this true? I once referenced expressions from higher comps in sub-comps and I remember it slowing the machine down.
Copy link to clipboard
Copied
Putting expression controllers in a Main comp has no effect on render time.
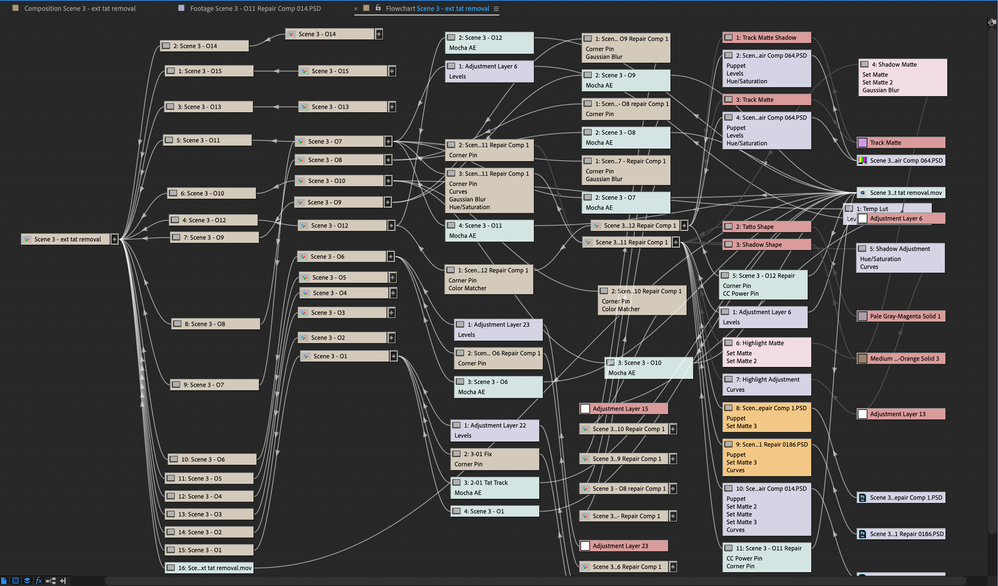
I hope you are not trying to edit a movie in After Effects. Each comp should be one shot or, at most, a transition between two comps. Trying to manage changes on a four or five-minute comp with 1000 layers is going to be a nightmare. I've cut a lot of movies and music videos with hundreds of shots that were created in After Effects, but they were all rendered and then edited in Premiere or another NLE. More than 90% of my comps are under 7 seconds because most shots in a movie, commercial, or music video are under seven seconds. Here's a flowchart for a typical composite.
If I remember correctly, 2 of the comps in the first column were rendered, all of the comps in the second column were rendered, then the Main comp was rendered to create a scene that lasted about eight seconds. I could go back into any of the comps in the third column and make changes, re-render, then re-render the main comp in a lot less time than it would take to render the whole project. Consider a similar workflow for your thousand-plus layered comps.
-
- 1
- 2


