 Adobe Community
- Home
- After Effects
- Discussions
- Re: Two Masks expanding next to each other problem
- Re: Two Masks expanding next to each other problem
Two Masks expanding next to each other problem
Copy link to clipboard
Copied
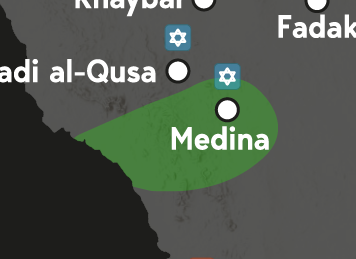
I am currently working on a history of Islam video. The green color is indicating an area influenced by Islam. So now I wanted do display a expansion of their influence. I had a map of Medina.
I wanted to expand the influence westwards. For doing that, I had two ai Files imported as Footage, one with the old border (A) (image above), one with the new (B). I placed A over B, then created a mask and expanded the mask until all of B was seen.
This expansion happens over the course of 15 seconds. This 15 seconds represent 9 years. While the expansion is still undergoing, another expansion in the north occurs 3 years after the beginnging, a battle.
Now I have another ai File (C) placed on top of B. I use the same mask techmique. However due to the fact that the expansion of B isnt yet finished, the both masks overlap at the same spot.
You can see in the West on the coast that B is still expanding and C is overlayn on top of B. Because of the fact that the expansion of C happens much faster, it accelerates the expansion process of B faster than history indicates. I was wondering how I can expand two Masks next to each other without this problem occuring. Hopefully you guys can understand my problem. I like to talk through cases, so this is what I did 😉 Any help is really appreciated.
Copy link to clipboard
Copied
I would not animate masks; I could use a shape layer and animate the path. You will only need one. Place the AI files in the timeline, so they appear at the key points you want to demonstrate, then use them as a guide to animate the shape of the path layer. Start with the beginning shape, move to the next one, then the next. If you need to add additional points as time passes, it's easy to do when you have your start, middle, and ending shape animated. I do this all the time, and it only takes a few minutes.
Copy link to clipboard
Copied
Copying the paths of the shape doesnt work for me at all. I made a shape layer. On there I copied the path of the first ai file with the starting expansion on the path of the shape. When I did that, the shape jumped from the position it should be far to the right out of the composition... whats going on here?
Here before I pasted the keypoint of the territory
And after. It jumped to the far corner, why is that?
Copy link to clipboard
Copied
Cropped screenshots are useless. You have to show us the timeline with the keyframes. That said, it simply seems you have a misunderstanding/ lack of understanding how AE interpolates paths, no offense. As I already wrote in my original reply you will very likely need to invest more work and can't expect this to look nice with only a handful of keyframes. The path clumping up is presumably due to your document sizes in AE and AE not matching up, but that's another thing you're not providing any info on, so we're left with speculation.
Mylenium
Copy link to clipboard
Copied
So what would you recommend for me to learn more about, like the topic I should cover extensively?
Copy link to clipboard
Copied
Not sure what you're asking, but usually the answer to making things slower is to add more inbetween animation. Of course your mask will appear to "explode" if you animate it linearly with only two or three keyframes, so instead you will have to add many more keys and likely also additional points to "pin" individual sections while others move. I'd also go with Rick's suggestion of using a shape layer. This eleminates any potential issues with transparencies looking odd where masks overlap if you don't want to have the green overlay in its own pre-comp.
Mylenium


