 Adobe Community
- Home
- After Effects
- Discussions
- Adobe After Effects -Timeline and Preview Disparit...
- Adobe After Effects -Timeline and Preview Disparit...

Copy link to clipboard
Copied
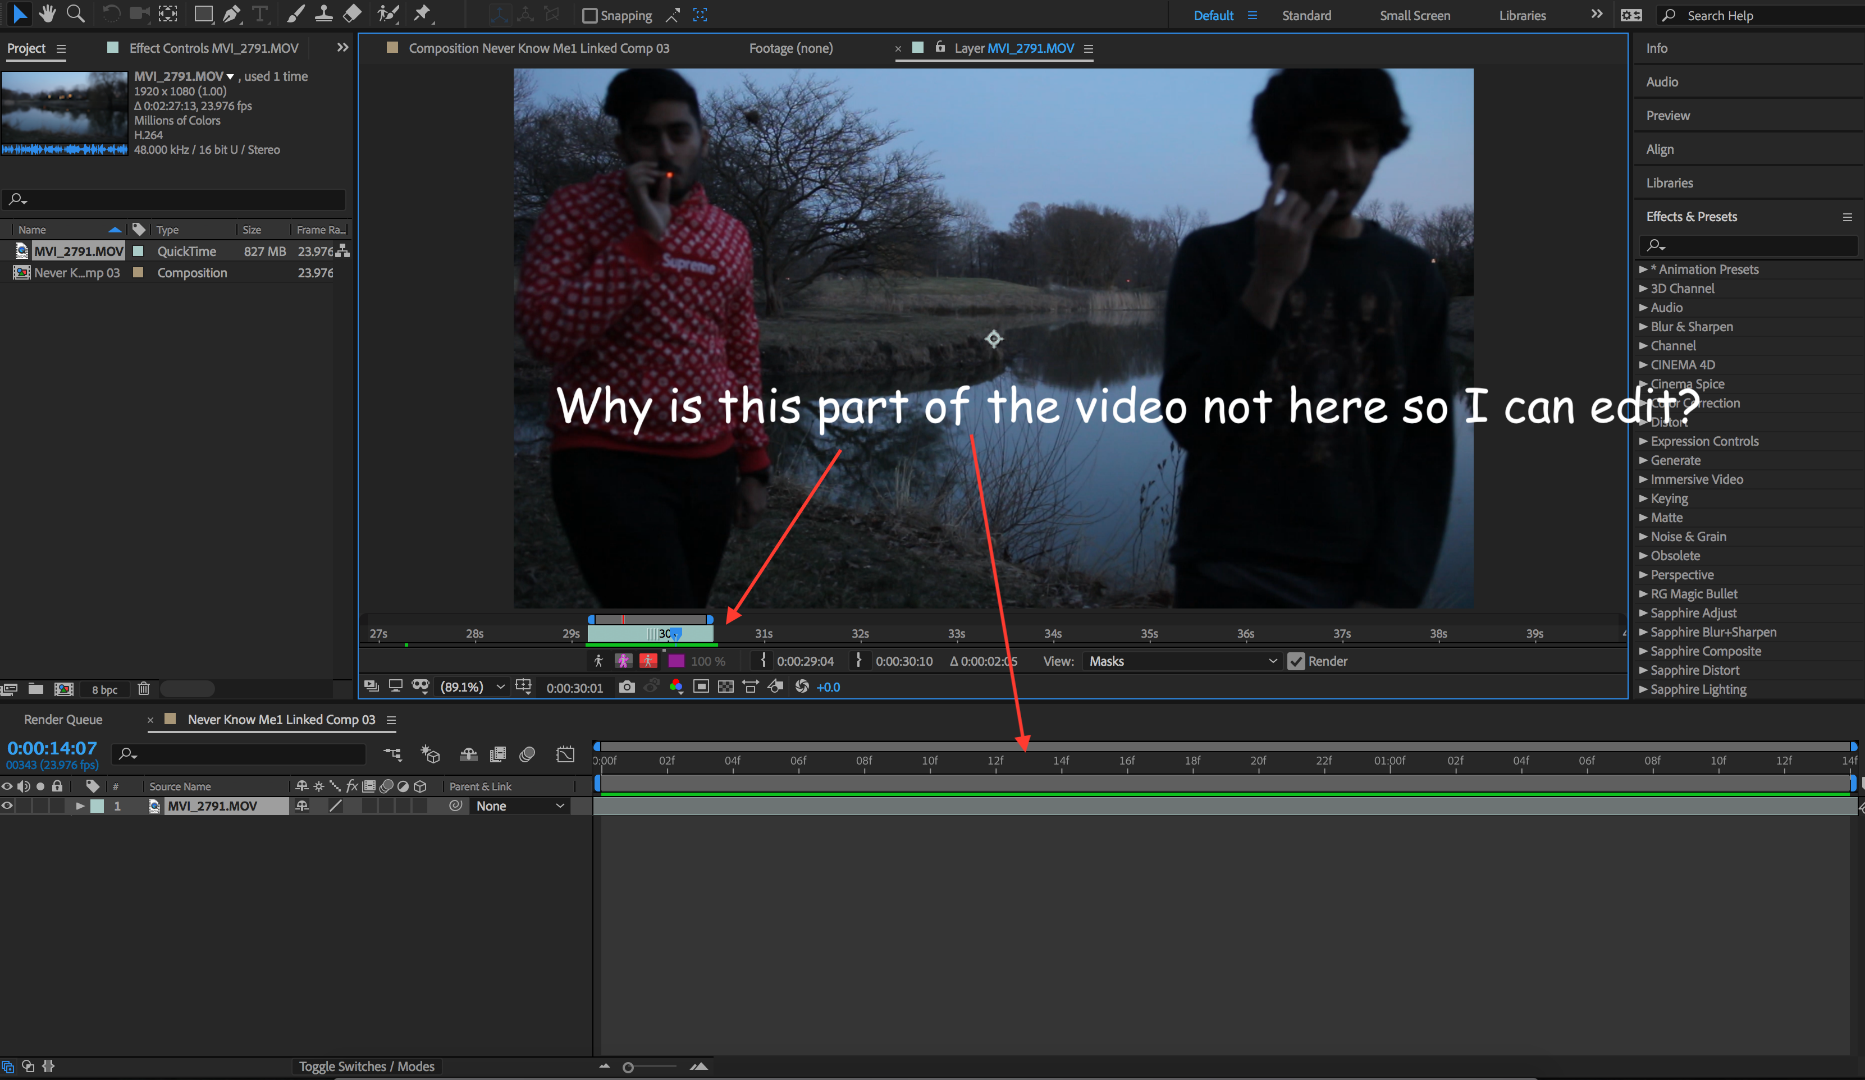
I'm in no way a veteran of After Effects, however, I've used it before and although it's a bit convoluted I was able to figure it out. This time I've imported a clip from my timeline in Premiere Pro and wanted to rotobrush out one of the people so I can add a different background and effects. My problem is twofold. I really have a hard time understanding why, when I import a specific section of video from Premiere, After Effects doesn't recognize the comp and it is, instead, just a black clip. Then, when I go to the layer, since it doesn't recognize that I just wanted to edit this specific selection, it's just the whole video that the clip was taken from. Okay, fair enough, I'll just go to the part I wanted to edit and work with it by adjusting the sliders. Well, I can adjust the sliders all I want and the change isn't reflected in my timeline. I'm assuming that I'm supposed to set the time ruler to where I want to edit my video since, when I move the layer in the timeline, the time ruler moves with it. Then I thought I'd drag those in- and out-points to fit the selection I wanted. Maybe move the red line that seems to move the marker? None of these things solve my issue. I just want to edit the clip I opened with After Effects from Premiere Pro and not have the whole video come with it so I don't have to deal with this and it worked before but now it's driving me insane. I'd appreciate some insight into how all of this functions because I'm flabbergasted at how I've been able to create some advanced effects in this program but can't seem to align video segments with my timeline so I can edit them. Thank you ahead of time.


 1 Correct answer

The easiest way to get PPro clip(s) into AE is to simply copy them from a Sequence in PPro and then pasting them into a Timeline in AE. You may also select one or more clips in PPro and right-click to invoke a Context Menu from which to select the Replace with AE Composition. For simple work to be done in AE, either method will work. For doing complex stuff in AE, the first example is preferred since the copied/pasted clips are independent and are not connected via Dynamic Link, which can create
... 4
Replies
4
4
Replies
4

Copy link to clipboard
Copied
No, AE doesn't adjust the comp duration or layer duration just by mucking around in the layer view. You have some fundamental lack of understanding AE basics there. The rest is just bugs on top of bugs with DynamicLink and a bad workflow. You better learn how to export the relevant sections as genuine clips from Premire and import them natively in AE to later export the final result from there.
Mylenium
Copy link to clipboard
Copied
Could you link me a video or something helpful to fix my workflow then? I've seen multiple videos on how to use dynamic link and have previously never had this issue but as soon as I update AE I can't seem to get this to work. What do you mean when you write "export the relevant sections as genuine clips from Premiere and import them natively?"

Copy link to clipboard
Copied
Most important workflow when working with footage within After Effects:
There is a difference, if you double click to open the footage from the project panel or double clicking the footage layer inside the composition. So, if you want to edit the footage in your comp, double click the nested layer. This will open the footage window, link the CTI (current time indicator) and will let you edit it.
When opening the footage via the project panel: Changes will apply when you drop it into another / a new composition. Example: When changing the In and Out first with this method and creating a comp via dragging it onto the comp icon, it will create a composition with the footage, based on the length you defined before.After that, you will have to double click the layer itself again, to do additional changes within this singular composition.
Copy link to clipboard
Copied
The easiest way to get PPro clip(s) into AE is to simply copy them from a Sequence in PPro and then pasting them into a Timeline in AE. You may also select one or more clips in PPro and right-click to invoke a Context Menu from which to select the Replace with AE Composition. For simple work to be done in AE, either method will work. For doing complex stuff in AE, the first example is preferred since the copied/pasted clips are independent and are not connected via Dynamic Link, which can create havoc when complex Timelines (and effects) are present in either PPro or AE.
Another point to take note is how AE's Layer Panel works when you perform editing - trimming in-out points to a layer. In PPro, trimming either the in or out points will provide intuitive visual cues in the timeline, in terms of whether the head or tail is being trimmed: ie, the clip(s) in/out points shift in the timeline to reflect the edit. In AE, things are a bit different - ONLY THE OUT POINT of the clip/layer is shifted in the timeline regardless if a trim is applied to the head or tail of a clip/layer. You can watch this in action by making edits in the Layer Panel while also keeping an eye out in the Timeline - ENSURE YOUR CLIP/LAYER has its in-point away from the start of the timeline in order to see the mechanics clearly.

 AdChoices