• Global community
    • Language:
      • Deutsch
      • English
      • Español
      • Français
      • Português
  • 日本語コミュニティ
    Dedicated community for Japanese speakers
  • 한국 커뮤니티
    Dedicated community for Korean speakers
Exit
0

After Effects Chroma Keying: Retaining Thin Details/Lost Details and Cleaning Shadows

Community Beginner ,
Oct 01, 2020 Oct 01, 2020

Copy link to clipboard

Copied

I filmed a spinning model with green screen, put a mask on it in After Effects, and used Keylight to key out the green screen. Because I'm still new to this process, though, there are a few issues I haven't figured out yet.


  • In some areas, the steps of the ladders on the model get cut off by the matte, disappearing for sections of the video. I've tried using Key Cleaner and Advanced Spill Suppressor, but they don't appear to be helping or I don't know the settings that would help. Is there a way for me to prevent the steps from sporadically disappearing while skill removing the green screen?
  • A human figure's shirt on the bottom of the model is transparent for a part of the video, and adjusting Clip Black and Clip White hasn't fixed it. What's a good way to fix it?
  • At the bottom of the model, I'm having issues removing some of the darkest edges. Any tips on how to clean it up, whether with Keylight and/or an additional effect?


If there's a better  forum to ask these type of questions, let me know. Thank you!

TOPICS
How to

Views

808

Translate

Translate

Report

Report
Community guidelines
Be kind and respectful, give credit to the original source of content, and search for duplicates before posting. Learn more
community guidelines
Community Expert ,
Oct 01, 2020 Oct 01, 2020

Copy link to clipboard

Copied

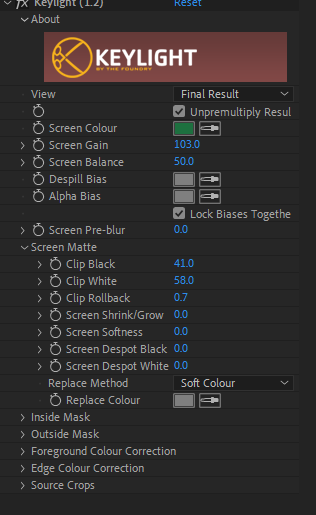
What is the format and bit depth of the original footage? I get a pretty good key right off the top just using Keylight. My first pass looks like this:

Screenshot_2020-10-01 11.12.15_eylJec.png

The comp is 32 bit. The base might require some rotoscoping to fix the shadows, but with raw or at least lossless original footage you should be able to get most of the way there just by fiddling with the controls in Keylight, but you'll have to mess with most of them. It is not unusual to have to do a little roto to clean up shadows.


I usually use shape layers as track mattes for the roto because you can easily see through the layer if you choose a good blend mode and you can animate the opacity of each individual path as needed. I find it easier than dealing with masks on my footage. That setup looks like this before setting the layer as a track matte for the footage. I was able to animate the masks with just a few keyframes.

Screenshot_2020-10-01 11.28.40_6JA1oG.png

As long as you have the path selected in the timeline it is very easy to edit the paths with the selection tool (v) because the cursor will change from a black arrow with a tail to a white arrowhead and you can drag selections around points. 


I chose a blue background solid because it is easier to see edge problems against a solid color than it is to see problems against black, white, or the transparency grid. I chose the color of the track matte solid (layer 1) so that it gave me the best view of the edges with the screen blend mode turned on. The results were perfectly acceptable with no other work.


BTW, your footage is 1920 X 1080 and the PAR is set to 1.33. This is completely non-standard and the shot may be distorted. Make sure that the footage PAR is correct in the original and that the comp is set to square pixels.  Here's the project file for you to look at. I'm also attaching the rendered comp.


Votes

Translate

Translate

Report

Report
Community guidelines
Be kind and respectful, give credit to the original source of content, and search for duplicates before posting. Learn more
community guidelines
LEGEND ,
Oct 02, 2020 Oct 02, 2020

Copy link to clipboard

Copied

LATEST

You overcranked the screen gain, but have basically two completely different greens to begin with. you need to dial that down and work with the "rollback" options further down. You also cannot avoid some manual masking due to the whole situation. Other than that it should be perfectly doable if you have a sufficiently tight garbage matte to only have the center. On another note it might have helped if you worked with some light from the left rear as well. The clipping you experience is no doubt related to the huge difference between when the figures are in the shadows vs. when they are in the light. If you use colored lights for such stuff you can even creatively selectively color correct them to enhance edges or fake additional shadows.


Mylenium

Votes

Translate

Translate

Report

Report
Community guidelines
Be kind and respectful, give credit to the original source of content, and search for duplicates before posting. Learn more
community guidelines