 Adobe Community
- Home
- After Effects
- Discussions
- Applying bulge effect to sync with audio amplitude...
- Applying bulge effect to sync with audio amplitude...
Copy link to clipboard
Copied
Hi all! I'm still fairly new to expressions, so hopefully question is clear enough. I have a circular logo whose scale changes based on the amplitude of audio tied to it. (The point is to make it look like a speaker bouncing with a lot of bass.) For context, the expression to make this happen includes this line:
temp = thisComp.layer("Audio Amplitude").effect("Both Channels")("Slider");
[temp+70, temp+70]
It works great. But to 100% pull off the illusion, it also needs a very slight bulge effect to distort the center of the "speaker". I can do that to the layer as a whole with Effects > Distort > Bulge, but it would need to sync with the amplitude expression. (The closest example I can find in another forum is here, but I'm not good enough with expressions yet to get it to work without an error.) Could someone offer a tip or more thorough example? Thanks in advance!
 2 Correct answers
Actually, I figured it out! I needed to apply a Bulge effect to my layer and then use an expression on that, rather than try to place a Bulge expression in my layer's Scale attribute. So my working code in the Bulge effect's expression is simply:
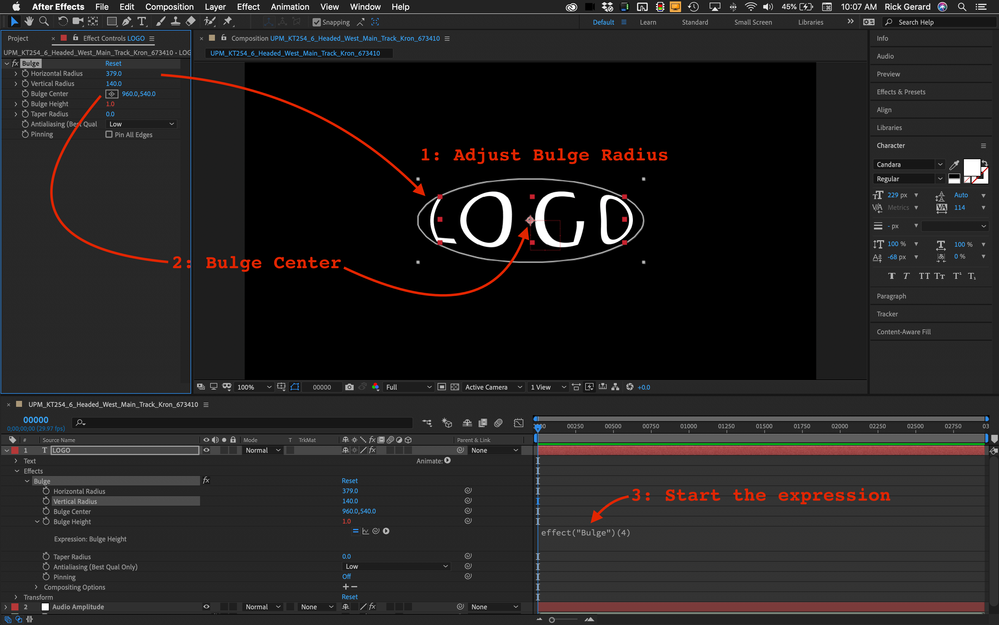
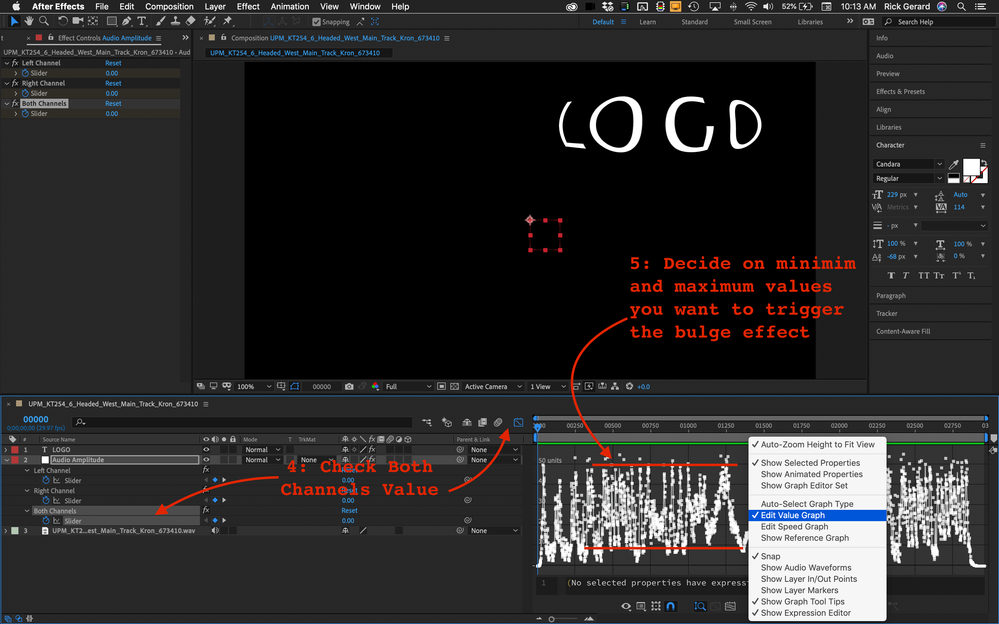
thisComp.layer("Audio Amplitude").effect("Both Channels")("Slider")/35The general workflow for using the Keyframe Assistant > Audio to Keyframes tool to drive animation has been covered hundreds of times. There are good and bad tutorials. I think you are making this much too difficult. Unless your logo is moving all around the screen and changing size (scale) all you need is a simple interpolation method that takes converts the minimum and maximum values for the audio channel slider you decide to use into Bulge Height values. Here are the steps you should follow:
Copy link to clipboard
Copied
And what exactly is the problem? If there are errors, you need to specifically tell us which ones. That aside there's no reason to even make it that complicated. By default effects with position controls will be placed smack in the center of the layer's bounding box, anyway, so half the code in your example is redundant. Chances are you could just use your scale expression but instead of applying a fixed value offset may need to multiply it with a factor instead to control the displacement amplitude, i.e. something like temp*3 for instance.
Mylenium
Copy link to clipboard
Copied
Thanks for the reply, Mylenium! Here's the full code I tried, combining my original working code for the amplitude effect with the copy/pasted code I found for the bulge effect. Again, I'm new to expressions, so I'm having trouble reading the syntax, etc. The error I'm getting is "Error: Error: Effect named 'Bulge' is missing or does not exist. It may have been renamed, moved, deleted, or the name may have been mistyped."
//start of amplitude code

timeToStart = 19;

timeToStop = 80;


if ((time > timeToStart) && (time < timeToStop)){

	temp = thisComp.layer("Audio Amplitude").effect("Both Channels")("Slider");
[temp+70, temp+70]

	//start of copy/pasted bulge code
	toComp(value);

	//Horizontal Radius:
	bc=effect("Bulge")("Bulge Center");
	length(toComp(bc-[value/2,0]),toComp(bc+[value/2,0]))

	//Vertical Radius:
	bc=effect("Bulge")("Bulge Center");
	length(toComp(bc-[0,value/2]),toComp(bc+[0,value/2]))

}else{

value;

}
//end of amplitude code
Copy link to clipboard
Copied
Actually, I figured it out! I needed to apply a Bulge effect to my layer and then use an expression on that, rather than try to place a Bulge expression in my layer's Scale attribute. So my working code in the Bulge effect's expression is simply:
thisComp.layer("Audio Amplitude").effect("Both Channels")("Slider")/35Copy link to clipboard
Copied
That will work but the linear or ease interpolation and the analysis of the minimum and maximum values is a more precise and more controllable method than just dividing the Both Channels Slider value by a value.
Copy link to clipboard
Copied
The general workflow for using the Keyframe Assistant > Audio to Keyframes tool to drive animation has been covered hundreds of times. There are good and bad tutorials. I think you are making this much too difficult. Unless your logo is moving all around the screen and changing size (scale) all you need is a simple interpolation method that takes converts the minimum and maximum values for the audio channel slider you decide to use into Bulge Height values. Here are the steps you should follow:
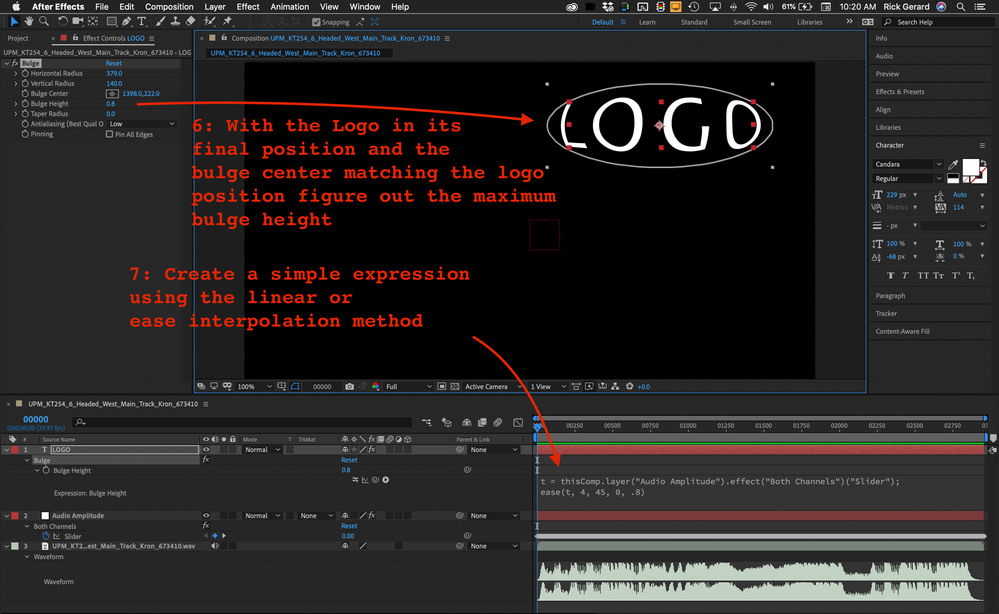
With the audio file, I chose in this example the minimum and maximum values I wanted to use for both channels are 4.5 and 45. The maximum Bulge Height is .8. By defining t as the Both Channels Slider values and adding the ease interpolation operator from the Expression Language menu in the Timeline it is easy to turn this ease(t, tMin, tMax, value1, value2) into this:
t = thisComp.layer("Audio Amplitude").effect("Both Channels")("Slider");
ease(t, 4, 45, 0, .8)
None of the code you have shown is doing anything to the Bulge Height. Instead it is changing the Bulge Horizontal and Vertical Radius and the if/else statement just turns on the bulge radius animation at 19 seconds off at 80 seconds. If you manually change the radius and look at the logo You probably won't get the distortion you want. If you like this look:
and you really want to animate the radius then you need to determine the minimum and maximum radius for both horizontal and vertical values and use an interpolation method to drive the changes based on the values for the "Both Channels Slider." If you decide on that method then the Bulge Height should also probably also be animated by an expression.
Copy link to clipboard
Copied
Thanks so much for putting that amount of time in your reply.


