 Adobe Community
- Home
- After Effects
- Discussions
- __I finally found a great tutorial on Greenscreeni...
- __I finally found a great tutorial on Greenscreeni...
Copy link to clipboard
Copied
__I finally found a great tutorial on Greenscreening
however I've got a thick dark line around my objects- dunno why...
 1 Correct answer
I give the tutorial a C-. Keylight is now much improved and for most footage, you don't need the other two effects. I've only done about 2 keys in my life that required only using clip white and clip black to clean up the key. I also rarely use Screen Matte, but if I do, it's only for the first pass at cleaning up the matte.
The reason you have a thick dark line around your key is that you have not tweaked enough of the settings.
Always start with a garbage matte. As soon as you pick your
...Copy link to clipboard
Copied
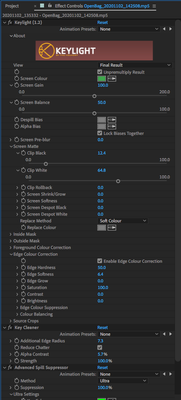
Can you post a screengrab which shows the preview window (so we can see the key results) and ther settings you've adjusted in Keylight.
Copy link to clipboard
Copied
thanks, Iwill in the morning (no access to pc)
Copy link to clipboard
Copied
Copy link to clipboard
Copied
I give the tutorial a C-. Keylight is now much improved and for most footage, you don't need the other two effects. I've only done about 2 keys in my life that required only using clip white and clip black to clean up the key. I also rarely use Screen Matte, but if I do, it's only for the first pass at cleaning up the matte.
The reason you have a thick dark line around your key is that you have not tweaked enough of the settings.
Always start with a garbage matte. As soon as you pick your key color switch to Combined matte and take a look at the matte you are generating. Start by adjusting Screen Gain and Screen Balance, then tweak clip black and white. Now move on to all of the other controls in the Screen matte section. To pull a really clean matte from a very well shot 10 bit or better footage from a professional camera like a Red or an Arri Alexa is going to require you to fiddle with about 1/3 of the controls. If it's footage from a consumer camera, you'll need to tweak about half of them. If it's footage from your mobile device, you are going to need to tweak most of the controls to get a clean professional looking result and it still won't be as good as it would be if you had professionally shot footage.
Key Cleaner is kind of a last resort sledgehammer and Spill Suppressor is easily outclassed by Keylight's edge correction tools unless you really need to hammer on the edges. I cannot think of the last time I used either of those tools, but then again, I almost always work with 10 bit or better log footage from professional cameras.
Copy link to clipboard
Copied
Thanks so much for that. This project is 'quick & dirty' - shot on a cellphone with a greenscreen. If I had the time, I'd do a rough mask that travels with it, but unfortunately, no time or budget for that. I feel like it's 9/10 of the way there, as far as having a transparent background, but it's still missing something....
Copy link to clipboard
Copied
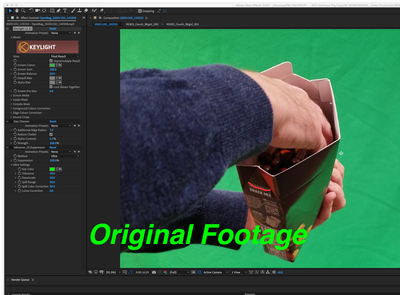
to be honest, Screen Gain and Screen balance are great, but they 'eat into' the image at certain parts, where the background green is reflected onto subject.
Copy link to clipboard
Copied
Share a high-resolution frame of your image and I'll show you how I would set it up. Screen Gain and Screen Balance are just the first steps in creating a clean key. If you are eating into the image then you have over cranked one or both of them.
Sometimes it's a really good idea to duplicate your greenscreen footage, apply a bunch of color correction to the duplicate, then pre-compose moving all attributes to the new comp and pull the key from the pre-comp. You can then use the key you pulled on the pre-comp as a track matte for the original footage, apply Keylight, and then use the color and edge correction tools to clean up the key.
Show us the shot and we can probably help get you setup. There's an old adage in the film business. "You can have it good, or you can have it cheap. Cheap usually takes longer and costs more."
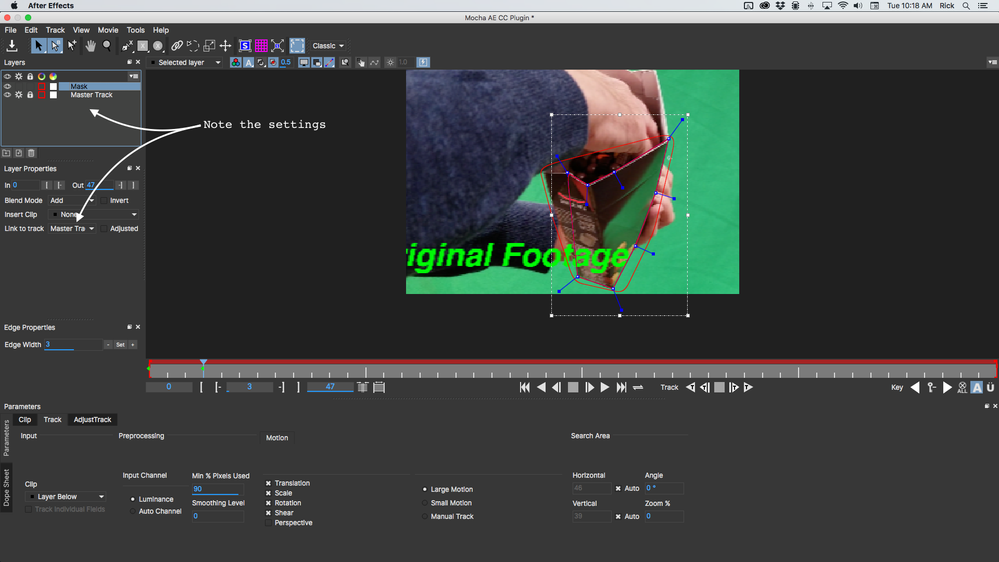
EDIT: Just saw your screenshots. I would motion track the reflective surface of the bag in Mocha to create a matte, then color correct a copy of the footage and set up a track matte. There's not enough green spill on the skin or sweater to cause any problems. I'll show you a couple of screenshots a little later today.
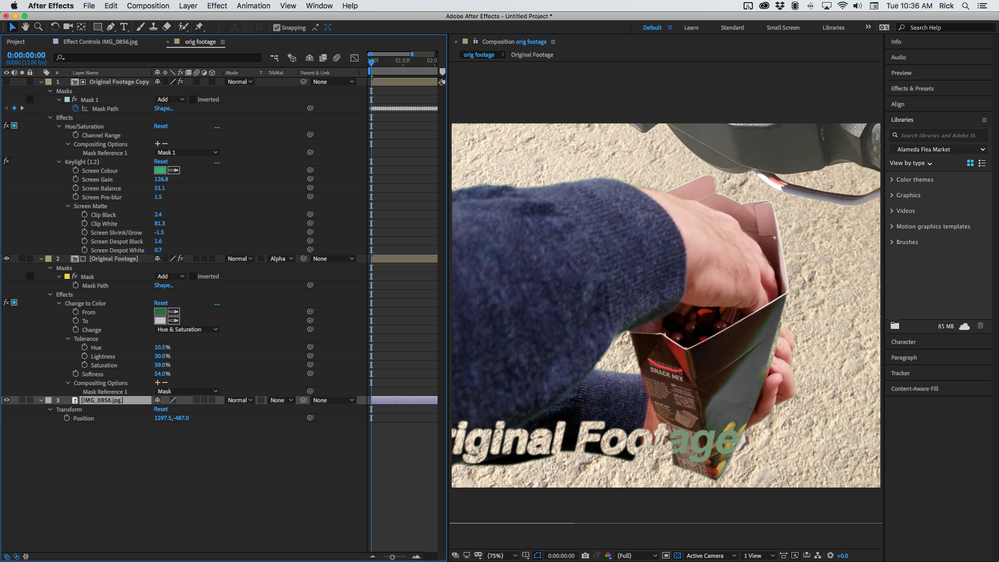
Something like this:
There are lot's of approaches, but this one works pretty well. The way to make the shot work is to eliminate the reflections on the bag by creating a mask and the easiest way to do that is to track the bag, then tie a matte to the tracked bag in Mocha. It would take me about 15 or 20 minutes max to do that in just about any clip. Once you have the reflections eliminated then it's just a matter of using the mask generated by mocha to control the area you are going to color correct. I just desaturated the green to keep the reflection and turn it approximately the color of the bg image. The copy of the footage uses Hue Saturation to remove the saturation from the bag so the green won't effect the key. You can see all of my settings. I could also have done it all on one layer.
I hope this helps. Pulling a really good key with marginal footage is pretty easy if you work on the real problem areas before you try and pull the key.
Copy link to clipboard
Copied
Wow - thanks so much Rick - I don't even know what Mocha is (I'm self-taught in AE, as you can likely tell)
Copy link to clipboard
Copied
Just saw this now - I'll have to try that - I cannot thank you enough Rick!!
Copy link to clipboard
Copied
I give the tutorial a C-. Keylight is now much improved and for most footage, you don't need the other two effects. I've only done about 2 keys in my life that required only using clip white and clip black to clean up the key. I also rarely use Screen Matte, but if I do, it's only for the first pass at cleaning up the matte.
The reason you have a thick dark line around your key is that you have not tweaked enough of the settings.
Always start with a garbage matte. As soon as you pick your key color switch to Combined matte and take a look at the matte you are generating. Start by adjusting Screen Gain and Screen Balance, then tweak clip black and white. Now move on to all of the other controls in the Screen matte section. To pull a really clean matte from a very well shot 10 bit or better footage from a professional camera like a Red or an Arri Alexa is going to require you to fiddle with about 1/3 of the controls. If it's footage from a consumer camera, you'll need to tweak about half of them. If it's footage from your mobile device, you are going to need to tweak most of the controls to get a clean professional looking result and it still won't be as good as it would be if you had professionally shot footage. YES BUT YOU WANT TO
Key Cleaner is kind of a last resort sledgehammer and Spill Suppressor is easily outclassed by Keylight's edge correction tools unless you really need to hammer on the edges. I cannot think of the last time I used either of those tools, but then again, I almost always work with 10 bit or better log footage from professional cameras.
By @Rick Gerard
Copy link to clipboard
Copied
Copy link to clipboard
Copied
the school district restricted us from using apps.


