 Adobe Community
- Home
- After Effects
- Discussions
- Puppet Pin Tool & Position keyframes handles.
- Puppet Pin Tool & Position keyframes handles.
Puppet Pin Tool & Position keyframes handles.
Copy link to clipboard
Copied
Hello everyone,
I'm not extremely confident with the Puppet Pin Tool as I used it just a few times so far.
I am now approaching a new animation and I would need to use it in a more advanced way.
Only problem I'm having is with the Graph Editor for the "Position" value of each pin.
As I open it, I see the classic red and green for X & Y value.
Usually, when I animate the position, I click on the "Separate Dimension", to unlink the 2 values, and that gives me the opportunity to work on each keyframe individually, playing with the keyframe handle to manually setup the ease of each keyframe.
Here, it looks like I can't. The Separate Dimension is greyed out so I can't work on the individual keyframe, allowing me only to tell a keyframe to "ease in" or "ease out" but not be able to access the classic keyframe's handles to make it customized.
This way the whole animation lacks rhythm and I'm figuring out a different way to animate this without using the Puppet Tool...
Copy link to clipboard
Copied
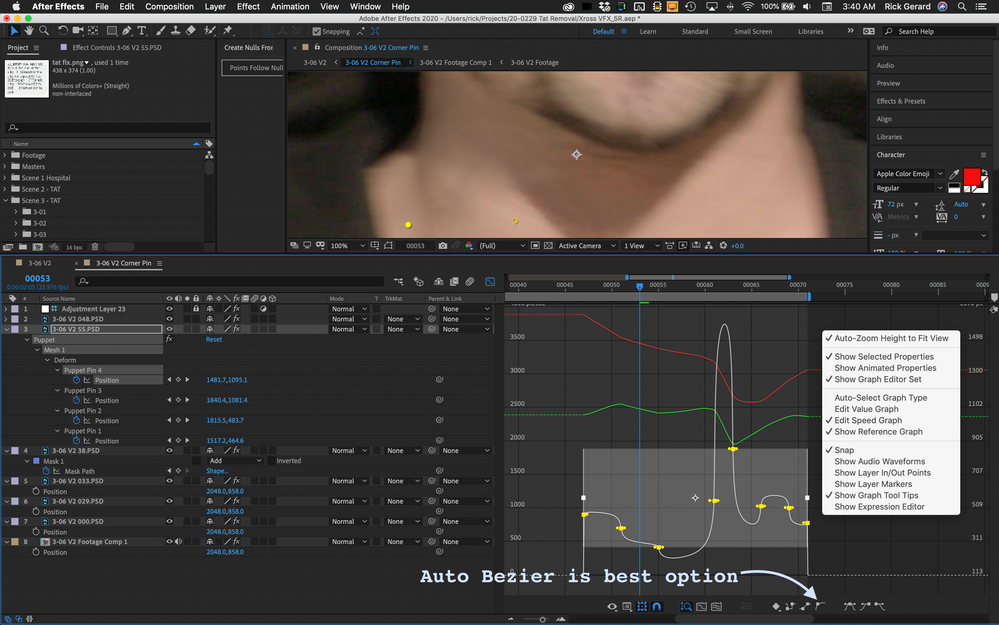
Are you trying to animate the position of a puppet pin in the timeline? Your cropped screenshot tells us nothing at all about what you are trying to do. Putting a curve on a position value does not ease in and out of the position, it puts a curve in the motion. If you want to ease you have to modify the acceleration curve. Easy ease is horrible for this most of the time unless you just want to put humps in the acceleration. Auto Bezier in the speed graph is the way to go the smooth out the timing of a motion path. This can also put a curve in the motion path over time.
Here's how I setup fine-tuning puppet pin animation using the graph editor.
You cannot separate dimensions on anything but the Layer>Transform>position property and you cannot add an editable bezier curve to a puppet pin position property.
If you must separate dimensions for puppet pin and try and add curves to the path you have to tie Puppet Pin position to the position of a null using a simple expression you can generate by simply dragging from the Puppet Pin pickwhip in the Parent and Link column to an appropriately named Null's position property. Only then can you separate dimensions and adjust the motion curve of both X and Y.
A more efficient way to adjust the curve of a motion path using for puppet pin is to open the layer in the Layer Panel by selecting it in the timeline and choosing Layer/Open Layer from the menu. Select Puppet to render, and if you have selected to show keyframes in the Preferences/Display section, you can just use the pen tool to accurately adjust the path between any two points. You can't break the handles, but you have a lot more control over the curve of the path than you do with the graph editor and the position properties. I use the Layer Panel all the time to edit motion paths in any effect that has a position property, like Lens Flare.

