 Adobe Community
rebuild a foot
Copy link to clipboard
Copied
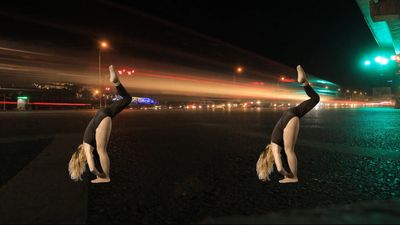
hello i have this clip where the foot of a dancer get cut (it is shot like this)
the right foot is stille there, dancer is lifting the lef
after few frames i have this
she finish to lift the leg and still the foot is missing..then back the leg down and foot reappear
Do you think is possible to create the foot form the one is there..or what can i do?
thank you
Copy link to clipboard
Copied
You'll need to duplicate the dancer footage, motion stabilized the so it doesn't move when it is in the frame, probably freeze-frame, then generate or draw a mask for the foot, then motion track the original and whenever the foot goes out of frame, you will use the duplicate layer.
Are you new to AE? Do you need more explanation that that?
Copy link to clipboard
Copied
yes i am new 😞
Copy link to clipboard
Copied
This should get you started.
Put the original footage on the bottom layer, duplicate the footage layer and move to the last frame where the dancer's foot goes out of frame. At that point either use the Composition/Save Frame As/Photoshop Layers menu or use Layer/Time/Freeze Frame (if the foot only moves out of the frame once). Now you are set to start the masking process. If you have multiple times when the foot moves out of the frame you need a new PSD of the last good frame each time. If the foot only goes out of frame once you can use a freeze-frame.
The next step is to create a mask for the foot. It is easy in Photoshop, and fairly easy in After Effects. You will want to add some feathering around the heel. If you set the anchor point of the layer on the center of the heel it is going to be easier to match things up.
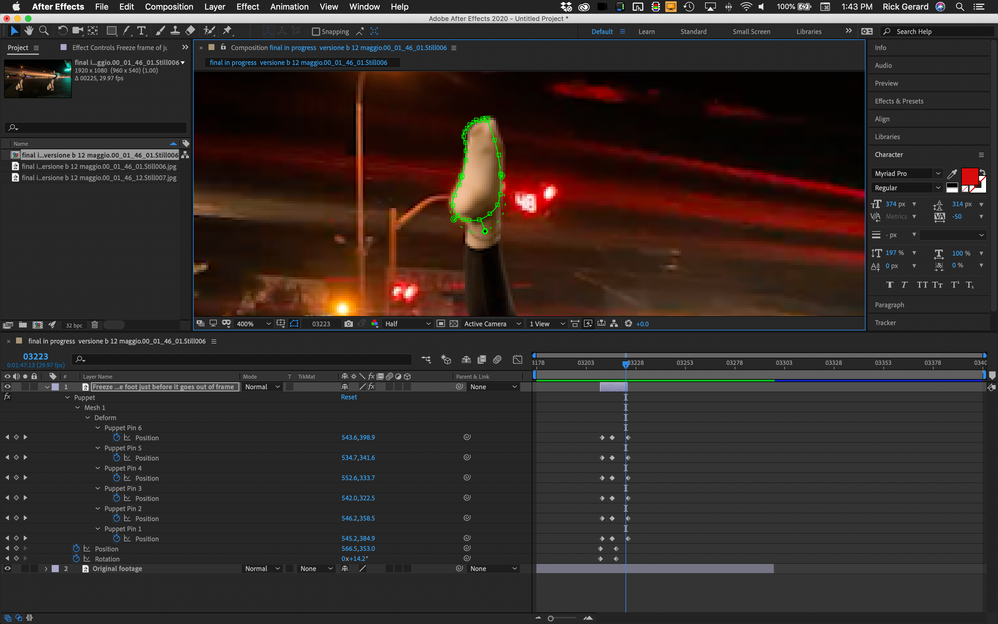
Trim the layer so that it is only long enough to cover the part where the foot is out of the frame. Mask the foot as shown and add some feathering below the heel. Animate the position and rotation to match up the movement as close as possible. You will probably need to add Puppet Pin to deform the foot slightly as it moves up and then back down. If needed fade out the last two frames when the toes come back into the frame. You want the replacement foot as small as necessary yet big enough to give you something to match up with the rest of the foot. In this screenshot, taken from your sample images it took 6 puppet pins to match up the foot so there was no visible shift in the size or look of the foot.
I hope this gets you started.
Copy link to clipboard
Copied
the foot goes out of frame for several frames, around 75
will this method work anyway?
Copy link to clipboard
Copied
also i am realizing that there is another problem
the original clip has the foot out, there is no space to add more
what you see in that screenshot is the orginal footage reduced to 30% with another clip underneath
so how shall i proceed?
Copy link to clipboard
Copied
ok i am going through
but at certain point the rotation of the leg make te foot too different form the freezed one...i am not sure if it can work
by the way i am searching for the puppet piun...where do i find?
i try to use the puppet pin (position ) tool...but for me seems difficult to put it in that way (the foot)
Copy link to clipboard
Copied
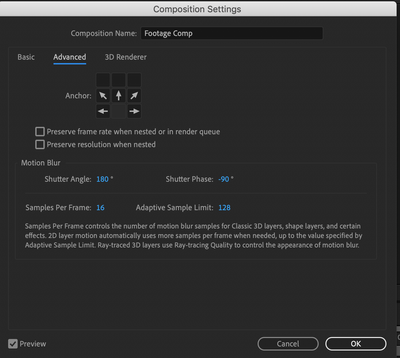
First, you do the work in a comp that is larger than your footage so you have room to add the foot. I would start by picking the in and out points for the shot in the Footage Panel, then create a "Footage comp" from the trimmed footage, apply any garbage mattes(masks), and Keylight to remove the background, then pre-compose the keyed footage (keyed comp). The next step would be to open up the Footage Comp and increase the height to allow for the foot to be repaired. You have the option in the composition settings to expand only the top of the comp like this:
That will give you more room at the top.
If the angle of the foot changes dramatically then you may need more than one replacement foot image. If you can share the footage I will try and share the workflow. If you can't share the footage, share the last good frame and the first good frame where the foot comes back into the frame.
The next step is to create the PSD files you are going to use to extend the foot and mask them so you can easily blend them with the original footage.
Put one PSD on top of the other on top of the pre-composed Keyed comp, trim the in and out points of each masked PSD to the last good frame and first good frame, then set the blend mode to something that you can see through so you can check how the feet line up.
Puppet pin is just one of the tools. It looks like a pushpin. You'll have to go through the tutorials to figure out how to use it. It is an easy way to warp layers as well as do animations. You always apply Puppet Pin to a layer that already has transparency, view the mesh, then animate the position of the pins. A layer that has Puppet Pins cannot have any animation (keyframes) for position, scale, or rotation. You will match the foot movement later.
Here's the tricky part. Move to a point between the in and out point of the layers set up a 2 to 4 frame overlap. Add 4 to 6 pins to each layer. The first good frame should be at the out point, the last good frame should be at the in point. Go to the overlap and while using the blend mode to see through the layers, move the pins on both layers until you get a good match. If the match is not perfect, set up a 2 or 4 frame dissolve between frames by animating opacity. When the last good frame image seamlessly turns into the first good frame image change the blend mode back to normal and pre-compose the morphing foot. Now all you have to do is animate the position of the pre-comp so that it matches the position of the foot. It may take a couple of tries to get it right, but you should be able to pull it off.
I recently worked on a shot (a comp) that was only 154 frames long. It required 44 masked PSD images morphed with Puppet Pin containing least 8 pins pre-composed and overlapped together un a pre-comp with at least 3 sets of keyframes each to complete the project. Even though your shot and my shot are completely different, the workflow is exactly the same. Find something you can use for each end of the shot and then morph between them.
Copy link to clipboard
Copied
ok i link you the proxy of the footage
the original is in 4k, my timeline in premiere is 2k and also i use the clip scaled down at 30%, so no problen for inserting the piece of foot
Copy link to clipboard
Copied
It's going to take some time. The workflow is pretty much as I described. Here's a project file that gives you the basic steps. All that is left is to finish the puppet pin morph in the nested comp, animate the mask in the main comp, then finalize with some color correction. It would probably take me two or three hours to finish the project. When you do the work you need to be working with the original files. You want as much detail as you can possibly get.
Step 1: Trim the footage, create a new comp, resize the comp, duplicate the footage, set markers for the last good frame and the first good frame, freeze-frame the layers, mask the foot.
Step 2: in the Morphed comp start with the last good frame and animate the puppet pin moving the repaired foot as close as you can to the guide layer original footage. When the first frame layer has gone about as far as you can go because of the shape of the foot and the lighting changes turn off the layer and start on the first good frame layer beginning at the out point. When the layers meet, overlap, and do a crossfade. You won't get perfect edges and blends yet, but get as close as you can to a realistic-looking foot.
Step 3: back in the main comp animate a soft edge mask to hide as many imperfections as you can, then apply color correction.
Like I said, this is going to take a while but you should be able to get something that is usable.
Copy link to clipboard
Copied
thank you, i'll try to start using it and i'll tell you if i need more explanation!
Copy link to clipboard
Copied
hello
at least i have some time to try working on it
First thing one question
In your aep file i see that tha first part and the òast part of the comp the foot you build it is just stacked somewhere
Did you mean that or there is somehting worng?
Just to make sure i' will work on the proper thing
thank you
Copy link to clipboard
Copied
I created a pre-comp that just contains the frames that I want to work on. Open up the pre-comp (Morphed Foot), select both layers and press the U key to reveal the keyframes. I see that I forgot to delete the motion tracker from the First Good Frame comp, so you can delete those keyframes.
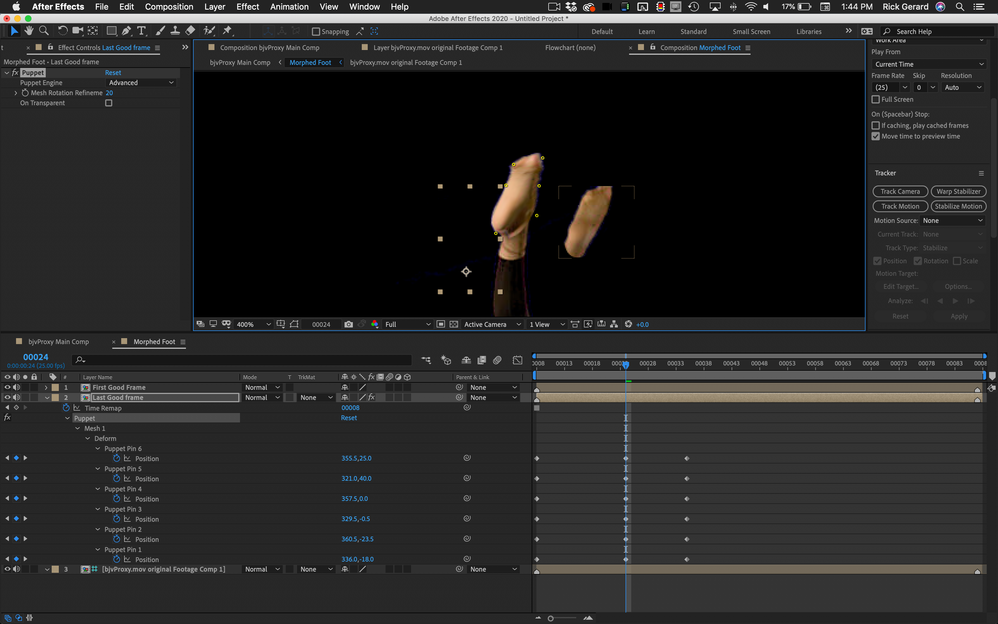
The bottom layer is just a guide layer so you can see the original foot. You don't do anything with that but it would be a good idea to lock the layer so it doesn't move. Layer 2 is the Last Good frame shot and it has a time remapping keyframe and some puppet pin keyframes. Your job is to animate the position of those puppet pins so that the foot follows the guide layer as close as possible. When you have gone as far as you can you turn off that layer and turn on the Layer 1, then add puppet pins and start keyframing from the last frame where the foot matches up again.
I should be fairly straight forward, but it is going to take some time and you may have to animate the masks a bit.
Copy link to clipboard
Copied
today i am trying to work at it again( don t have nuch time these days and also it scares a bit to me this work, seems so difficult) anyway..step by step...i have replace the clip woth original, in 4k. Everyhting is black now.don t see nothing.. don t know what to do to make it appear. The bjvproxy main comp appears, while hte morphed foot comp no. Also in the main comp there is no more the green, that is fundamental for the ultrakey fx i ll apply on premiere
edit
after moving around the clip appear. problem is tht the 4k clip is too strong to handle for my pc and takes time before it appears, and anyway never move, so i should use proxy...i don tknow the workflow of proxies in ae though
also putting the original 4k clip seems to alter all the position..getting lost 😞
Copy link to clipboard
Copied
anyway ..i am trying to work by simple setting back the file as the pne i send you
What is difficult for me to understand is how it works the combination of all those PUPPET PIN. DOn't know which one is related to the one on the screen and dont know how to manage them to suit a foot shape..
Copy link to clipboard
Copied
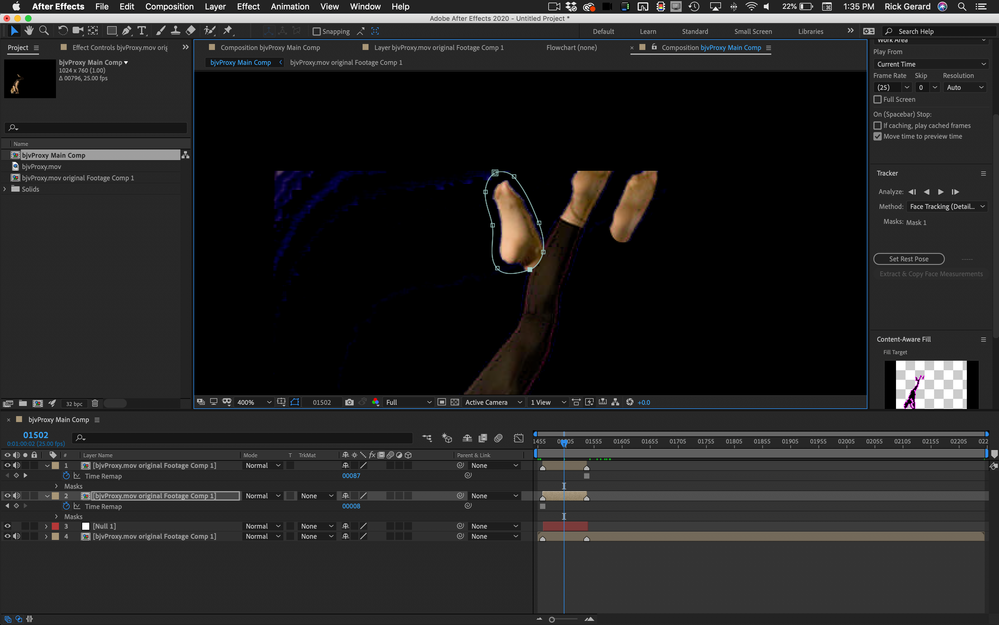
Open up the AEP I provided. Link the footage. Open the pre-comp. Press the U key to reveal all the keyframes so that your comp looks like my second screenshot.
Now move the CTI (current time indicator) back a few frames, make sure the selection tool (v) is selected, and Puppet Pin is selected in the timeline or the Effects Control Panel. The four pins will be visible. Just start moving one pin at a time until you reshape the foot so that it matches the guide layer.
Copy link to clipboard
Copied
ok i start to get through. But i am concerned on the final result, i am afraid that after much job for the reconstruction, the final result woll be not that good. Better no foot(or invent another solution) that a rebuilded, visible artifical foot. DOn't forget i am new to it..
What you think about?
Copy link to clipboard
Copied
It might take me as many as 3 or 4 hours to get the foot to look acceptable. It is not only going to take manipulating the shape but some rotoscoped adjustment layers with color correction effects applied to match up the lighting changes.
Copy link to clipboard
Copied
that is why i am concerned, i am not sure i ll be able to do all these adjustment in a good way...don t know if there is a work around...to put somehting in th evideo that cover the foot at that point
