 Adobe Community
- Home
- After Effects
- Discussions
- Subtracted mask automatically has a fade
- Subtracted mask automatically has a fade
Subtracted mask automatically has a fade
Copy link to clipboard
Copied
Copy link to clipboard
Copied
Well, it would be useful if you gave us actually the full picture (no pun intended) by giving us all the info. Clearly there are effects or other features applied to the layer that have an effect on its edges. This has nothing to do with the mask itself. Therefore the simple answer to this may be that you need to pre-compose stuff to isolate the individual processing steps in accordance with how AE's rendering pipeline simply works.
Mylenium
Copy link to clipboard
Copied
Hey Mylenium,
Sorry for the bad demonstration. I try to explain it a little further.
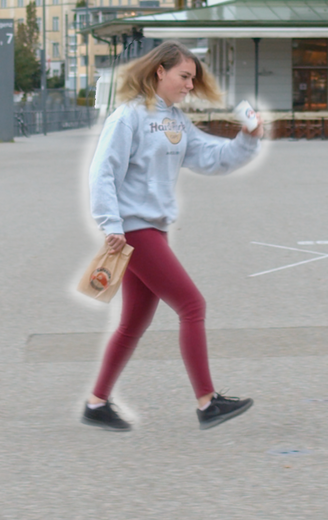
So the effect I'm trying to achieve is a teleport effect where the person jumps into the scene (Screenshot 1).
For this, I did Content-aware fill on the Clean 2 Layer that is behind the person and then took the shot without any effects and masked the person in (each mask has a feather of 20px). Then I precomposed the layer and copied it.
The light layer is where I put the glowing effect on with a tint effect making it B&W, then curves to boost highlights, and finally a turbulant displacement effect. Now I'm trying to cut away the right side of the effect to give the illustration that my person is jumping out of the portal. That's where the offset is going on.
Hope this helped,
Tobi
Copy link to clipboard
Copied
Cropped screenshots are useless when it comes to diagnosing problems. Select the problem layer, press 'uu' to show all modified properties, then show us a screenshot of the entire UI. We have no idea at all what is going on in your comp except that you have more than one mask on at least one layer and that masks appear to be turned off and one of them is not very well lined up with the edge of the leg and foot and the other 3 masks don't appear to be lined up with anything.
Copy link to clipboard
Copied
Hey Rick,
I showcased the problem on the answer above, hope this helps you!
Cheers
Copy link to clipboard
Copied
You are still showing us cropped screenshots, but the display is a little better. I'll try and reproduce what you are showing us. I don't think there is anything wrong. From your first screenshots, I see that the mask is not precisely lined up with the actor. From the second set of screenshots, I see that you have applied Tint and a serious curves adjustment to wipe out any blacks in the Light layer (layer 2). I am assuming that layer 1 is a copy of layer 2 with a mask. The mask on Layer 2 has a 10-pixel feather applied and that explains the soft edge that fades away from the mask. You failed to show us the modes column but I'm guessing that the blend mode for layer 2 is set to overlay. Layer 3 is an image sequence that may or may not have transparency and layer 4 is a movie. Layer 3 and Layer 4 do not have any effects applied or turned on. I'm only guessing that layers 3 and 4 make up the background.
I do not see anything that I do not expect. Tint is set to map black to black and white to white so it is not doing anything at all to the layer Deleting the Tint effect will do nothing at all to the comp. You have jacked the RGB curve so that everything from about 10% brightness is pushed to about 90% brightness and you'll get a layer that is almost entirely white and has almost no blacks anywhere. The only mask on Layer 2 is set to subtract so it is poking a hole in the layer with a soft edge and there are only 2 keyframes so I assume that the actor isn't moving very much. Because I don't see a lot of white pixels I have to assume that layer 1 has the same mask as layer 2, but it may not have any feather applied.
I have no real idea what you are trying to do, but I do not see anything at all in your screenshots that is not what I would expect to see. If I wanted to control the edge around the actor I would have used a different workflow. Are you following a tutorial? If you are then please post a link. I think the tutorial is giving you some bad advice.
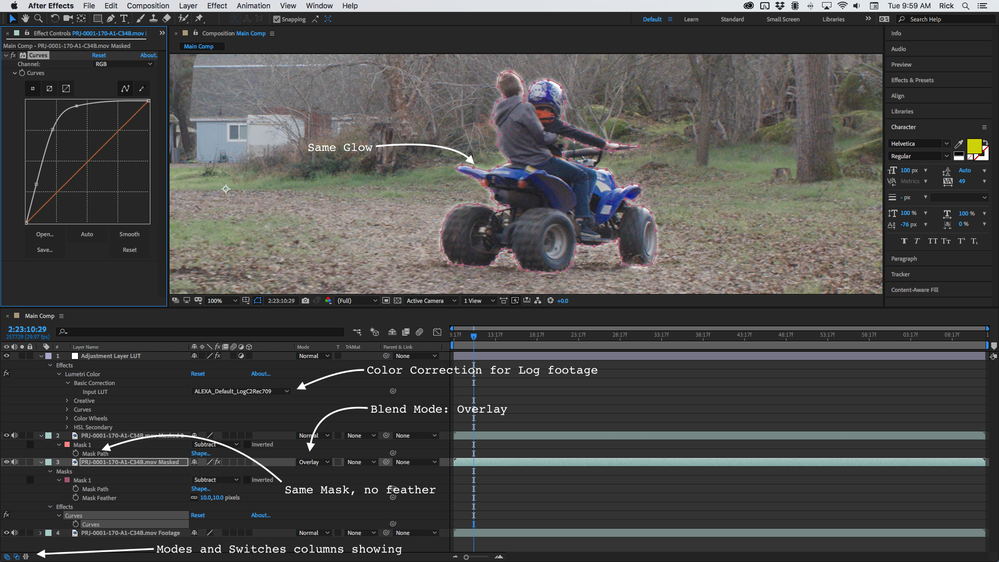
As promised, here is basically what I think is your workflow. I have a Log shot that I'm working with so Layer 1 is an adjustment layer with a Lut applied using Lumetri so all layers get the same color correction. Then I have a masked copy of the footage with no effects (not animated because it would take a lot of time), another copy below that with a 10-pixel feather, and the curves effect applied and the layer set to Overlay. As expected, I reproduced the white edge around the masked layer.
The modified properties of all these layers were revealed by pressing 'uu' and then I added the call-outs so you could easily see what is going on in the layer.
Copy link to clipboard
Copied
Hello Rick,
first of all thanks for helping me getting better screenshots!
The tutorial I am watching is: https://www.youtube.com/watch?v=9iDnTaf-d90&ab_channel=FilmRiot
I am trying to explain my situation deeper:
1. Layer 4 is the base layer - where I applied content-aware fill (Layer 3 is the fill). I have done this to have a clean plate behind my actress that I can do the teleport effect.
2. Layer 1 is the Layer where I masked out the actress and let her come into the scene:
https://imgur.com/aKDIIRI
https://imgur.com/eRayBqV
3. Then I precomposed the layer with these settings:
4. Then I copied the layer to add this glowy light effect:
I only want to add the glow to one side of the actress to make it look like her coming out of a portal:
5. Now the problem:
When I try to subtract the areas (the masks are only examples of the problem, not final masks) where I don't want the effect to happen, it automatically creates a weird offset (not like the one in the video)
Sorry for the Imgur links - couldn't upload any pictures. Hope this explains better!
Cheers


