 Adobe Community
- Home
- After Effects
- Discussions
- Time remap audio glitch issues after effect
- Time remap audio glitch issues after effect
Time remap audio glitch issues after effect
Copy link to clipboard
Copied
i made expression "trigger animation using markers" by Dan marker-sync which is so amazing and works well!
in this case i use it to trigger audio only. this is inside the audio precomp :
and below is what the issues about :
the "pop" marker triggers time remap perferctly but it creates kind of glitch.
because it is remaping backward (0:00:00:08 to 0:00:00:01)
is there a way to avoid that? Any help and suggest would be appreciated!
Copy link to clipboard
Copied
The simple truth of the matter is that it once more boils down to AE being terrible at audio processing and honestly this isn't a professional approach, anyway. Export the remapped audio only, import it into Audition as a reference track and rebuild the audio in a multitrack project. That's the only thing that is going to work relaibly and give you the amount of control you need, latest when it comes to final mastering for output.
Mylenium
Copy link to clipboard
Copied
Your approach and workflow are wrong. All you need to do is import your audio file, create a comp from the audio file, set the in and out point of the audio layer to the start and end of the sound by looking at the waveform (ll), set the work area to the in and out point of the audio file and then trim the comp to the length of the sound you want to use.
Then you add the audio comp to the main comp, enable time remapping, and if you need to, extend the out point of the audio comp to the end of the main comp. Then you need to delete the last Time Remapping keyframe so that the first keyframe is at the start of the audio and has a value of zero.
All the expression has to do is check the time of a marker or a keyframe added to the layer. If it finds a marker or a property keyframe all you have to do is subtract the time of the marker from the current time and the audio will play once every time you get to a keyframe. You have way over complicated the process, there is no need to name the markers, and there is no need to refer to the pre-comp. There is no need to refer to a marker name.
This simple expression will do it:
ref = marker;
keyTime = ref.nearestKey(time);
if (keyTime.time <= time)
	keyNumber = keyTime.index;
else
	keyNumber = keyTime.index - 1;
lastKeyTime = ref.key(keyNumber).time;
time - lastKeyTime
Once again, the first frame of the audio comp is the first frame of the audio track. The last frame of the audio comp is the last frame of the audio.
Nest the Audio Comp in the Main comp, enable time remapping, and delete the last keyframe
Add markers to the Audio Comp layer and add the expression. The expression will start playing the audio in real-time every time a marker is reached. I think this expression will throw an error that there is no frame number 0 before the first marker but it will work after it. I will try it in AE later tonight and see if I'm right about the error. If I am I'll fix it.
Copy link to clipboard
Copied
Thank you Mr. Rick, im still trying to fix the glitch using audio level and hold keyframe but i didnt find the way.
hope to see your reply and another pro soon
Copy link to clipboard
Copied
I got it figured out by adding a null, then driving the Anchor Point of the null with the markers on the time remapped Audio Loop layer. Then I drive the Audio Levels with the anchor point. I've set it up so that the audio levels dip to -192 as it approaches the next marker, then it skips 2 frames and then ramps up to 0 over the next 2 frames. This kills the glitch.
Here are the expressions for the two layers required, Null 1 and Audio Loop.
// Audio Loop/Time Remapping with one keyfame set to frame 2
ref = marker;
keyTime = ref.nearestKey(time);
if (keyTime.time <= time)
	keyNumber = keyTime.index;
else
	keyNumber = keyTime.index - 1;
lastKeyTime = ref.key(keyNumber).time;
time - lastKeyTime


// Audio Loop/Audio Levels
t = time - marker.nearestKey(time).time;
v = linear(t, thisComp.frameDuration, thisComp.frameDuration * 2, -192, 0);
[v, v]
This is still throwing an error when the CTI is in front of the first marker. I have not figured out how to modify the expression so that it doesn't look for Keyframe 0. I am not sure how to handle the problem but the expression error is annoying, it doesn't break the project. Maybe Dan Ebberts has a solution. I can't seem to fix the problem.
This is what the Comp looks like:
The screenshot shows using a null layer to control the audio levels. I figured out how to keep everything on one layer. The Markers do need to a little farther apart than the actual audio to avoid clipping, but the spikey glitch is gone.
Maybe I'll spend some more time on this problem in the next day or two.
Copy link to clipboard
Copied
it works great Mr. Rick!
i tried to use try and catch, it seems solved the error.
ref = marker;
keyTime = ref.nearestKey(time);
try {
	if (keyTime.time <= time)
		keyNumber = keyTime.index;
	else
		keyNumber = keyTime.index - 1;
	lastKeyTime = ref.key(keyNumber).time;
	time - lastKeyTime
}
catch (err) { 0 }
now i dont know how to edit ur expression to call another marker inside audio comp. so im back to use Dan's marker sync then add your audio lvl expression.
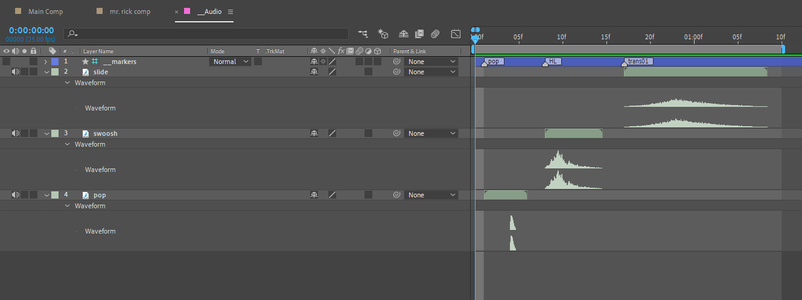
here's inside audio comp:
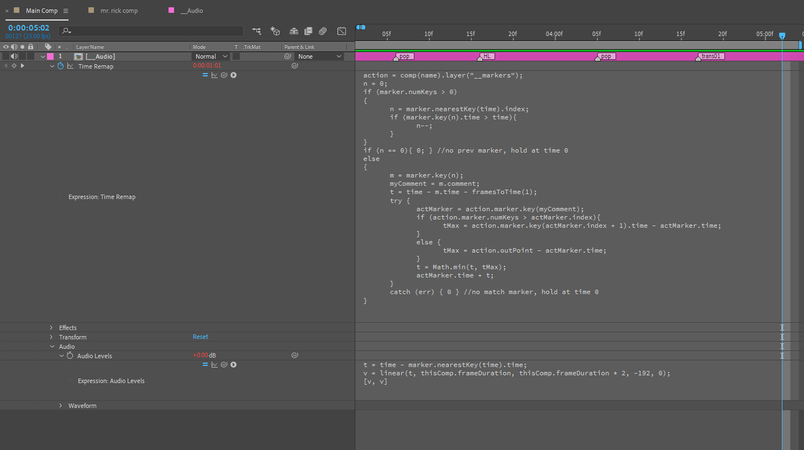
here's the Main comp:
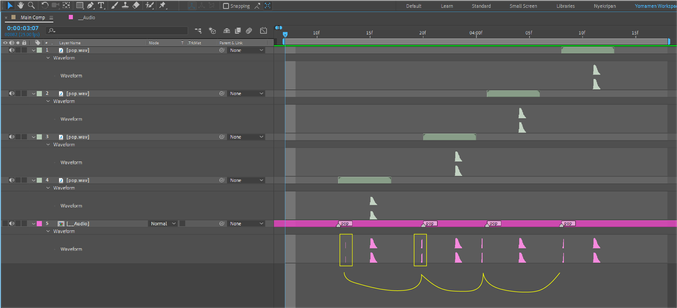
and here's the waveform comparison before (layer 2) and after (layer 1) the glicthes solved
as you see, it works like a charm!
then i found some limitations like i cant get the markers too close (at least 6-7 frames) so the current audio won't turned to -192 dB also i do offset the audio so it will play after marker.time + 1 frame
action = comp(name).layer("__markers");
n = 0;
timeOffset = framesToTime(1);
if (marker.numKeys > 0)
{
	n = marker.nearestKey(time).index;
	if (marker.key(n).time > time){
		n--;
	}
}
if (n == 0){ 0; } //no prev marker, hold at time 0
else
{
	m = marker.key(n);
	myComment = m.comment;
	t = time - m.time - timeOffset; //i do offset 1 frame here
	try {
		actMarker = action.marker.key(myComment);
		if (action.marker.numKeys > actMarker.index){
			tMax = action.marker.key(actMarker.index + 1).time - actMarker.time;
		}
		else {
			tMax = action.outPoint - actMarker.time;
		}
		t = Math.min(t, tMax);
		actMarker.time + t;
	}
	catch (err) { 0 } //no match marker, hold at time 0
}
i drop the file here
Copy link to clipboard
Copied
There's nothing to it. Dan's expression is overkill if you have one sound you want to repeat. All you need to do is trim the audio layer to set the in and out points for the sound + about 2 or 3 frames, pre-compose the audio layer moving all attributes to the new comp and trimming the comp to the layer duration, then apply this animation preset to the pre-comp and add some markers. It will take you about a minute.
I checked your latest project and things are still not. The Main Comp is almost there, but the mr.rick Comp is a mess, and What is the slider for? Your project is also extremely disorganized and very difficult to troubleshoot. I'll explain it.
The first problem, your audio pre-comp should only be as long as the sound or sounds you use in the project. Yours is 20 minutes long. The total audio in your Audio comp is one second and seven frames. The Project works if you trim the comp to that length.
Second, the only Time Remapping keyframe should be at the first frame of the nested comp and that should be set to 0.
The expression you use in mr.rick comp does not work. I didn't have time to troubleshoot it. The expression you used for Time Remapping in Main Comp works just fine. I simplified your project and saved the AEP file here.
You should start animating your comp on the first frame of a comp. Your comp should not be longer than the layers are in the comp. Most of mine are under 7 seconds because I work on movies and most shots in a movie are under seven seconds. I've done thousands of comps that were only 2 or 3 seconds long. Also, AE is just about the worst video editing app in the world. It is not designed for editing, it is designed for creating shots and motion graphics that cannot be created in an editing app. Occasionally I will do a short sequence of two or three shots, but only if the transition between the shots cannot be achieved in any other way. You're going to get very lost very quickly unless you start cleaning up your projects.
I believe you are trying to count kills in some screen capture gameplay scenarios. If that is the case, I would still break the project up into shots or scenes in the gameplay. Look for chances to cut and make a new comp. The last thing you ever want to do is send a 30 minute or hour-long comp to render and have the render fail 100 frames from the end. That is a real possibility with long comps. You can easily run out of system resources. The last thing you want to do is lose 10 or 20 hours of rendering because the render failed in the last 10 seconds of your project. If I have a render that is going to take longer than 10 seconds a frame I always use the Render Cue and Render Garden (a bg rendering app) and render an image sequence. If you get a render failure you do not lose any of the frames that have already been successfully rendered. I then use Premiere Pro to add the audio to the project and render the final project.
I know that breaking things up into small manageable pieces seems like more work, but it is actually less. I've been in the motion picture business for 50 years and I've been editing on computers for 27 and using After Effects for 25. Even in an NLE, I break up a movie (I've edited more than 40 hour-long documentaries, 6 feature films, and hundreds of shorter pieces, I break up my movies into scenes and sequences and assemble the final as a combination of Sequences in the master comp because changes are what editing is all about and if you put everything in one timeline changes are a real problem. I recently cut a 10-minute short film that had 5 scenes in 4 different locations and each scene had it own Premiere Pro sequence, there were about 20 VFX shots in the film so there were 20 comps that were created, the longest about 100 frames, the shortest about 10 frames, and the opening sequence (Destiny Scn 1 v 1 through 6) was recut about 6 times, the turn (Destiny Scn 4 v 1 - 8) was cut in about 8 versions, and we compared the final full cut and made adjustments by swapping out the sequences in the Master until we got it right. If I had cut the entire 10-minute movie in a single sequence making those changes and trying different approaches to the story would have been a nightmare.
I hope this helps you be more efficient and more productive. I'm still not sure I like this approach to the problem of repeating a sound in a long-form movie. MOGRT's don't have audio but that would is a great feature request.


