 Adobe Community
Using invisible layer for alpha

Copy link to clipboard
Copied
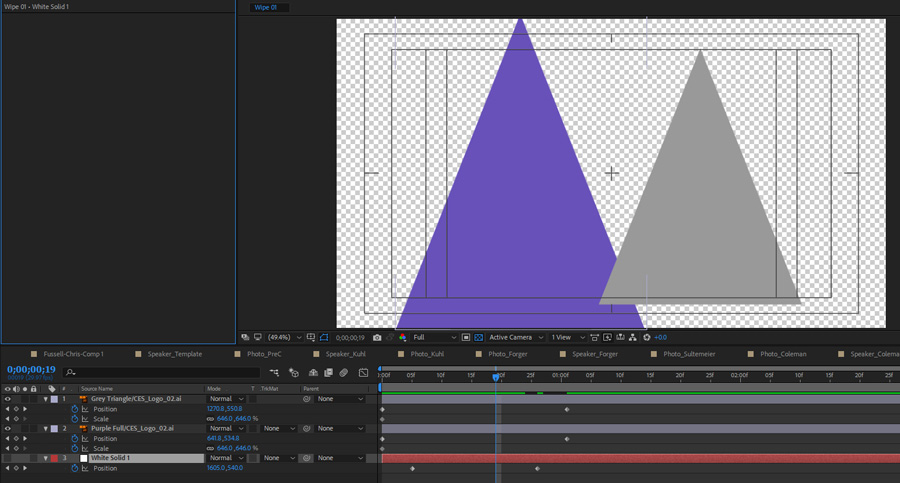
I'm trying to create a wipe in AE to use in Premiere. I created 2 shapes which move thru the frame. I created a solid to act as the alpha channel, but I can't remember how to have that layer effect only the alpha and not show in the composite. Here is the desired RGB out:
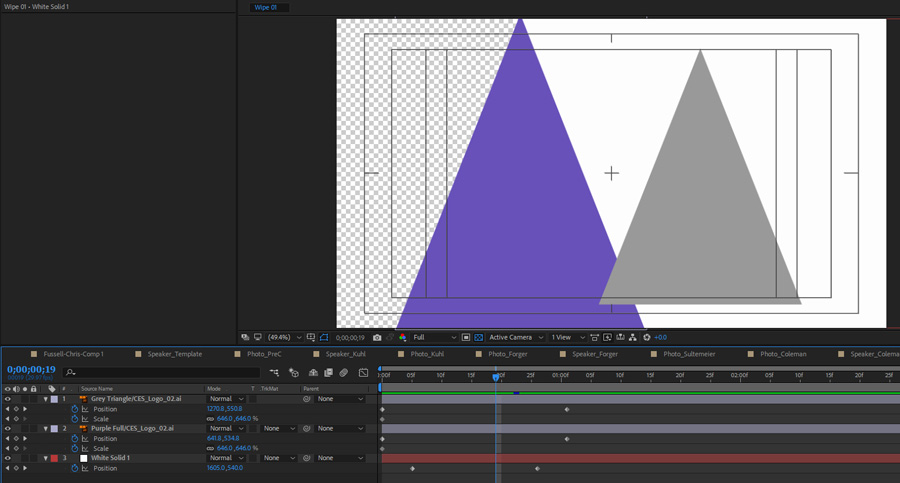
Here is the object I'm trying to create the alpha with showing white:
I know I can output 2 separate videos, but I am sure I've done this before and combined them - i think.


 20
Replies
20
20
Replies
20

Copy link to clipboard
Copied
I think you need to export two different movies; both with Alpha Channels. What you have looks good - from here, render out the Solid on its own - I would use a grayscale image with 127 as values for each of the RGB Channels - not totally required but these values, I believe will allow you to have better control over in PPro.
Then render the two triangles as a single movie, within an Alpha Channel. You'll then need to apply the first movie as a Gradient Wipe - ensure that you use the Video Effects>Transition>Gradient Wipe. You will have to select the appropriate Video Track as your Gradient Layer. Once this is done, overlay the triangle movie on a track above.
HTH

Copy link to clipboard
Copied
What you are looking for is Track Matte. The top screenshot has an Alpha Channel that will work in Premiere Pro. I am exactly sure what you are trying to accomplish. If you use the white solid as a track matte it needs to be above the layer you want to mask and it is going to cut a square hole in that layer. When you are talking about a wipe in Premiere Pro you can create an overlay, you can use the comp through Dynamic Link and use that as a matte source for a layer in Premiere but you'll need to do some layering. You are going to have to give me a more detailed explanation so I can figure out what this transition is supposed to look like.

Copy link to clipboard
Copied
The Purple triangle moves from left to right. As it moves it will reveal the "B" layer behind it.

The problem is that the white alpha channel object can't be part of the RGB render, only the alpha. I guess I could do it in Fusion easily enough, but it is handy to be able to preview things in Premiere without having to render.
Copy link to clipboard
Copied
What you want is a two-step transition -
1) first step is to commit to a wipe for the Video layer.
2) Then on top of that, you place the purple triangle
What you're doing will work - timing both steps in AE. You just need to ensure that you render the two steps into their respective movies, for use in PPro.
I've already laid down the steps you need to do in PPro. Rick has also suggested an alternative way to get the Wipe effect done by using the Track Matte feature. My technique actually requires just a still image since I've suggested that you use the Video Effects>Transitions>Gradient Wipe effect. Just ensure that for the Gradient Wipe method, you create a left-to-right greyscale gradient in AE.
Alternatively, you could create everything in PPro as this doesn't look necessarily an AE-specific task - it all depends on how comfortable you are in PPro.
HTH
Copy link to clipboard
Copied
If you look at the original there is actually multiple triangles moving in multiple ways thru the screen. Trying to do that in premiere would be more time consuming. I guess I could create it in it's own timeline and drop that into my narrative timeline. As I say, I know this is possible in Fusion or Nuke. Seems odd to need to create 2 separate videos.
Copy link to clipboard
Copied
BTW - I tried just doing a linear wipe in PP under the triangle, but I couldn't get the timing to track exactly right. I tried moving things a frame both ways in both apps and was never able to get the wipe to stay lined up with the triangle.
Copy link to clipboard
Copied
You should do BOTH steps of the transition in a single app. This way, you will be able to sync both steps of the single transition.
I have no idea why you've suddenly decided to do each step in a different software - this just makes a simple matter difficult.
So, decide if you want to do this in PPro or AE. Then do it. Hopefully there are no further issues. Do let us know of your results.
HTH
Copy link to clipboard
Copied
That's what I'm trying to do - both in the same app - AE - in a single file. The issue arises in trying to create the single file. As I stated in the OP, I know I can create 2 files, it just seems that there should be a way to create a single file. I'm making a number of these. Also much easier to manage a single file in Premiere, and less time consuming.
Copy link to clipboard
Copied
Perhaps we're visualizing your intended effect differently. I'm not seeing how this can be done with a single render going from AE to PPro. I've also suggested using PPro, from start to finish since this will, even, preclude having to render a single file.
Good Luck.
Copy link to clipboard
Copied
Here's what I'm wanting - this is using 2 outputs from AE:
Copy link to clipboard
Copied
That's what I thought you wanted. I'm doubtful you'll be able to create this transition effect with a single render/output from Fusion and then finishing up in PPro.

Copy link to clipboard
Copied
You're making this way more difficult than it needs to be. Just create a standard linear wipe and have the triangles move with it so the apex of the tallest triangle moves with the edge of the wipe. You're over thinking it by a million miles
Copy link to clipboard
Copied
I answered this already - the wipe and the objects do not line up.
Copy link to clipboard
Copied
Copy link to clipboard
Copied
OK - now I need to re-create that with other shapes about 20 times. Creating a single template in AE seems easier - but yours does work. I was not having luck getting the shape and the wipe to stay in sync throughout the wipe
Copy link to clipboard
Copied
I guess what I'm having a hard time with is that I can't create an object in AE that only affects the alpha. I can easily do that in Photoshop, and I thought I had done it before in AE.
Copy link to clipboard
Copied
I have no idea what you mean when you write "what I'm having a hard time with is that I can't create an object in AE that only affects the alpha" and I believe either you're not describing your thoughts accurately or you're confused with how effects work.
On creating your transition, you should look AE's Parenting feature.
1) Animate your triangle across the Composition. Move the Time Indicator to a point in time where the triangle is approximately in the middle of the active comp area.
2) Re-position the Solid/Gradient (which ever solution you prefer to apply in PPro) such that it is perfectly aligned with the triangle - in the manner you want.
3) Parent the Solid/Gradient to the triangle
That's it.
To repeat the process, simply duplicate the composition and replace the triangle with the new shape. If the replacement layer differs in size to the triangle then repeat Step 2 above.
HTH
Copy link to clipboard
Copied
brian704 wrote
OK - now I need to re-create that with other shapes about 20 times. Creating a single template in AE seems easier
Then I guess a track matte is the way to go.
But I wonder which is faster, rendering out 20 video clips or just finessing those keyframes to line up with where the highest point of the shape appears and disappears?. If I can do it you can do it. Although.. people often call me a genius. 
Copy link to clipboard
Copied
You can use Set Matte or track matte to control the alpha channel of one layer from Alpha Channel of another layer. That is not the hard part of this project. You are just trying to do it with 3 layers and the only way to get that done is to throw in a pre-comp and add a bunch of keying effects.
To do this easily in After Effects are going to need four layers. Starting from the bottom you have your second shot, then the first shot, then an animated layer to use as an Alpha track matte to perform the wipe, then the animated shapes.
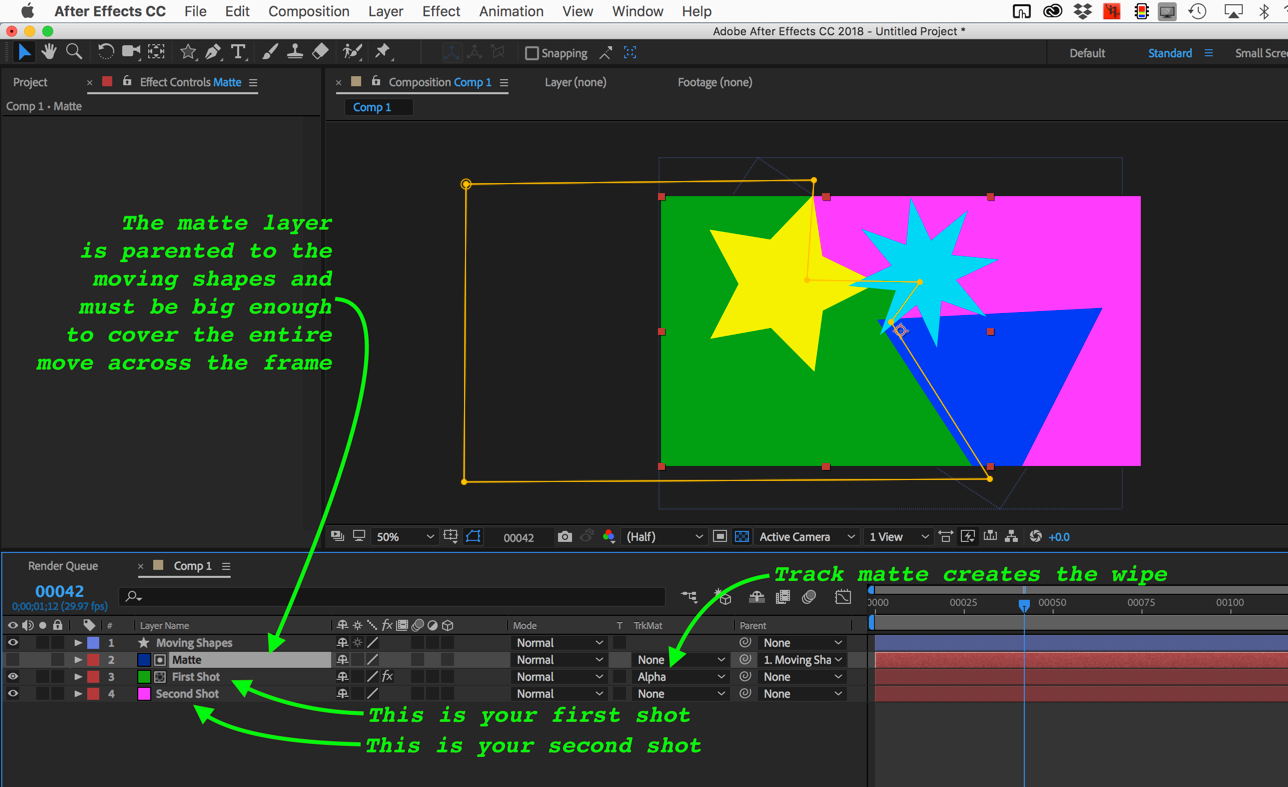
The green is the first shot being hidden by the track matte which reveals the pink layer, the second shot below. Parenting the moving shapes to the track matte keeps them locked together. If your shapes are animated then the track matte layer, created here with a mask, is also going to have to be animated to keep up with the individually animated shapes.
If you want to do this in Premiere Pro you will need both the Matte layer as a separate composition or rendered movie and the animated shapes linked comp or rendered movie. In Premiere Pro you need 4 video tracks, the second shot on track 1, the first shot on track 2, the track matte that you will use to hide first shot and the animated shapes on the top so you can see them.
There is no way that I can think of to do this with only 3 layers. Even if you tried to use the green part of my example as a source for keying you would need to duplicate a layer to pull off the matte.
Copy link to clipboard
Copied
create the wipe
then move the first keyframe of the wipe to where the apex of the highest triangle first comes on screen.
move the last keyframe of the wipe to where the apex of the highest triangle leaves screen.

 AdChoices