 Adobe Community
Customizing Web Forms

Copy link to clipboard
Copied
Customizing an Auto Responder
You can customize the way that auto-responder emails are sent to people filling in your web forms.
Within the Site Manager options you need to go to Web Forms, click on the relevant Web Form and click on Setup Auto Responder.
Fill in the following fields:
- Email From Address - Use the following format: "John Smith" johnsmith@yourdomain.com
- Email Subject
- Email Format - HTML or Text (Text emails are less likely to be blocked by a spam filter)
- Template - You can choose an HTML template. Edit these in Admin -> Manage Site-Wide Templates
To personalise the response, you can use the following tags (click on the "Tag Manager" icon in the editor):
- {tag_emailaddress} Email address of the recipient (email address must be present on form)
- {tag_recipientname} Full name of the recipient (firstname and lastname must be present on form)
- {tag_webformresults} Summary of the form that was filled out (only use if email format is HTML)
- {tag_recipientfirstname} First name of the recipient (first name must be present on the form)
- {tag_recipientlastname} Last name of the recipient (last name must be present on the form)
- {tag_verificationurl} The verification URL for customer to select and opt-in to your newsletter
Disabling an Auto Responder
You can disable the auto responder if desired. To do this, you will need to alter the form action URL by adding &SAR=False
For example:
action="/FormProcessv2.aspx?.....&SAR=False"
Disabling the Secure Zone login details email
Upon creating a webform which collects the username and password fields and subscribes the submitting contact to a Secure Zone an email is sent to the submitter with the login details he can use for that secure zone. If you wish to disable the sending of this email simpy append the following to the action URL of the webform:
action="/FormProcessv2.aspx?.....&SWE=False"
Customizing your Web Form after inserting
Use this method when customizing an individual form, used only in one place. Web forms are customized after they are inserted on a web page and you can then customize it by editing the HTML code, adding CSS classes or replacing buttons with images. You can also re-arrange the fields. Any customizations you make will only affect the copy of the web form on the page.
Note: Its important that you test the web form after making changes to it by making a few submissions through it. This ensures that whilst customizing the web form you have not broken the form.
If you make changes to your web form via Modules -> Web Forms then you must re-insert your web form on any web page where the web form was previously placed.
Collecting anniversary dates using a date picker
For each customer you can store up to 5 anniversary dates. These dates are used for loyalty email campaigns. Refer to an earlier section for more details. To capture this information, include the following your web form:
<input name="Anniversary1" id="Anniversary1" readonly onfocus="displayDatePicker('Anniversary1);return false;">
You can also replicate the above for anniversaries 2 to 5, e.g. Anniversary2, Anniversary3 and so forth
Customizing your Web Form using the 'Customize Web Form' option
Use this method when you have inserted the Web Form as a module. This method allows you to make a change to the form via the 'Customize Web Form' option and have this automatically update throughout the site where you have inserted the web form as a module:
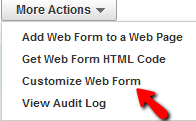
When updating the web form via the 'Customize Web Form' option, this allows you to update all instances of this form from one central place.
Note: You can not insert a web form as a module in your Registration(buy) layout for your ecommerce shop as this must be inserted as HTML.
Combining the first name and last name into a full name
You can combine the First Name and Last Name fields of a web form as a single 'Full Name' field by modifying the Form HTML Code, and changing the First Name input HTML Code to 'Fullname'....
For example, this field:
<tr>
<td><label for="FirstName">First Name <span class="req">*</span></label><br />
<input type="text" name="FirstName" id="FirstName" class="cat_textbox" maxlength="255" /></td>
</tr>
Can be updated like this:
<tr>
<td><label for="FullName">Full Name <span class="req">*</span></label><br />
<input type="text" name="FullName" id="FullName" class="cat_textbox" maxlength="255" /></td>
</tr>
Then delete the 'Last Name' input field alltogether.
You will need to update the javascript validation at the bottom of the form. You will need to look for the following:
if (theForm.FirstName) why += isEmpty(theForm.FirstName.value, "First Name");if (theForm.LastName) why += isEmpty(theForm.LastName.value, "Last Name");
You need to remove the last name part completly. Delete:
if (theForm.LastName) why += isEmpty(theForm.LastName.value, "Last Name");
You will then need to update the FirstName references to FullName as below:
if (theForm.Fullname) why += isEmpty(theForm.Fullname.value, "Full Name");
A quick example of this can be found here: http://jsfiddle.net/yeqgU/2/
Once completed, the system will separate a fullname (i.e. Tom Jones) into a first and last name (i.e. Firstname-Tom, Lastname-Jones) upon form submission.
Attaching web forms to Contacts instead of Cases
Sometimes you want to attach a custom web form field to the customer record rather than the case. You can do this by simply appending a variable to the action URL of the web form
Append ECRM=1 to the action URL of the web form
Example:
action="/FormProcessv2.aspx?WebFormID=11557&OID=248384&OTYPE=1&EID=0&CID=0&ECRM=1
Adding multiple file attachment fields to the web form
To add multiple file attachment fields to your form, you can simply copy the HTML code of the original field and paste it between the <form> tags.
This is the example of the code:
<input name="FileAttachment" class="FileAttachment" class="cat_textbox" type="file">
You can also change the name and id of the new field in the following manner:
<input type="file" name="FileAttachment1" id="FileAttachment1" class="cat_textbox" /><input type="file" name="FileAttachment2" id="FileAttachment2" class="cat_textbox" />
This will then allow you modify the JavaScript validation if you would like to make any of these fields mandatory.For example, where you see:
if (theForm.FileAttachment) why += isEmpty(theForm.FileAttachment.value, "File Attachment");
You can change the (theForm.Fileattachment1) to look like below:
if (theForm.FileAttachment1) why += isEmpty(theForm.FileAttachment1.value, "File Attachment");
duplicate this for fileattachment2.
Please have in mind that the upload cannot exceed 150 MB and only the first file will be included in the workflow notification even though multiple files are uploaded.
Preventing autocomplete on web form fields
A lot of browsers have an 'AutoComplete' function which enables them to 'remember' previously submitted information to that for firld.
If you don't want to the browser to pre-populate the field you need to place autocomplete="off" attribute into that field.
For Example -
<input type="text" maxlength="255" class="cat_textbox" autocomplete="off" id="FirstName" name="FirstName" />
Redirecting the Web Form confirmation page
To redirect a Web Form submission to the another page, you will need to go to the page you have placed the Web Form on and view the HTML of this page. Find the form action URL, this should looks similar to the below:

Change this by appending the below to the action URL:
&PageID=/Results.htm
Where Results.htm is the URL of the page of the next Web Form
For example:

Pre-populate web form fields
You can use the following module tags to pre-populate the form:
| {module_fullname} | {module_emailaddress} |
| {module_firstname} | {module_lastname} |
| {module_title} | {module_company} |
| {module_homeaddress} | {module_homecity} |
| {module_homezip} | {module_homestate} |
| {module_homecountry} | {module_workaddress} |
| {module_workcity} | {module_workstate} |
| {module_workzip} | {module_workcountry} |
| {module_webaddress} | {module_workphone} |
| {module_workfax} | {module_homephone} |
| {module_homefax} | {module_cellphone} |
| {module_dob} | {module_username} |
| {module_password} | {module_shippingaddress} |
| {module_shippingcity} | {module_shippingzip} |
| {module_shippingstate} | {module_shippingcountry} |
| {module_billingaddress} | {module_billingcity} |
| {module_billingzip} | {module_billingstate} |
| {module_billingcountry} |
Note: This only works inside Secure Zones, because the subscriber must be logged into a site in order for the system to recognize them and populate the form with the relevant data.
For security purposes, the billing address of a customer is always stored with the order information (and is never stored with the customer detail records).
When the system displays the billing address using the {module_billingaddress} tag, the system always displays the last billing address that the customer used when placing their most recent order.
You can pre-populate a form's fields using the module tags listed above. Edit the form and place the desired module tags inside the field values.
Editing form fields to insert module tags
Follow these steps to update an existing form's fields to prepopulate the data with the system's data.
Edit the web page that contains the form. Click the HTML tab to view the source code.
Scan the code to locate the field that you want to prepopulate. In the example below, the line of code that creates the text field that contains the subscriber's user name is displayed:
<input class="cat_textbox_small" type="text" name="Username" maxlength="255"/>
To prepopulate this field, add value="{module_username}" to the end of the field code, like this:
<input class="cat_textbox_small" type="text" name="Username" maxlength="255" value="{module_username}" />
Setting up a form to email using Web Forms
You can configure a form to send the data to a user's email address, rather than storing it in the database. This strategy enables you to create simple web form with email functionality that forwards the details of a web form submissions to a pre-designated email address.
To set up a web form to forward the submitted data, follow these steps:
- Create and insert a web form on a page.
- Update the action URL in the source code of the form to use the format shown below:
action="/Default.aspx?A=Form&Email=You@YourDomain.com&Subject=This+is+email+subject&EmailFrom=yourfromemail@YourDomain.com&PageID=/DesinationPage.html"
In the example above:
- &Email=You@YourDomain.com - The email adddress to which the submission is sent. Replace “You@YourDomain.com” with your email address.
Note: The email address that will be receiving the form submission must exist in either your sites CRM (customer database) or be a admin/email user of the site.
If the email address being used to receive these form submissions does not exist as a site user or in the CRM, then the email will not be sent. A notification will be sent to the partner of the site advising them of this requirement.
- &Subject=This+is+email+subject - The subject of the email. Make sure you separate each word in the subject with the + (plus) sign.
- &EmailFrom=yourfromemail@YourDomain.com - The from email address. Replace yourfromemail@YourDomain.com with the email address you want to use for the submission.
- &PageID=/DestinationPage.html - The URL of the landing page presented to the visitor after the web form has been submitted.
For more details, see the KB article.


 74
Replies
74
74
Replies
74

Copy link to clipboard
Copied
Hi Daniel
Thanks very much for your help on this I'll post here how it goes.
Cheers,
Craig

Copy link to clipboard
Copied
Probably worth adding these details as posted by Sidney Mitchel Jun 2, 2012 as well. (Post - How to remove auto notification for web form)
Please try appending the "&SWE=False" to the end of the from action code to disable the zone details email from sending out.
For more details...
Send Secure Zone Login Details email switch
In this release, we've added a new parameter called SWE that decides whether or not the Secure Zone Login Details email will be sent when the form is submitted. By default, this new parameter is not included in the query string and its set to "True" (email will be sent). Partners that want to stop this email from being sent should add "&SWE=False" in the query string when creating a secure zone registration form.
The already existing parameter named "SAR", that decides whether the WebForm Submission Confirmation AND Secure Zone Login Details emails are sent remains unchanged. For the Secure Zone Login Details email specifically, if any of these parameters is set to "False", the email will not be sent.
It would be really helpful if there was a single list of all paramters, their meaning and possible value settings for the BC forms. For some reason this doesn't exist yet to me seems a fairly basic piece of documetation for developers.

Copy link to clipboard
Copied
Is there any way to split a long web form into two columns?

Copy link to clipboard
Copied
@ShrimpWonder: Sure you can. The forms generated in BC use tables by default. You can either modify or create your own table into two columns (see http://www.w3schools.com/html/html_tables.asp). I prefer to use CSS with div tags in my forms, that way I can make it responsive. I can recommend using Bootstrap (http://getbootstrap.com/) as it has some nice simple CSS for forms. You can also put your long table in tabs or an accordion (again some nice solutions can be found in Bootstrap). The important thing is that your form tags are wrapped around the table or div tags.
Copy link to clipboard
Copied
Thanks. I kind of wanted to avoid getting my hands dirty with coding, but it's good to know that it's the only way.

Copy link to clipboard
Copied
Welcome to the web 

Copy link to clipboard
Copied
Hi Simon, do you have an up to date on that link, no longer there, I am keen to see some sample CSS for forms, do you have other links? or anyone else could help? Thank you
Copy link to clipboard
Copied

Copy link to clipboard
Copied
I am creating a staff directory. Rather than list the staff member's email address on the staff member's directory page there will be a form where the site visitor can send an email to that staff member ( NOT the system admin ) by providing their email, subject line and comments. So that they staff member knows that the email came from the website the subject line would then be preceded by the name of the site.
Back in the day when I first started with BC ( Before Adobe ) I was successful at doing this for another site... That site has long gone and of course I do not have the files for it so i know it is possible. just cant remember how I did it.

Copy link to clipboard
Copied
Combining the first name and last name into a full name
When I tested this solution the form was sent but when I checked the dashboard the name didn't show. Do I need to add some codes in the BC validation. And what should it be.
Kind regards

Copy link to clipboard
Copied
The only requirement is that the name field has this name:
name="FullName"
Copy link to clipboard
Copied
Dont understand your point Mario.
Copy link to clipboard
Copied
In html every input field has to have a name and the value. They are sent
to the form form processor as key:value pairs. In your case, you need to
create an input field with name="FullName" as a field attribute in order
for it to be pricessed by the web form processor. I hope that makes more
sense
Copy link to clipboard
Copied
Yup, As Mario pointed out and in the original document that is why you have:
<tr> <td><label for="FullName">Full Name <span class="req">*</span></label><br /> <input type="text" name="FullName" id="FullName" class="cat_textbox" maxlength="255" /></td> </tr>
If this is implemented correctly the name will come through. Done this many times on a day to day basis almost 
Copy link to clipboard
Copied
I have done all this. What am asking is, am I going to remove the entire tr areas of the lastName from the code as instructed above. Regards
Copy link to clipboard
Copied
What you said was ...
When I tested this solution the form was sent but when I checked the dashboard the name didn't show. Do I need to add some codes in the BC validation. And what should it be.
Kind regards
It works so you must have not done something correctly, hence our comments. If you just meant you wanted help on how to edit the html then just ask that
Copy link to clipboard
Copied
Ok Liam I need help on how to edit the html. Kind regards
Copy link to clipboard
Copied
go to jsfiddle.com and paste the html of the form of what you have so far and then save and copy the link and paste it here.
Copy link to clipboard
Copied
Ok sir. This is it. http://jsfiddle.net/topelovely/96xsP/
Copy link to clipboard
Copied
You had a script error, scripts sit at the bottom of the BC form as well.
You will notice though in the javascript it was still asking for first name and last name in what you put up. In this fork you can see I putt it at FullName and removed the lastname call. The required request that pops up for non existing fields will have been corrected now.
In terms of the html, what do you want to achieve?
Copy link to clipboard
Copied
Thanks Liam. So so grateful, that is exactly what I was looking for. I know one has to ammend the validation script for it work. (But am not js person.) But earlier in this post the solution provider assumed one should know that the js has to be ammended, which is not often the case for most designers. In the future the resource needs to be updated to help those who require step by step instructions.
In terms of the html, I just want the user to register as usual with limited fields to fill. If their are other possibilities Liam, I will like to learn.
Thanks Liam you are really taking me up the BC ladder.
Just to ask for a favour please. Have you seen this request, I posted it over a week now. http://forums.adobe.com/message/5311855#5311855. Thanks while you look at it.
Copy link to clipboard
Copied
I have updated the document to include informaiton about updating the javascript.

Copy link to clipboard
Copied
Hi: What type of files (extensions) can be uploaded using a form and where do these files go?
Can I upolad graphic files (PSD, EPS, PDF?)
Thanks
Copy link to clipboard
Copied
Thats fine, they go agaisnt the case
Copy link to clipboard
Copied
Is there any way I can make the form's recipient (on the client side) change depending on a selected value within the form itself?
Say there's a dropdown with the options Red, Green, and Blue. If the user selects Red, the form's content is sent to red@example.com, if the user selects Green, it's sent to green@example.com, and so on.
 AdChoices