 Adobe Community
Copy link to clipboard
Copied
Ok, I posted about this earlier in this is a bit of progress.
See video link below.
I need a cylinder rod to move in and out of the cylinder body in a straight linear motion up to limit, so I never want the cylinder rod to go all the way out of the cylinder body, or all the way hidden inside the body.
I think I could add a stick to the cylinder rod, and maybe pins to the cylinder body, but from there, how could I do the rest?
Video here:
https://www.youtube.com/watch?v=L6pcq13i60Y
 1 Correct answer
Sorry, this got out of order. If you get here, now go back up and keep reading the screenshot posts above which continue from here.
Copy link to clipboard
Copied
Cool! Yes, you seem to have the puppet structure correct. Yes, those behavior drop downs are the same, you can use either. I suggest you add a Transform behavior to the rod. I will explain more in a moment.
First thing to understand is you have CH in rig mode. You can do anything there (drag etc) as it is like the editing mode. You cannot stop movement there. You set everything up in this mode, then later you go to the record or stream mode to use it. At that time you drop the puppet into a scene and position it relative to other things in the scene. So don't worry about not stopping things in rig mode. You never want to move things there actually - it can mess things up if you change the artwork later.
What i suggest you do;
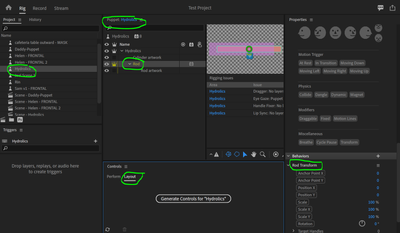
1. Add a 'Transform' behavior to the rod layer
2. Go to record mode and Create a scene and drop the part puppet into the scene. You may have to use the top level transform to scale it smaller to fit. (Click on puppet in timeline panel, look for top level transform behavior in properties panel, change scale value to 50% at a guess)
3. In the record mode, find the second transform you added (you can rename it to make it easier to find) and change the position x value. It should move sideways as you adjust it. Work out the smallest and largest values you want for the rod at the two end positions.
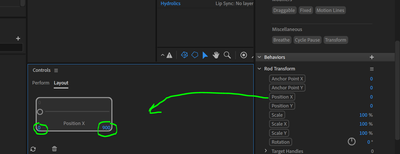
4. Go back to rig mode. Open up the "Controls" panel (you can open it from the windows menu) then select the "layout" tab (next to 'Perform"). Drag the 'position x" label from the properties panel of the transform behavior to the control panel area. This will give you a horizontal slider. There will be a little number in both bottom corners. Click and change the numbers to the min and max values you want for position x from step 3. Using this dragger will then move the rod horizontally, with min and max values.
5. To record in a scene, select the puppet in the timeline, go to perform tab, and drag the slider to move the rod. It will change position x for you, making sure you don't go too far
Copy link to clipboard
Copied
Well..
I seem to be stuck in line 2. of your suggestions.
For some reason the record mode doesn't seem to be loading my video to do any sort of control? Would I need to click on something to make it work?
Check video below.
https://www.youtube.com/watch?v=5qFqT1WB704
Copy link to clipboard
Copied
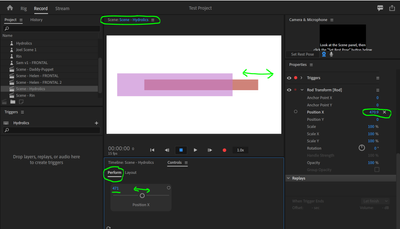
Continuing on from my previous post... in the Scene panel in the middle I want to make sure the rod moves. (If it says "Puppet" in the title in the middle, it is in the wrong window - double click on the scene in the project panel to bring it to the front.) I do this by going to the Rod Transform and adjust the Position X value. I want to see how far I want it to extend. (Fiddle the Scale more of the top Transform if it runs off the edge of the screen.)
So the initial Position X is 0 (the starting point), and for my artwork I want to go up to 900 max for Position X to extend the rod out.
You can just change the Position X by hand, but its a pain to not go too far. To do that, there are "controls" you can use. I double clicked on the puppet again in the project pain, then I had to go to the Windows menu to open the "Controls" window. For me it appeared beneath the center rigging area.
Now we want to select the "Rod" layer in the rigging area, so we can see the Rod Transform properties over to the right.
Next, drag the "Position X" button from the Rod Transform behavior into the Controls panel and drop it there. These will create a slider for you. Then click on the -900 and 900 in the bottom corners and change them to 0 and 900.
Great! Finished the rigging! Double click on the scene in the project panel again. In the Control panel, change over to the "Perform" tab. (The Layout tab is for adding new buttons etc. Perform is for using the controls.) If you drag the slider, the rod will move (in the Scene view, not the rig view). It updates the Position X value. You can just type in the Position X value you want by hand, but the slider makes not possible to slide beyond the limits of 0 and 900.
After that you get into recording etc. There are training videos on that (standard stuff), so I won't describe that here.
Copy link to clipboard
Copied
Ugg. Sorry, I replied to the reply instead of the original message, so my reponses are now out of order. So see other post below first, then come back and read this one (blush).
Copy link to clipboard
Copied
I will try to do a video. You are doing the right things, but i was doing it from memory. The problem was the main screen did not leave the puppet view. There is a scene view you needed to flip to in the main area.
The reason to do the 50% scale is puppets frequently start too big, so you scale them down (as you did, but still looking at the puppet and not the scene). But you need to flip the main panel to the scene window to see the changes take effect.
Copy link to clipboard
Copied
Here are some screenshots that will hopefully help you through the steps.
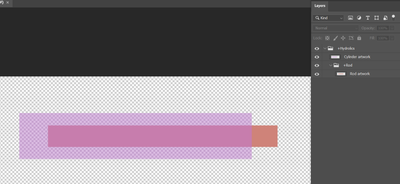
Here is the high quality hydrolics thingy I created.
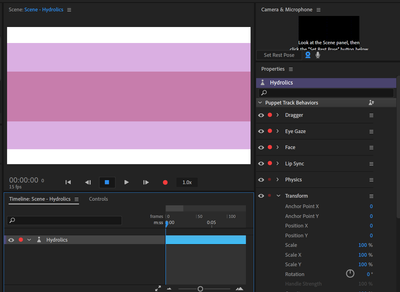
I imported into CH as a puppet (no rigging yet), then clicked the create scene button. See how the artwork is too wide (goes off edge of scene).
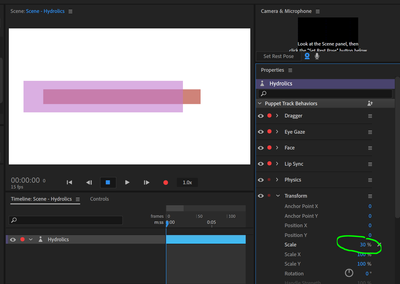
I changed the Transform scale to make it fit in the window. (I had to reduce it to 30%!!)
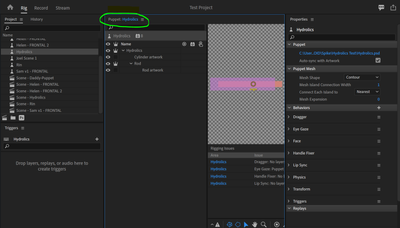
But I have not done the rigging yet, so I double click on the puppet so the middle big area changes from "Scene" to "Puppet".
I added the Transform on the nested layer (like you did correctly) and renamed mine to Rod Transform.
Oh, those little yellow dots - they are handles. Single click on one when in Rig mode and hit the DEL key on your keyboard and it will delete the one you selected.
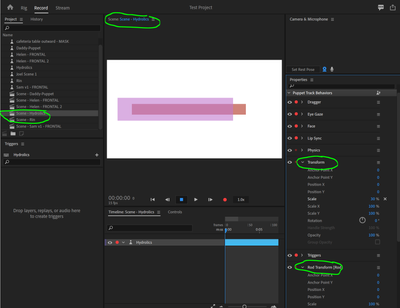
I double clicked on the scene again in the project panel, which goes into Record mode and brings the scene panel back to the front. The timeline is at the bottom, and because I have the puppet selected (which is why you single click on it, if its not selected) - you can see the two transforms over in the right properties panel.
I am going to hit POST here and keep going in a following post - sometimes I hit a size limit 😉
Copy link to clipboard
Copied
Sorry, this got out of order. If you get here, now go back up and keep reading the screenshot posts above which continue from here.
Copy link to clipboard
Copied
I got it!
Thank you.
I was missing the part of loading the file into a scene.
Now I can adjust the rod and move it to diffrent positions for a recoding.
thank you!


