 Adobe Community
- Home
- Dimension
- Discussions
- Decal Around Multiple Sides of Object
- Decal Around Multiple Sides of Object

Copy link to clipboard
Copied
Hello,
I'm trying to wrap a decal around an object in Dimension, but I'm getting some odd results with the decal wrap. The front will scale correctly, but the artwork for the back and sides of the box becomes compressed.
Front (scaled normally)
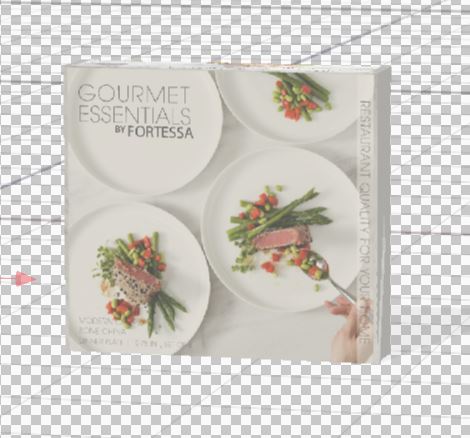
Top (top artwork and back artwork is compressed on to one panel)
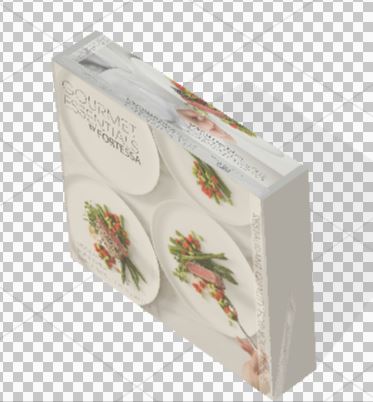
I am currently using the 'cube' model, not the cube box ( got the same results with the cube box, but I assumed that was because the cube box had more 'faces' than my artwork).
Any thoughts on how to resolve this? I'm eager to use Dimension for my organization, but I really need to get these decals sorted!
Peace+Thanks for your help!
Erica SS.


 1 Correct answer

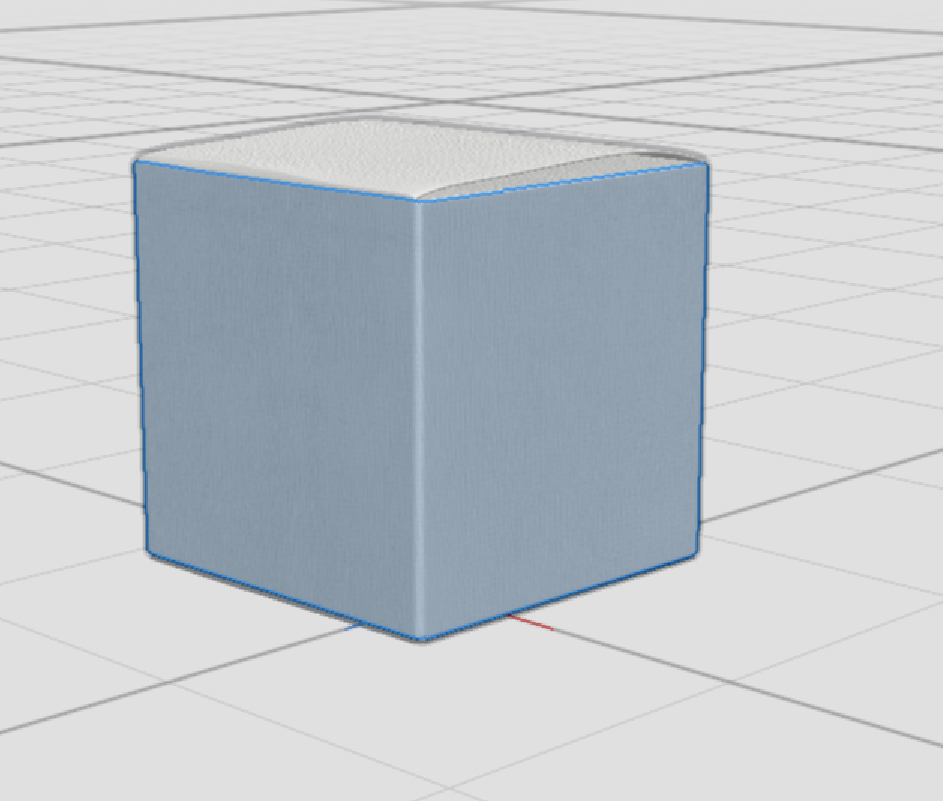
Unfortunately Decals can't really perfectly wrap around sharp corners on multiple sides of an object well. In this case I'd recommend making images per side and assigning them individually. Since there's a limit of 1 decal per material you'd need to do this:
- Add the Cube model to the scene
- Resize the Cube to the box you want to use
- Use the Magic Wand to select each side of the cube
- With a single side selected add a new material from the asset panel (use the white matte or something as your base).
- A
 8
Replies
8
8
Replies
8
Copy link to clipboard
Copied
Unfortunately Decals can't really perfectly wrap around sharp corners on multiple sides of an object well. In this case I'd recommend making images per side and assigning them individually. Since there's a limit of 1 decal per material you'd need to do this:
- Add the Cube model to the scene
- Resize the Cube to the box you want to use
- Use the Magic Wand to select each side of the cube
- With a single side selected add a new material from the asset panel (use the white matte or something as your base).
- Apply a decal to each side.
here's a simple example of what it should look like. In the scene panel you should see multiple material regions and you can have 1 decal applied per region. Here I have 4 regions the Cube Material which is the default (applied to the back and bottom sides) and then 3 copies of the White Matte material which I applied with the magic wand 3 individual times to the front and top sides. Then I applied a decal to each of the front and top sides. If I wanted a shot of the back I would just move my camera and keep magic wand, assign material, apply decal to each side.


In the future we plan to allow multiple decals per material region and better workflows for full wrap designs.

Copy link to clipboard
Copied
Thank you so much! This worked perfectly.

Copy link to clipboard
Copied
Hello,
Jeanette, thanks for the solution but idoesn't work for Cube Box. Magic Wand Tool selects both sides at ones and separate image doesn't work as it scales incorectly. I set correct size of the box. Any clues?
Thanks,
Dominik

Copy link to clipboard
Copied
I' having the same problem with the cube box JeanetteMathews, please respond?
Copy link to clipboard
Copied
Unfortunately there's not much you can do here except try to hold alt and click on the other side to see if the magic wand can deselect part of the current selection. If the angles aren't sharp enough, the magic wand won't distinguish it as two pieces all the time.
In our upcoming release we'll have multiple decal placement. You're welcome to join the Prerelease and download a release build. Please keep in mind you will need to sign an NDA to join the Dimension program as many topics discussed there are future facing.
- Join the Dimension program
- Download the latest build for Mac or Windows

Copy link to clipboard
Copied
What is your suggestion for getting images to fit to the sides of the cube and not overlap? I have a cube, sized the same as my individual pieces of artwork and getting the images to fit perfectly (as they do in your example) is impossible so far.
Copy link to clipboard
Copied

Copy link to clipboard
Copied
Hello! There's an update now which allows you to export an object's UVs.
 AdChoices