 Adobe Community
- Home
- Enterprise & Teams
- Discussions
- How to Customise Acrobat Pro DC 19 when using Name...
- How to Customise Acrobat Pro DC 19 when using Name...

Copy link to clipboard
Copied
Our client has Named User Licensing, managed in the Adobe CC portal.
We have downloaded Adobe Acrobat DC Pro from the portal and run in to the problem that the Adobe Customization Wizard does not work when you are using Named User Licensing. Adobe support have advised that only works with Serial Licensing.
We need to put customisation in to the mass deployment such as disabling cloud storage plugins and adding web sites to Privileged Locations. Has anyone been able to do this without switching their licensing?
I am hoping the solution is not to try to export the convoluted mess of HKLM and HKCU settings from the registry and deploy that alongside the MSI.


 1 Correct answer

First, whoever told you that the Adobe Customization Wizard DC does not work with Named User Licensing was WRONG.
The whole process remains pretty much the same as it has always been with customizing a Creative Cloud installation. You modify the Acrobat installation files and then there is one new caveat that possibly needs to be added if you want the previous version of Acrobat to be removed.
Steps
1. In the Adobe Customization Wizard DC, you got to File>Open and navigate to the root of the Acr
... 2
Replies
2
2
Replies
2
Copy link to clipboard
Copied
First, whoever told you that the Adobe Customization Wizard DC does not work with Named User Licensing was WRONG.
The whole process remains pretty much the same as it has always been with customizing a Creative Cloud installation. You modify the Acrobat installation files and then there is one new caveat that possibly needs to be added if you want the previous version of Acrobat to be removed.
Steps
1. In the Adobe Customization Wizard DC, you got to File>Open and navigate to the root of the Acrobat DC install files as pictured below:
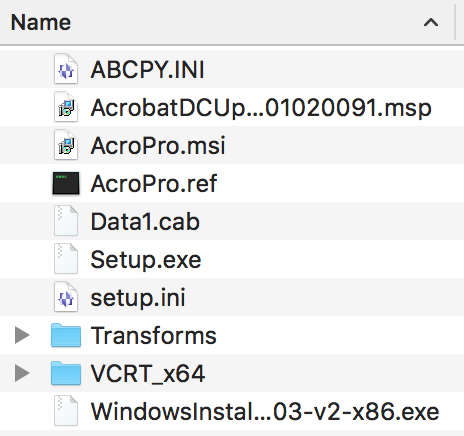
2. Select the file "AcroPro.msi" and click Open.
3. In the Adobe Customization Wizard DC User Interface make your customizations for the package.
4. Save your customizations either by using File>Save or clicking the "Save" button.
5. EXTRA STEP: Now if you want to make sure the previous version of Acrobat XI gets removed in the installation, then you have to change one thing in the file "proxy.xml". It uses the installer property “REMOVE PREVIOUS” and it is set explicitly to “NO”. That will leave the previous version still installed. In order to remove the previous version of Acrobat the value needs to be set to "YES".
<?xml version="1.0" encoding="UTF-8"?>
<PayloadInfo>
<BuildInfo>
<Property name="Created">2015-01-14</Property> <!-- Enter created date -->
<Property name="ProcessorFamily">All</Property> <!-- All: for both 32-bit and 64-bit OS; x64: For 64-bit OS only -->
</BuildInfo>
<InstallerProperties>
<Property name="ProductName">Adobe Acrobat DC</Property> <!-- Enter product name here (Display Name) -->
<Property name="ProductVersion">19.012.20034</Property> <!-- Enter product version format x.x.x.x -->
</InstallerProperties>
<InstallDir>
<Platform folderName="" isFixed="0" name="Default">[AdobeProgramFiles]</Platform>
</InstallDir>
<Languages languageIndependent="1" />
<AppLaunch path="[INSTALLDIR]\Acrobat DC\Acrobat\Acrobat.exe" /> <!-- Enter application path which will be launched -->
<LicensingEntities>
<LicensingEntity name="V7{}AcrobatCont-12-Win-GM">1</LicensingEntity>
</LicensingEntities>
<NGLLicensingInfo>
<AppId>AcrobatDC1</AppId>
<AppVersion>12.0</AppVersion>
<LibVersion>1.9.0.2</LibVersion>
<ImsClientId>ngl_acrobat_dc1</ImsClientId>
<ImsAppProfileScope>acrobatdc1</ImsAppProfileScope>
</NGLLicensingInfo>
<InstallDestinationMetadata relocatableSize="" sysDriveSize="">
<Destination>
<Root>[INSTALLDIR]</Root>
<TotalSize>3002445952</TotalSize>
<MaxPathComponent>[AdobeCommon]\Acrobat\DC\Linguistics\Providers\Plugins2\AdobeHunspellPlugin\Dictionaries\de_CH\2006\README_extension_owner.txt</MaxPathComponent>
</Destination>
</InstallDestinationMetadata>
<ConflictingProcesses> <!-- Optional tag: Enter list of conflicting process which are shown during time of installation incase they are running; See more at WIKI -->
<!-- Enter blocking="1" if you want the running application be closed before installation -->
<!-- Enter NonAdobe="1" if the running application is not owned by Adobe e.g. outlook.exe -->
<Win32>
<Process blocking="1" processType="NonAdobe">[Ww][Ii][Nn][Ww][Oo][Rr][Dd]\.[Ee][Xx][Ee]</Process>
<Process blocking="1" processType="NonAdobe">[Ww][Ii][Nn][Pp][Rr][Oo][Jj]\.[Ee][Xx][Ee]</Process>
<Process blocking="1" processType="NonAdobe">[Nn][Ee][Tt][Ss][Cc][Pp]\.[Ee][Xx][Ee]</Process>
<Process blocking="1" processType="NonAdobe">[Ee][Xx][Cc][Ee][Ll]\.[Ee][Xx][Ee]</Process>
<Process blocking="1" processType="NonAdobe">[Vv][Ii][Ss][Ii][Oo]\.[Ee][Xx][Ee]</Process>
<Process blocking="1" processType="NonAdobe">[Pp][Oo][Ww][Ee][Rr][Pp][Nn][Tt]\.[Ee][Xx][Ee]</Process>
<Process blocking="1" processType="NonAdobe">[Oo][Uu][Tt][Ll][Oo][Oo][Kk]\.[Ee][Xx][Ee]</Process>
<Process blocking="1" processType="NonAdobe">[Mm][Ss][Aa][Cc][Ee][Ss][Ss]\.[Ee][Xx][Ee]</Process>
<Process blocking="1" processType="NonAdobe">[Ff][Oo][Rr][Mm][Dd][Ee][Ss][Ii][Gg][Nn][Ee][Rr]\.[Ee][Xx][Ee]</Process>
<Process blocking="1" processType="NonAdobe">[Aa][Cc][Aa][Dd]\.[Ee][Xx][Ee]</Process>
<Process blocking="1" processType="Adobe">[Aa][Cc][Rr][Oo][Bb][Aa][Tt]\.[Ee][Xx][Ee]</Process>
</Win32>
</ConflictingProcesses>
<FailureMoreInfo Type="REG" >
<RegKey Key="HKEY_LOCAL_MACHINE\SOFTWARE\Adobe\Setup\Reader" >
<LogTime name="LogTime" type="REG_DWORD" /> <!-- Time at which this registry was written. Can be used to ensure that it is valid -->
<ErrorCode name="ExitCode" type="REG_DWORD" /> <!-- Error code raised during installation -->
<ErrorMessage name="ErrorText" type="REG_SZ" /> <!--String to be displayed. It is already localized -->
<ErrorLocale name="ErrorLanguage" type="REG_SZ" /> <!--1033,1034, 2015 etc. -->
</RegKey>
</FailureMoreInfo>
<ThirdPartyComponent>
<Metadata>
<Type>application</Type> <!-- other options: msiPackage, applePackage-->
<Name>Adobe Acrobat\Setup.exe</Name> <!-- Enter msi/pkg/exe file name which will be launched by the AAM installer -->
<Properties>
<!-- This attribute ProductCode used for win MSI only -->
<Property name="ProductCode">{AC76BA86-1033-FFFF-7760-0C0F074E4100}</Property>
</Properties>
</Metadata>
<Arguments prefix="" delimiter=""> <!-- Optional: Mostly used for application based installers but can be paased to MSI and pkg also. See more at <WIKI>-->
<Install>
<Argument name="/sALL"></Argument>
<Argument name="/sPP"></Argument>
<Argument name="/re"></Argument>
<Argument name="/sMutexTimeout"></Argument>
<Argument name=""5""></Argument>
<Argument name="/sl"></Argument>
<Argument name=""[installLanguage]""></Argument>
<Argument name="/msi"></Argument>
<Argument name="INSTALLDIR=">[INSTALLDIR]\Acrobat DC</Argument>
<Argument name="EULA_ACCEPT=">"YES"</Argument>
<Argument name="SUITEMODE=">1</Argument>
<Argument name="OWNERSHIP_STATE=">1</Argument>
<Argument name="LANG_LIST=">"[installLanguage]"</Argument>
<Argument name="AS_DISABLE_LEGACY_COLOR=">1</Argument>
<Argument name="IGNOREAAM=">1</Argument>
<Argument name="REMOVE_PREVIOUS=">NO</Argument>
</Install>
<Repair>
<Argument name="/sALL"></Argument>
<Argument name="/sPP"></Argument>
<Argument name="/re"></Argument>
<Argument name="/sl"></Argument>
<Argument name=""[installLanguage]""></Argument>
<Argument name="/msi"></Argument>
<Argument name="SUITEMODE=">1</Argument>
<Argument name="OWNERSHIP_STATE=">1</Argument>
<Argument name="LANG_LIST=">"[installLanguage]"</Argument>
<Argument name="AS_DISABLE_LEGACY_COLOR=">1</Argument>
<Argument name="IGNOREAAM=">1</Argument>
<Argument name="REINSTALL=">ALL</Argument>
</Repair>
</Arguments>
<SuccessCodes> <!-- Mostly for application based installers -->
<Install> <!-- Optional tag: -->
<Range lowerBound="0" upperBound="0"/>
<Range lowerBound="3010" upperBound="3010"/>
</Install>
</SuccessCodes>
<Capabilities>
<Repair isRepairable="1"/> <!-- set it to 1 to support product repair/re-install -->
<Uninstall isUninstallable="1"/> <!-- set it to zero to disable uninstall -->
</Capabilities>
</ThirdPartyComponent>
</PayloadInfo>
6. Done.
Copy link to clipboard
Copied
Thank you for your reply.
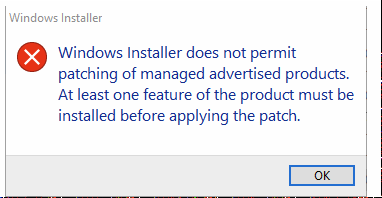
I had tried those steps after Adobe told me that the Wizard doesn't work in Named User Licensing mode. I hit the below error and assumed that it's just because it's not meant to work.
Windows Installer
 Windows Installer does not permit
 patching of managed advertised products.
 At least one feature of the product must be
 installed before applying the patch.
Following your reply I have revisited this. I ran the Adobe Cleanup Wizard and ticked Acrobat on my test machine. After the reboot I was able to deploy Acrobat DC using an mst using the command below
Setup.exe /sAll - with the AcroPro.mst sat in the same folder as AcroPro.msi.
So your answer is indeed correct and Adobe support had misinformed me! Unfortunately my test machine was clearly corrupt as well which added to my confusion.
Extra things I found for anyone else doing this:
- I had to use the English North America language option when creating the package in Adobe Creative Cloud. English International failed on my British English based devices.
- I had to make sure that the Setup.ini file had the below line in the [Product] section otherwise the Setup.exe wouldn't call the .mst during the install. I know I can redo the command using msiexec with the TRANSFORMS option but I didn't want to play about again with this already massively delayed deployment once I'd got it working!
CmdLine=TRANSFORMS="AcroPro.mst"

 AdChoices