• Global community
    • Language:
      • Deutsch
      • English
      • Español
      • Français
      • Português
  • 日本語コミュニティ
    Dedicated community for Japanese speakers
  • 한국 커뮤니티
    Dedicated community for Korean speakers
Exit
0

Clipping Mask Help

New Here ,
Apr 02, 2022 Apr 02, 2022

Copy link to clipboard

Copied

Hello, I've tried watching countless tutorials but still can't get this to work. I'm simply trying to the make the blue text, have the gradient that can be seen in the rectangle behind it. Nothing will work though. Please help.

TOPICS
Draw and design , Tools

Views

174

Translate

Translate

Report

Report
Community guidelines
Be kind and respectful, give credit to the original source of content, and search for duplicates before posting. Learn more
community guidelines
Adobe
Community Expert ,
Apr 02, 2022 Apr 02, 2022

Copy link to clipboard

Copied

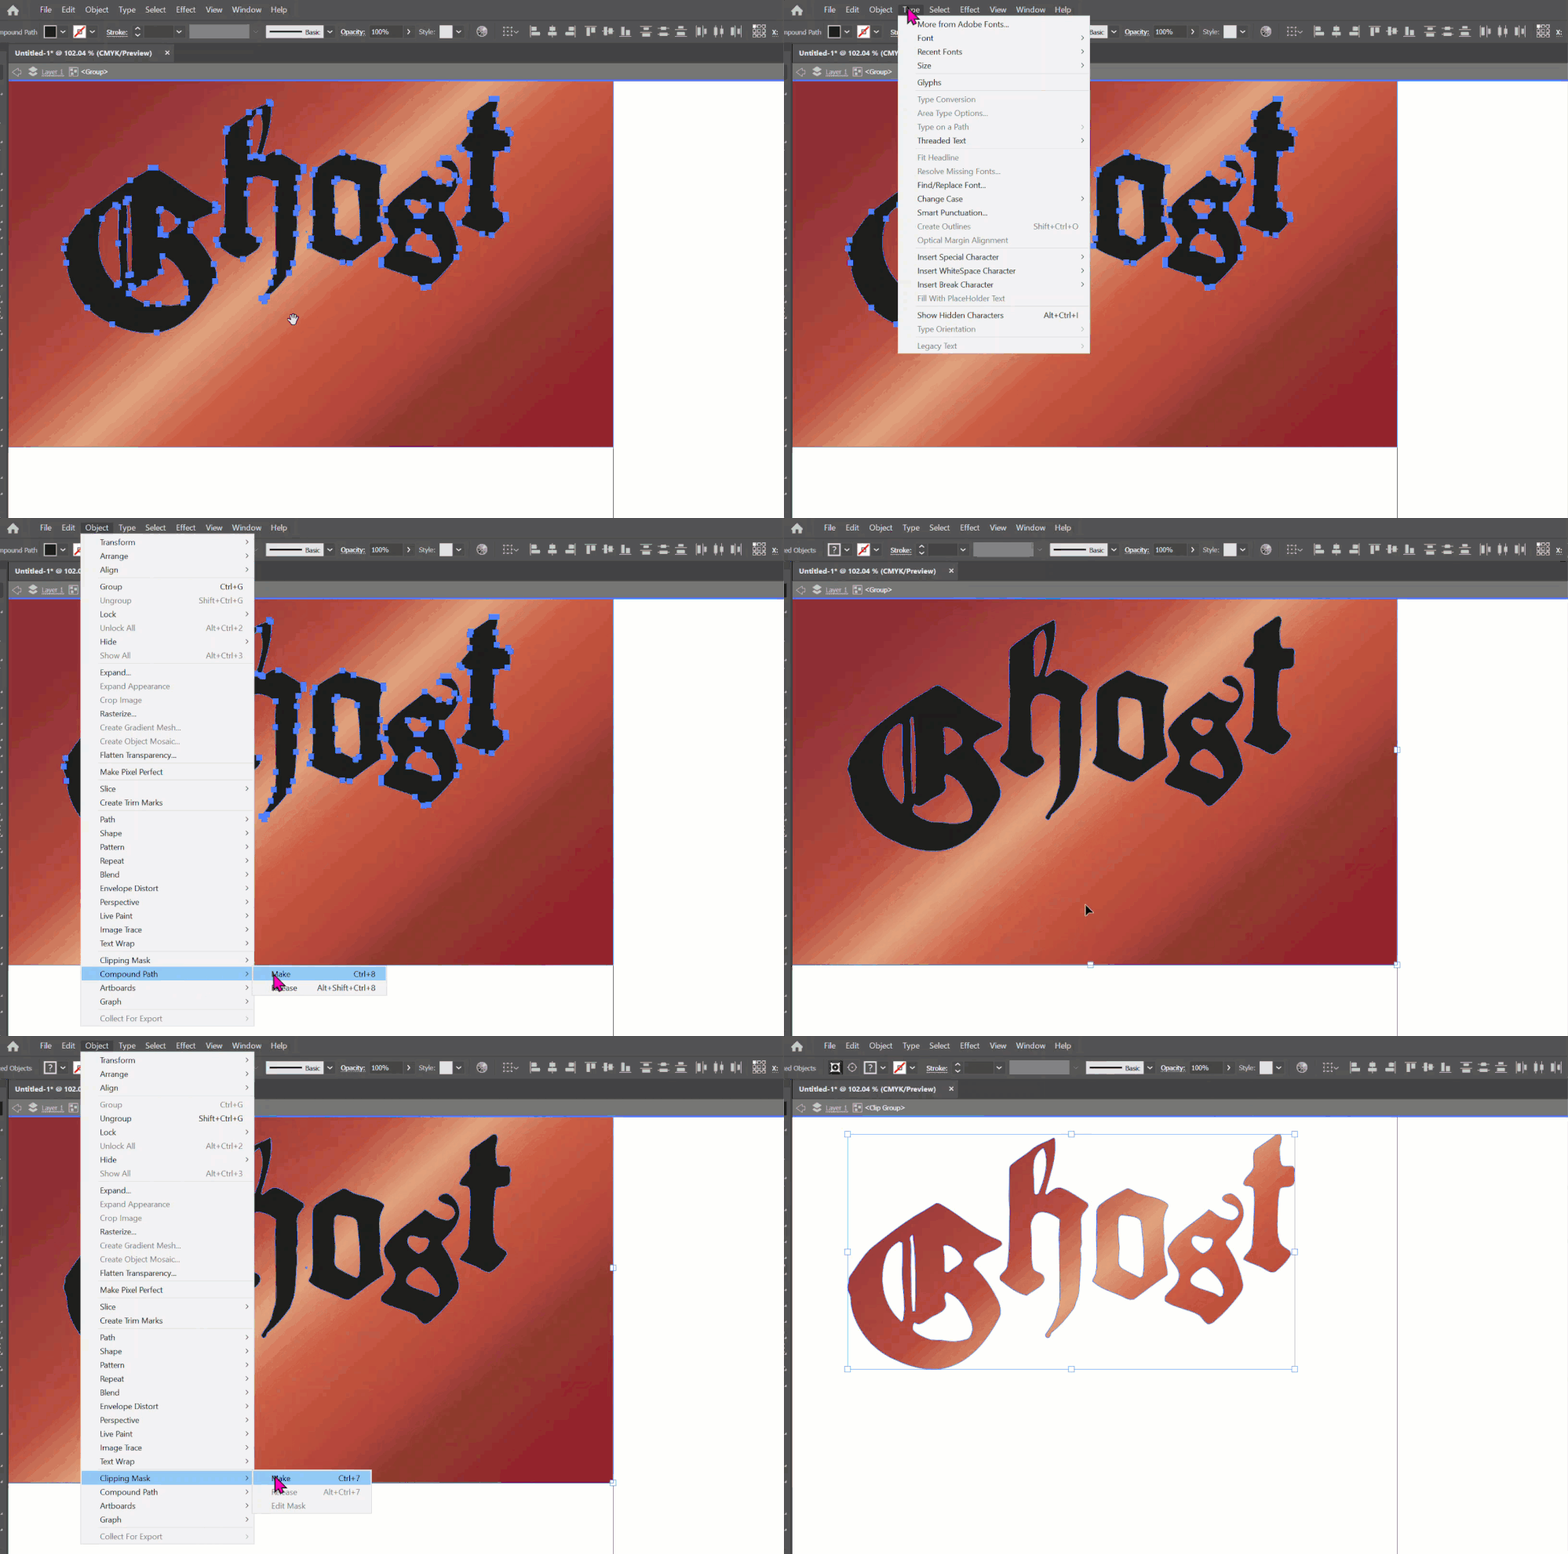
Try selecting all the blue elements and choosing Object > Compound Path > Make.

Select the result and the gradient in the back and choose Object > Clipping Mask > Make.

Votes

Translate

Translate

Report

Report
Community guidelines
Be kind and respectful, give credit to the original source of content, and search for duplicates before posting. Learn more
community guidelines
Community Expert ,
Apr 02, 2022 Apr 02, 2022

Copy link to clipboard

Copied

Ethan,


Based on my (mis)interpretation of the screenshot:


You need to have the text (in Layer 4) above the gradient (in Layer 2), so switch their positions in the stacking order, and also to select both.


Then it ought to work.


Edit, after reading the answer by Ton and having a proper look at the text: Text can be live Type or Outlined Type; I just realized that it must be the latter with further elaboration or custom made as paths, in which case it needs to be turned into a single (compound) path to work as a Clipping Path, just as Ton said.


Edit edit: Hi Ton.


Votes

Translate

Translate

Report

Report
Community guidelines
Be kind and respectful, give credit to the original source of content, and search for duplicates before posting. Learn more
community guidelines
Community Expert ,
Apr 02, 2022 Apr 02, 2022

Copy link to clipboard

Copied

If I understand what you want correctly, this is what @Ton Frederiks was instructing:

(Note: I did not try to match your design.)

2022-04-02_17-17-13.gif

David Creamer: Community Expert (ACI and ACE 1995-2023)

Votes

Translate

Translate

Report

Report
Community guidelines
Be kind and respectful, give credit to the original source of content, and search for duplicates before posting. Learn more
community guidelines
Community Expert ,
Apr 02, 2022 Apr 02, 2022

Copy link to clipboard

Copied

Looking at your screen grab, it looks like your blue text is NOT vector-based. It appears to be a raster, in which case you cannot do what you want in Illustrator. If you don't have vector at all, you'd be better of doing what you want in Photoshop.

Votes

Translate

Translate

Report

Report
Community guidelines
Be kind and respectful, give credit to the original source of content, and search for duplicates before posting. Learn more
community guidelines
Community Expert ,
Apr 03, 2022 Apr 03, 2022

Copy link to clipboard

Copied

LATEST

Ethan,


To begin with I decided to spare you the Opacity Mask way, which requires a full black or white to work, but it can be (more) relevant with the text part as raster as keenly seen by Brad, if you wish to work in AI (and keep as much as possible as vector artwork).


You can change the colour of the text part to black, directly as vector (after an Image Trace), or as raster in PS and bringing it back into AI, then use Opacity Mask with both Clip and Invert Mask ticked (Invert mask unticked if white), no matter whether the clipped artwork is raster or vector.


Edit: Hi Brad.


Votes

Translate

Translate

Report

Report
Community guidelines
Be kind and respectful, give credit to the original source of content, and search for duplicates before posting. Learn more
community guidelines