


Copy link to clipboard
Copied
For technical CAD drawings, the stroke of an object is dotted when it is placed behind or inside a mass.
Is there a feature or plugin that will adaptively change the appearance of lines from solid to dotted depending on it's arrangement (forward/backwards).
Manually changing the appearance to a dotted line is very tedius when the drawing is complicated and the subject is only partially hidden.
Example: imagine changing the position of 2 circles of a ven diagram and repeatedly cutting and joining the lines accordingly. I am looking for a solution that will allow the red circle to remain joined as 1 connected path.


 1 Correct answer

defaultt,
You need two of each, one as the default appearance and one to enter the Knockout Group, and the one that serves as the mass object needs to be at the top (obvioulsy, since the others are behind it), in this case the black one; and all paths have a stroke and no fill.
You can use the following steps, making sure the black one is at the top:
1) For the black path, select and Ctrl/Cmd+C+F (hold Ctrl/Cmd and press C then F) to create a copy in front, then lock the copy in the Layers
...Explore related tutorials & articles
 5
Replies
5
5
Replies
5

Copy link to clipboard
Copied
You can use Live Paint objects.
Copy link to clipboard
Copied
defaultt,
Illy (job description Adobe Illustrator) can always come up with a sillier way, and she is always eager to help.
Here is a sample of a Knockout Group way where any or all of can be moved round freely, with red and blue lines dotted inside the black one at any time.
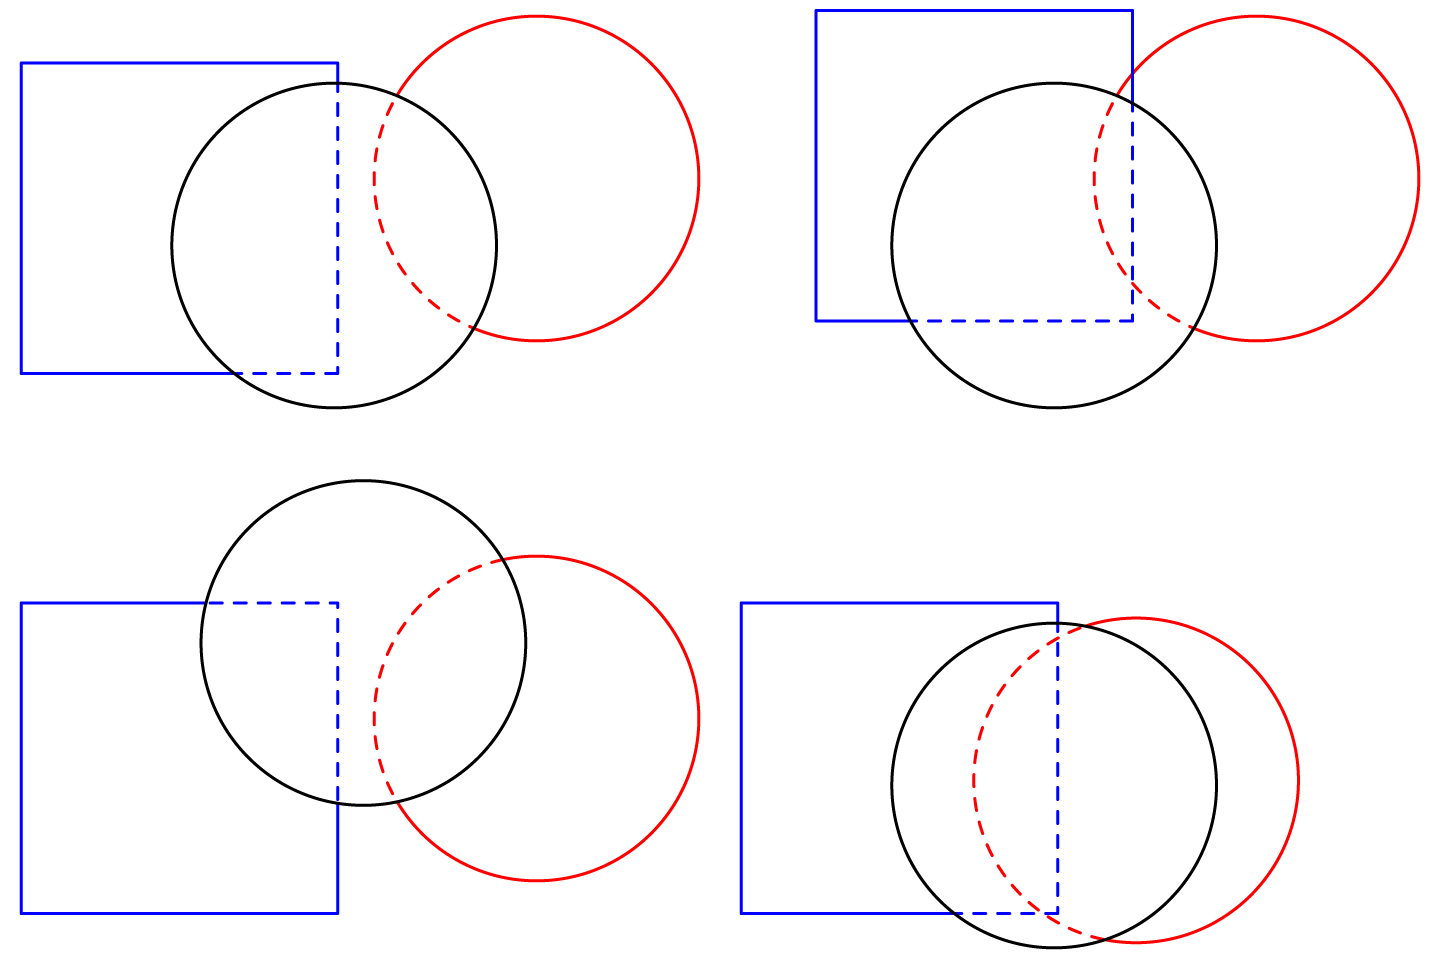
Click to get closer
Copy link to clipboard
Copied
This looks promising in terms of what I'm looking for, but can you direct me to some step-by-step instructions re: knockout groups?
Copy link to clipboard
Copied
defaultt,
You need two of each, one as the default appearance and one to enter the Knockout Group, and the one that serves as the mass object needs to be at the top (obvioulsy, since the others are behind it), in this case the black one; and all paths have a stroke and no fill.
You can use the following steps, making sure the black one is at the top:
1) For the black path, select and Ctrl/Cmd+C+F (hold Ctrl/Cmd and press C then F) to create a copy in front, then lock the copy in the Layers palette (with the Layer expanded); this is the selected path, so easy to find;
2) Select the unlocked original from 1), then switch from stroke to fill, then set the Opacity to 0 in the Transparency palette;
3) For the other paths (red and blue and whichever additional paths you wish), select and Ctrl/Cmd+C+B (hold Ctrl/Cmd and press C then B) to create a copy in back, then lock the copy in the Layers palette (with the Layer expanded); this is the selected path, so easy to find;
3) For each of the other paths, ClickDrag over it with the Direct Selection Tool and apply Dashed Line as desired (you can hide the locked duplicate to see);
4) Select all the non selected paths and Ctrl/Cmd to form the Group, then tick Knockout Group in the Transparency palette enough times until you have a full tick mark;
5) Unlock all locked paths in the Layers palette; now you are ready to move;
To move any of the path sets round freely:
6) With the Direct Selection Tool, Alt/OptionClickDrag (hold Alt/Option and ClickDrag) over the path set(s) you wish to move to select it, making sure to avoid selecting other path sets that need to stay in place, then ClickDrag the path set(s) by any segment/Anchor Point to move to the desired position.
In 6), you can select multiple path sets (such as the red and blue one, avoiding the black one), so they are moved in the same way.
If you are unable to select all path sets you wish to move in the same way at the same time in 6), you can use ShiftAlt/OptionClickDrag (hold both Shift and Alt/Option and ClickDrag) to select the path sets in multiple steps.
The Alt/Option lets you select whole paths.
The Shift lets you select more path sets together; you can skip it for the first set, but it is simpler and safer to use it throughout.

Copy link to clipboard
Copied
Select both circle shapes (with no dashed lines applied). Go to Pathfinder/Outline. This breaks the lines up into 6 arcs including where they intersect. Using the direct selection arrow tool click on the arc section to apply a red dashed stroke. Then, use the direct selection arrow tool to select the remaining arcs to apply a solid black or red stroke.

 AdChoices