• Global community
    • Language:
      • Deutsch
      • English
      • Español
      • Français
      • Português
  • 日本語コミュニティ
    Dedicated community for Japanese speakers
  • 한국 커뮤니티
    Dedicated community for Korean speakers
Exit
0

How was this image made

New Here ,
Feb 14, 2022 Feb 14, 2022

Copy link to clipboard

Copied

240-2401353_ftestickers-usa-flag-usaflag-independence-independenceday-jeep-hd.png

Views

106

Translate

Translate

Report

Report
Community guidelines
Be kind and respectful, give credit to the original source of content, and search for duplicates before posting. Learn more
community guidelines

correct answers 1 Correct answer

Community Expert , Feb 14, 2022 Feb 14, 2022

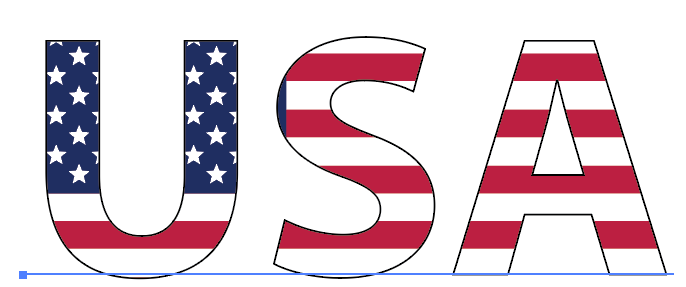
Put the text on top of a flag illustration or image.

image.png

Select everything.

Choose Object >  Clipping Mask > Make.

image.png

Deselect.

With the white Direct Selection tool, click on the text. When selected it should look like this with an underline. Click the Stroke icon in the Swatches or Color panel and change the stroke to black.

image.png

Use the Stroke panel to increase the weight of the stroke.

 

Votes

Translate

Translate
Adobe
Community Expert ,
Feb 14, 2022 Feb 14, 2022

Copy link to clipboard

Copied

In this tutorial I'll be demonstrating how you can use a photo to make a clipping mask with text in Illustrator. It will create the appearance that your text is made of a photo. We'll also be utilizing a simple trick to make a pop-out effect where it appears as if certain areas of the ...

Votes

Translate

Translate

Report

Report
Community guidelines
Be kind and respectful, give credit to the original source of content, and search for duplicates before posting. Learn more
community guidelines
Community Expert ,
Feb 14, 2022 Feb 14, 2022

Copy link to clipboard

Copied

LATEST

Put the text on top of a flag illustration or image.

image.png

Select everything.

Choose Object >  Clipping Mask > Make.

image.png

Deselect.

With the white Direct Selection tool, click on the text. When selected it should look like this with an underline. Click the Stroke icon in the Swatches or Color panel and change the stroke to black.

image.png

Use the Stroke panel to increase the weight of the stroke.

 

Votes

Translate

Translate

Report

Report
Community guidelines
Be kind and respectful, give credit to the original source of content, and search for duplicates before posting. Learn more
community guidelines