 Adobe Community
- Home
- Illustrator
- Discussions
- Layered strokes producing unwanted spikes
- Layered strokes producing unwanted spikes
Layered strokes producing unwanted spikes
Copy link to clipboard
Copied
Hey guys, self-taught semi-newbie here. I am working on adding outside stroke layers to text and found a video that showed me how to layer the strokes since I cannot add an outside stroke (I tried changing the text to outlines and still couldn't add an outside stroke). I added three strokes and made each one bigger to pop out from behind the main text. When I started to enlarge the strokes I noticed spikes protruding out from odd places (see photo). Any advice on ridding myself of them?
Like I said, I'm pretty self-taught and not super advanced in my abilities. Thanks in advance!
Explore related tutorials & articles
Copy link to clipboard
Copied
What happens if you lower the miter limit in the Stroke panel? Or change the Corner join to round?
Copy link to clipboard
Copied
Thank you for responding! I didn't see any noticeable change when I altered those.
Copy link to clipboard
Copied
Nevermind! I was doing the miter limit wrong, I think this solved it!
Copy link to clipboard
Copied
… or try to use in Appearance Panel new fills with Offset Path Effect (instead of strokes)
Copy link to clipboard
Copied
Cory, Hi.
Since you mentioned you are a newbie, here is the way I would do it.
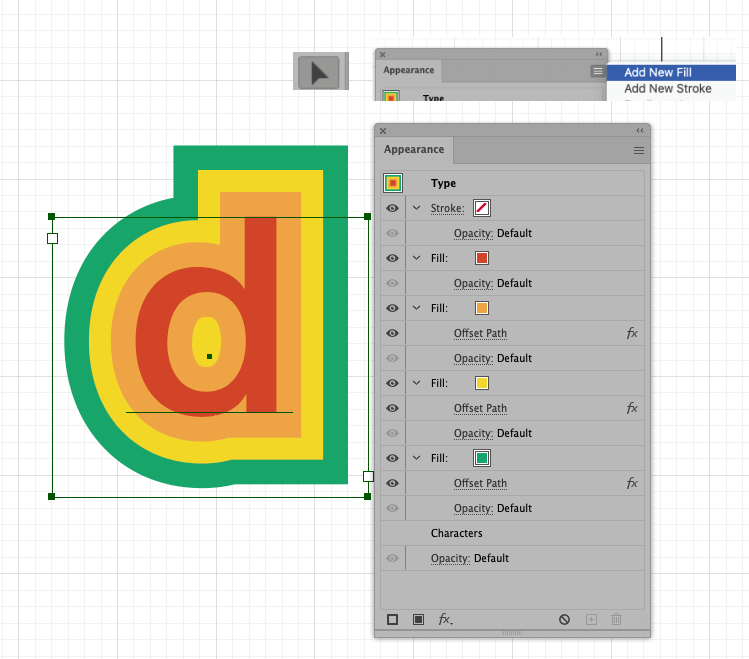
I’m working with Live Type, Fills, with Effects>Path>Offset. EZ edits!!!
Open up your Appearance Panel
With Text Tool, set your type. Fill it with none.
Switch to the Selection Tool.
In the Appearance Panel, Fly out menu, Add new Fill. (Red)
Again, Add new Fill. (Orange) Move below (Red). Give it an Offset
Do the same for the yellow and green.
You can save it as a Graphic Syle also. So anything you type (or shapes), will have the same Fills and Offset.
One last tip, Before outlining your type, ALWAYS save the original, just duplicate it and lock your original type.
K


