 Adobe Community
- Home
- Illustrator
- Discussions
- Michael, You can use that old way still"to creat...
- Michael, You can use that old way still"to creat...

Copy link to clipboard
Copied
Can someone explain to me the best way to draw wires? I think it would probably be to use a stroke and apply gradients/effects to it.
I need to draw loads of thin bendy wires that have shading, so that going down the middle of the wire it's lighter, and the sides fade into a darker colour to make the wire look less flat. Example: http://www.dansdata.com/images/io030/wire280.jpg
Are there also any brushes that can be used to do this? I've looked for downloadable brushes like this but surprisingly cant find anything for something so basic.


 1 Correct answer

Sorry, Beany.
Here is a fuller answer:
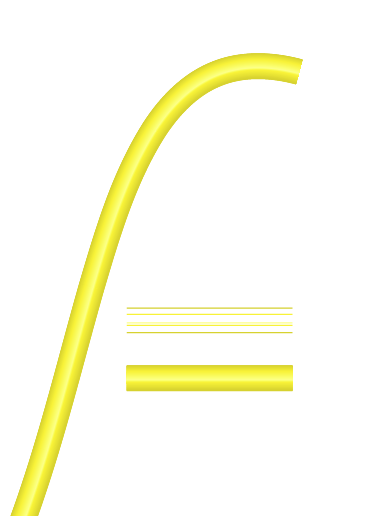
1) Create a fill/no stroke rectangle with a height corresponding to the thcikness and a colour corresponding to the colour at the edges;
2) Copy and Paste it in front, change the colour to the hoighlight colour (which may be white), reduce the height to a small value (depending on the intended shininess of the highlight), and position it where you want the highlight if off centre;
3) With both selected, Object>Blend>Make;
4) Drag the blend to the New Brush b
...Explore related tutorials & articles
 16
Replies
16
16
Replies
16
Copy link to clipboard
Copied
Beany,
For a simple gradient across, you may use an Art Brush based upon a blend made between two rectangles:
1) Create a rectangle with a height corresponding to the thcikness and a colour corresponding to the colour at the edges;
2) Copy and Paste it in front, change the colour to the hoighlight colour (which may be white), reduce the height to a small value (depending on the intended shininess of the highlight), and position it where you want the highlight if off centre;
3) With both selected, Object>Blend>Make.
For more complicated appearances, there is more to do.
Copy link to clipboard
Copied
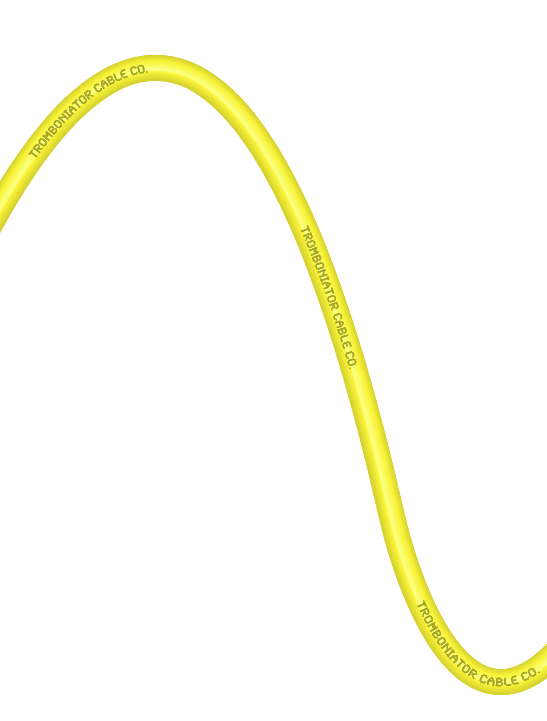
Here's a somewhat more complicated example of what Jacob is talking about, using a blend of line segments with 1 pt. stroke of varying shades of yellow, and spaced to give a sort of 3D appearance. Select the line segments, then Object>Blend>Make and Object>Blend>Blend Options>Smooth Color. In the Brushes panel make it an art brush or pattern brush, depending on how you want to use it.
Peter
Copy link to clipboard
Copied
Thanks for all the help.
Trombinator - you're example is the best for what i need to do, but i cant get a smooth colour gradient. You can see the steps in it... 
And the thinner the wire is, the more the colour steps are apparent, because they dont get smaller when the wire is resized. When selecting Smooth Colour in the blend options it does not affect it. But i've noticed when bending any of the lines it suddenty makes the gradient perfectly smooth... so this might not be a problem once i've shaped the wire. But how did you bend the wire in your images?
Thanks.
Copy link to clipboard
Copied
Beany,
I presume you know the length i arbitrary when you create the Brush (presuming your not ticking the Proportional option), baecause it stretches fit fit).
And Peter just applies the brushes to curvy paths made with the Pen (or other) tool, as does James.
By the way, in the first post I failed to mention that the rectangles should be fill/no stroke; that is the other simple way of making the blend.
Copy link to clipboard
Copied
Sorry i'm a bit lost here... Are you saying i can turn lines or rectangles that i've blended into a Brush? how would i do that? because that would make things a lot easier if i can then just use the pen tool to draw them...
Copy link to clipboard
Copied
Sorry, Beany.
Here is a fuller answer:
1) Create a fill/no stroke rectangle with a height corresponding to the thcikness and a colour corresponding to the colour at the edges;
2) Copy and Paste it in front, change the colour to the hoighlight colour (which may be white), reduce the height to a small value (depending on the intended shininess of the highlight), and position it where you want the highlight if off centre;
3) With both selected, Object>Blend>Make;
4) Drag the blend to the New Brush button at the bottom of the Brushes palette/panel, select Art Brush for a simple brush, give it a name, and leave the default options (not Proportional).
Now you can select any path and apply the brush to it.
For other appearances, you may use other options such as varying width (you may create paths that are pointed at the ends or many other shapes).
You should be aware that only certain objects can used for brushes; notably you have to use a blendinstead of a gradient (you will get an error message about elements that canot be used).
Copy link to clipboard
Copied
Cheers Jacob, you've been very helpful and that works great!
Copy link to clipboard
Copied
You are welcome, Beany.
Copy link to clipboard
Copied
Hi Jacob
Thank you for this simple but effective way of creating a cable for a Brush. However, I've got a job with underground curving cables in a cut-away and wondered if there was a way to create a Brush for curved path so that it can be applied to any stroked path or is that asking the impossible. Any guidance greatly appreciated.
Michael

Copy link to clipboard
Copied
Please show a sketch of this.
Copy link to clipboard
Copied
Thanks Monica. As you'll see in my reply to Jacob, I hadn't fully read his directions.
Many thanks for getting back, though.
Michael
Copy link to clipboard
Copied
Michael,
You can use that old way still"to create a Brush for curved path so that it can be applied to any stroked path", but I suspect some additional requirements or special appearances/conditions; in any case I agree with Monika that a sketch would be good.
Some special appearances appear in the posts by Peter at Tromboniator Cable Co, and by James, including special ends which may be able to suit the "in a cut-away" part.
Apart from that, at least for simple cases, new means have appeared in the decade that has (almost) passed (gradient across the stroke just to mention one), but I believe your case may require customized solutions.
Copy link to clipboard
Copied
Hi Jacob
Completely missed the saving it as an Art Brush – it made all the different! Just shows one should always read things properly. Anyway it works for what I need it to do. So many thank you for the tip. and support. Great forum – so many thoughtful people.
Michael
Copy link to clipboard
Copied
For my part you are welcome, Michael.
Copy link to clipboard
Copied
Beany,
And, in addition to what Peter said, you want the relative crossways position of the highlighting to vary, you may use wavy internal paths instead of straight ones, and if you want the overall colouring to vary, you may use colour blending along the brush; both may support the appearance of a wavy wire.
Was this too easy to understand?

Copy link to clipboard
Copied
BYOB. (Build Your Own Brushes)
{return A.apply(null,[this].concat($A(arguments)))}")
TechBrushes.jpg
JET

 AdChoices