 Adobe Community
- Home
- Illustrator
- Discussions
- Betreff: Duplicate image around an oval shape
- Betreff: Duplicate image around an oval shape
Duplicate image around an oval shape

Copy link to clipboard
Copied
Hello everyone. I am a brand new user of Illustrator but I am familiar with Photoshop. I watched a video on how to duplicate an image around a circle but I would like to do the same thing around an oval shape. When I try to do it the same way as the circle, the whole oval rotates as well which tells me the circle and the image are actually duplicating as well but you just can't see it. Is there a way to duplicate an image around an oval?
Thanks for your help.
David


Explore related tutorials & articles
 13
Replies
13
13
Replies
13

Copy link to clipboard
Copied
Could you perhaps show a screenshot of what you want?
Also: is this image vector or raster?
Copy link to clipboard
Copied

So here is my very first try. I watched a tutorial and was able to do this. The house picture is from clipart from Google images. I am using a different house but still from Google images clipart. I made the circle and and did the duplicate thing then put the text in. I would like to attempt the same idea only using an oval instead. Thank you for responding so quickly as this is for a customer. I told them I am no graphic designer and that I am learning a new program so they are willing to work with me through my learning curve.
Thanks again,
David

Copy link to clipboard
Copied
jumeda,
A very simple solution is prevented by fundamental differences between circles and ellipses/non circular ovals.
In your sample, the bases of the houses can easily be placed evenly along the circumference which has the same curvature all the way round, and they form central parts of identical chords of a slightly larger circle, corresponding to the sides of a regular polygon which has identical side lengths all the way round.
A non circular ellipse has a varying curvature, in this connexion corresponding to a regular polygon that has been stretced corresponding to varying side lengths.
You can see that if you create a circle and a (regular) polygon with the same radius on top of each other, then make/move a copy of the set and stretch them to twice the width.
What you ask for corresponds to an irregular polygon where the sides lengths are identical all the way round; and I am afraid that requires an iterative approach;
I wonder whether anyone has scripted that.

Copy link to clipboard
Copied
Did you try making an art brush.
Drag your house to brushes palette, choose scatter brush. Relative to path say ok. Then drag the icon from brushes palette onto an oval path.

Copy link to clipboard
Copied
jumeda,
Edited: see new answer below.
Copy link to clipboard
Copied
Hello everyone again. Thank you to those whom are trying to help me but I still need help. Can someone please tell me how to put images around an oval?
Thanks,
David

Copy link to clipboard
Copied
Have you attempted Mike's suggestion above?
Copy link to clipboard
Copied
Hi Doug and thanks for asking. I did try that and I got really really close but it gave me some message about the file not being right to make a brush from. I think I might have to try it again and get the right error message so you guys can help me. I also traced the image and the message went away but I still could not make a brush. Of course being so new I get really confused as to what I have done and haven't done. Sorry to be so vague.
David
Copy link to clipboard
Copied
Copy link to clipboard
Copied
Hi Jacob,
That looks like what I am trying to get to. The big question is how? I can make an oval and I can open my house and drag it onto the page with the oval but that is all I know how to do.
Thanks,
David
Copy link to clipboard
Copied
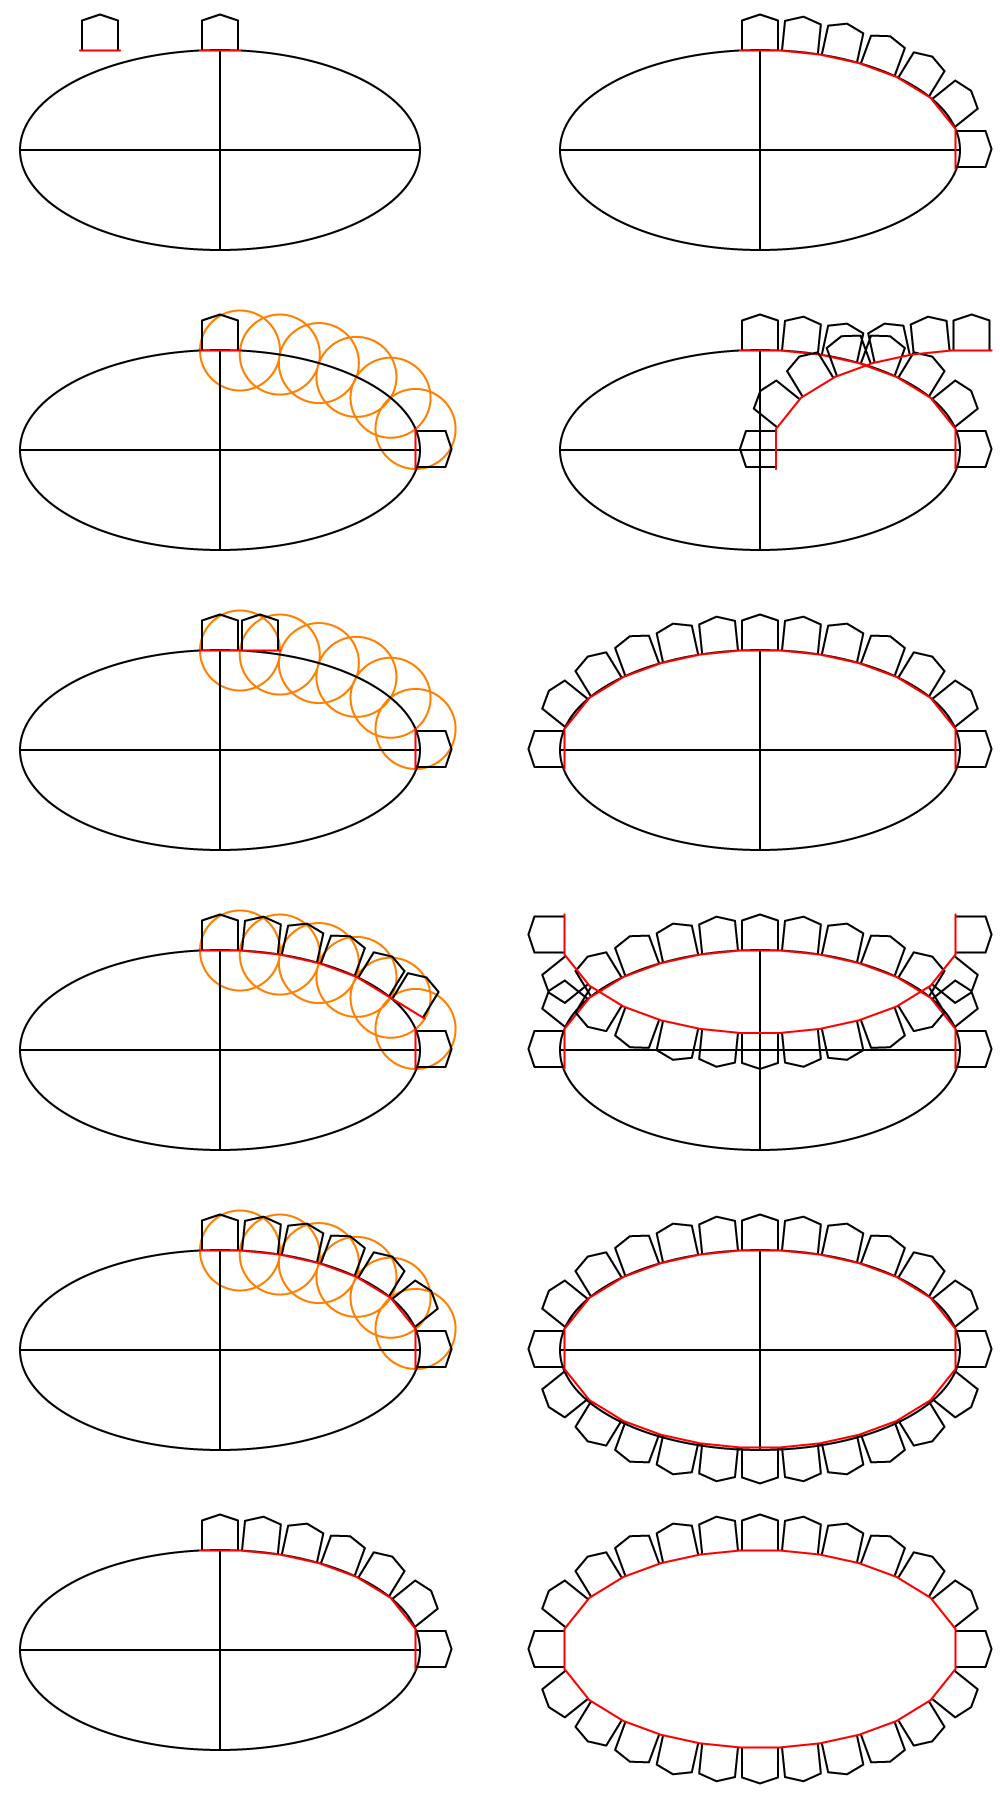
David,
It is a matter of sensing the right fit of houses and ellipse (or try again until it is obtained, that is iteration), and care.
You can:
1) Choose a (first attempt at a) fit of the following, starting out with any one of them:
1a) The total width of the straight stretch of ground under the house = width of the house + the distance between adjacent houses at ground level, the house centred on it;
1b) The number of houses/stretches;
1c) Size of the ellipse, determined by width and height resulting in a total circumference = path length, see Document Info;
https://helpx.adobe.com/illustrator/user-guide.html/illustrator/using/file-information-metadata.ug.h...
Crucially, the total width of all the stretches must be a wee bit smaller than the length of the path because the latter is curved. If/once you can sense the right difference and get a sufficient accuracy, you can do the following just once.
I only had to do it once, satisfied with the accuracy, starting out with 1c) an ellipse with W = 200 and H = 100, total path length 484.4916, then settling for 24 houses/stretches with a width of 20 giving a total width of 480, a a shortening of the stretches/houses of about 1%.
Once chosen (Smart Guides being your friends telling you when you are within snapping distance), as shown in the drawings in two columns (the bottom one in the first repeated as the top one in the second):
https://helpx.adobe.com/illustrator/user-guide.html/illustrator/using/rulers-grids-guides-crop-marks...
2) Create the ground stretch as a horizontal line and centre the house on it (I put it in red in front of the house, see top left) and Group them (Ctrl/Cmd+G;
3) Create the ellipse, and add lines between opposite Anchor Points (you can just ClickDrag between them with the Line Segment Tool, see the Drawing tool gallery part) to judge the fit;
https://helpx.adobe.com/illustrator/user-guide.html/illustrator/using/tool-galleries.ug.html
4) Centre align the first stretch/house horizontally with the ellipse (Align panel, select both and Click the Ellipse again);
5) Deselect and ShiftClickDrag the leftmost end Anchor Point of the first stretch/house down to snap to the ellipse; now the first strecth/house is in place, acting as as the first chord of the ellipse;
6) Create a circle with W = H = twice the width of the stretch, deselect then ClickDrag it by its centre to snap to the rightmost end Anchor Point of the first stretch;
7) Deselect and Hold Alt/Option while ClickDragging (a copy of) the previous circle along the ellipse and snap to the intersection between the previous circle and the ellipse; repeat until the circle extends below the rightmost Anchor Point of the ellipse at the end of the horizontal line;
8 ) Rotate a copy of the first strectch/house by -90 degrees (holding Alt/Option) and ClickDrag it by its top end Anchor Point to snap to the centre of the last circle;
Now you can judge the fit by the vertical distance between the centre of the vertical stretch and the horizontal line, and see whether the accuracy is satisfactory, and either make adjustments between 1a) - 1c) and start over from 2) or 3) (iteration), or continue;
9) Hold Alt/Option and ShiftClickDrag the second stretch/house by the leftmost end Anchor Point horizontally along the first stretch/house to snap its rightmost end Anchor Point (you can hold Alt/Option); the second stretch/house will float above the ellipse;
10) Switch to the Rotate Tool and Click the leftmost end Anchor Point of the second stretch/house to set it as the centre of rotation, then ClickDrag the rightmost end Anchor Point down to snap to the intersection/centre of the second circle;
11) Repeat 9) and 10) for the following stretch/house sets; each stretch/house will float higher above the ellipse;
Now you have a full set of stretch/house sets covering (more than) the first quarter;
12) Hide or delete the circles and Group all the stretch/house sets;
You can also hide or delete the ellipse and the horizontal/vertical lines or leave that till later;
13) Reflect a copy of the stretch/house Group from 12) with a Vertical axis (Object>Transform>Reflect);
14) ShiftClickDrag the copy Group from 13) by the rightmost end Anchor Point to snap to the rightmost end Anchor Point of the first stretch/house, then Group the two Groups;
Now you have a full set of stretch/house sets covering (more than) the top half, with a double set in the centre;
15) Reflect a copy of the stretch/house Group from 14) with a Horizontal axis (Object>Transform>Reflect);
16) ShiftClickDrag the copy Group from 15) by the topmost/leftmost end Anchor Point to snap to the topmost end Anchor Point of the lower left stretch/house of the original Group, then Group the two Groups;
Now you have a full set of stretch/house sets all the way round as one Group, with a double set at top and bottom and at both sides, and if left in place you can compare the shape/size of the strecth/house Group with that of the ellipse;
17) Hide or delete the ellipse and the horizontal/vertical lines if not already;
18) If desired delete the unnecessary doublets at top and bottom and at both sides by deselecting and switching to the Direct Selection Tool, then holding Alt/Option and Clicking each then pressing Delete.
In a way I was just doing what I wrote about earlier, only without iteration: the stretches correspond to an irregular polygon where the sides lengths are identical all the way round.
And I just enjoyed doing it, helped and guided by Illy (her job description is Adobe Illustrator, and she is always eager to help).
I only realized how complicated it may/must seem when I had to retrace and write down the steps to make the drawings less unintelligible.
A more accurate fit would have been a stretch/house width of about 19.9 corresponding to a shortening of about 1.3%.
For comparison, an accurate shortening for a circle would be 0.3% (which I had not established before now).
Obviously, the right shortening depends on the number of houses (decreasing) and the width/height ratio of the ellipse (increasing).
I hope this is usable.
Below is a circle and a (regular) polygon with the same radius on top of each other, then a copy of the set stretched to twice the width, to show the fundamental difference mentioned earlier.

Click/Right to see in full size, Click Here to see in Chrome
By the way, the houses made round the circle using the tutorial that you showed are a bit tilted/rotated clockwise, corresponding to a serrated shape of the stretches of ground beneath them: if you follow the direction of the stretch of ground under each house, it points towards the bottom corner of the house to the right, but it points a bit higher up the wall of the house to the left.
Copy link to clipboard
Copied
Hi Jacob,
Thank you very much for all the info. I will give it a try but I am anticipating not having much luck. It seems extremely complicated for someone that pretty much does not know anything about Illustrator. I appreciate your effort to help me and I will let you know how I make out.
Thanks,
David
Copy link to clipboard
Copied
You are welcome, David.
I am aware that it may be daunting, maybe a crash course into finding ways of doing thing, but hopefully useful, now and further along (with new tools that are good to know).
And you are in good hands here, with many friendly helpers, for this and other tasks.
From step 2) on it is easier than it may look (I have an addition in 3) of something I forgot): it consists of small/simple steps, and much is repetition.
You can make a preliminary choice of numbers and sizes for 1a) - 1c) and get a suggested shortening, to have a softer start.
In any case I hope you will report your findings.

 AdChoices