 Adobe Community
- Home
- Illustrator
- Discussions
- Re: Finding Geometric Center of Triangle, Star and...
- Re: Finding Geometric Center of Triangle, Star and...
Finding Geometric Center of Triangle, Star and Pentagon

Copy link to clipboard
Copied
I am trying to find the geometric center of a triangle, star and a pentagon so I can align Group Spokes and cut the shapes.
What is Illustrators trick?
I do not want the center of the bounding box. I need the center of the shape.
I once had this thread bookmarked for later reference but the link no longer exist.
Centers of triangles.
http://www.adobeforums.com/webx?14@@.3bdfc3af/0
Thank you in advance. Ai CS3
Kathryn


Explore related tutorials & articles
 24
Replies
24
24
Replies
24

Copy link to clipboard
Copied
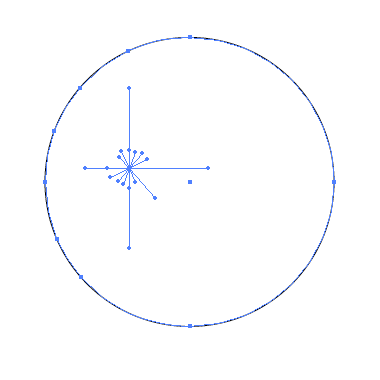
If you're a Javascript dabbler you might write one yourself. It's a simple matter of averaging the X and Y coordinates of the path's points to find the X and Y coordinates of its "center of gravity."
JET
Copy link to clipboard
Copied
I do not know how to write scripts.
I spent COUNTLESS hours yesterday trying to figure a quick and easy way to perfectly center align. Finally I threw in the towel.
Kathryn

Copy link to clipboard
Copied
1. Select the object
2. Copy and Paste in Front
3. Select > Object > Direction Handles
4. Cmd+X (Cut); do not deselect
5. Object > Path > Average: choose both axes
6. View > Guides > Make Guides
These steps can also be recorded as an action.

Copy link to clipboard
Copied
Apologies for resuscitating an old thread but the solution given here (Kurt), as much as very attractive at first, is not correct... and I want to help people avoiding falling in the trap as I nearly did.
Averaging the path give a center weighted by vertices and not an absolute geometric center of the shape itself.
As shown on the picture, the shape is a circle with more points (vertices) on the left side. The averaged path solution gives a center that moves on the side with more vertices.
As of now, I still do not have a solution that work in Illustrator.
X.

Copy link to clipboard
Copied
xtassin schrieb:
As of now, I still do not have a solution that work in Illustrator.
Get the Subscribe plugin from Astute Graphics (it's free)
Use the Line perpendicular from path tool
Draw two lines into the center of the circle
The center is where the lines meet.

Copy link to clipboard
Copied
X,
The solution by Kurt implies a path with no unnecessary Anchor Points.
In the sample shown in your post #21, you actually have the centre already (for the case of a circle).
For other cases, such as polygons, have you tried the suggestion in post #18 to use the circle as a centre/centring template?
Copy link to clipboard
Copied
Thank you so much for concise instructions. It worked like a charm.
I tried writing an Action.
The only problem Object > Path > Average would not record. <sigh>
James, if you could find your script, that would very helpful because I have a quantity of shapes where I need to find the centers.
Thank you again. Kathryn
Copy link to clipboard
Copied
To include the Object > Path > Average command in your action, you'll have to use the Insert Menu Item command through the Actions Palette Flyout menu.
Copy link to clipboard
Copied
Kurt, I like it with steps 3 & 4. It leaves an x in the center when not selected.
I can now turn on Smart Guides and center the Grouped Spokes to cut the shape.
Copy link to clipboard
Copied
The script I was trying to remember is here:
http://www.IllustrationETC.com/AIbuds/CentroidCircles/JET_CentroidCircle.zip
In the discussion that gave rise to it, the thread originator was working on a mobile sculpture, and wanted to locate a hole at the center of gravity of each shape. So it prompts you for a diameter, and then draws a circle at the centroid.
http://www.IllustrationETC.com/AIbuds/CentroidCircles/CentroidCircles01.jpg
http://www.IllustrationETC.com/AIbuds/CentroidCircles/CentroidCircles02.jpg
http://www.IllustrationETC.com/AIbuds/CentroidCircles/CentroidCircles03.jpg
Either the script or the Align Points method can be used to find the centroid of irregular polygons, not just regular polygons.
What if the shape has curved segments? Copy / PasteInFront to make a clone of the path. Then apply extra points along the curves, using the Add Points command, or a Filter like ZigZag.
JET
Copy link to clipboard
Copied
Select all, run JET_CentroidCircle script, a center circle is placed.
Thank you both Kurt and James.
Kathryn
Copy link to clipboard
Copied
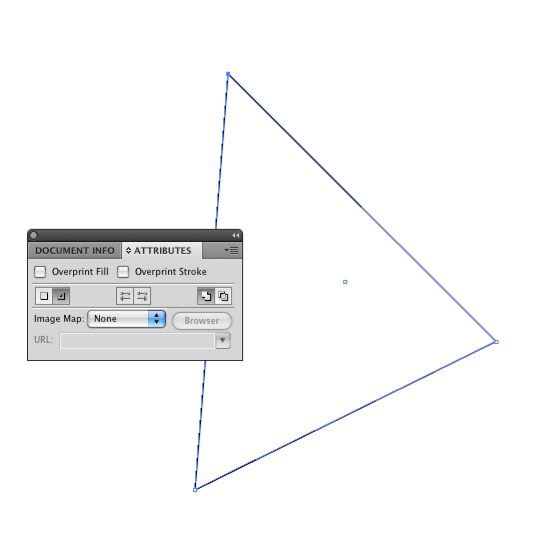
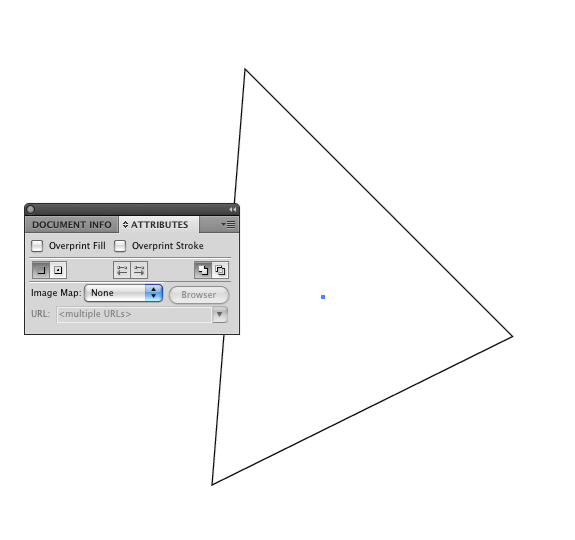
With your pen tool draw lines between diametrically opposite anchor points of the polygon or star. Do this twice, between different pairs of points.
Convert these new lines to guides. The place where the guides cross is the geometrical centre.
If you like, you can unlock the guides and group them with the polygon.
They will then move or rotate with the polygon even if you re-lock them, so you always know where the centre is.

Copy link to clipboard
Copied
Sorry for re-opening this thread, but in my search for a solution this is what has come the closest.
I appreciate the methods for finding the center of polygon shapes described here, but I would like to fix the center to the shape so that Illustrator understands it.
Quite simply (!), I am trying to make a perfect blend - kind of a rounded triangle - between an equilateral triangle and a circle using the Blend tool. While the tool will latch on to the center of the circle, the center of the triangle always becomes offset. It seems the Blend tool is oriented towards the center of the bounding box rather than the center of the geometric shapes.
Does anybody know of a fix?
Thanks
mccanute.
Copy link to clipboard
Copied
Assuming CS3:
Forget the Blend.
1. Polygon Tool: Draw the equilateral triangle.
2. Use one of the methods described above to find the center of gravity. Position a vertical and horizontal guide there to mark the spot.
or...
When drawing the triangle, mousedown on some other snapable coordinate, like an anchorPoint of an existing path, or the Artboard origin. Then AltShiftDrag to draw the triangle outward from its center.
3. WhitePointer: Drag a marquee selection around TWO of the triangle's anchorPoints. Click the Convert Selected Anchor Points To Curve button. (Stop to catch your breath after saying that.)
4. Drag a selection marquee around the triangle's other anchorPoint. Click the Convert Selected Anchor Points To Curve (pant, pant) button. Now you should have the bulgy triangle you describe. To adjust the bulginess...
5. Select>Object>DirectionHandles.
6. Scale Tool. Click (don't drag) the center point described in step 2, to set the center of transformation there. ShiftDrag to scale all the handles as desired.
JET
Copy link to clipboard
Copied
Actually, in my CS3 Illustrator it's "Convert selected anchor point to smooth", but - not daring to say it out loud for fear of not catching my breath - I still had to stop to uncross my eyes. :)
This was quite another angle on solving the problem, and so far the best - thank you!
I'll work with it a bit to find out, just for fun, how to hit the exact midpoint between the side of the inscribed triangle and the circumference of the circle.
Thanks again
mccanute
Copy link to clipboard
Copied
Dunno if this helps.
The blue bulgy triangle is exactly half way between the inscribed triangle and the circle.
Start off by copying one side of the triangle and an arc of the circle.
Use Pathfinder to clip the arc so that it's the same length as the side of the triangle (or you can do it manually).
Do a one step blend between the two and you've got the blue bit.
(Or you can just scale/copy the arc 50% vertically to get the same result)
Now just rotate/copy the blue bit by 60° (twice), snap the ends together and join them and you've got your bulgy triangle.

Copy link to clipboard
Copied
To Kurt Gold's solution, I would add steps 7 and 8 in order to group the center point with the shape as follows:
1. Select the object
2. Copy and Paste in Front
3. Select > Object > Direction Handles
4. Cmd+X (Cut); do not deselect
5. Object > Path > Average: choose both axes
6. View > Guides > Make Guides
7. Cmd+A (select all)
8. Cmd+G (Group)
Copy link to clipboard
Copied
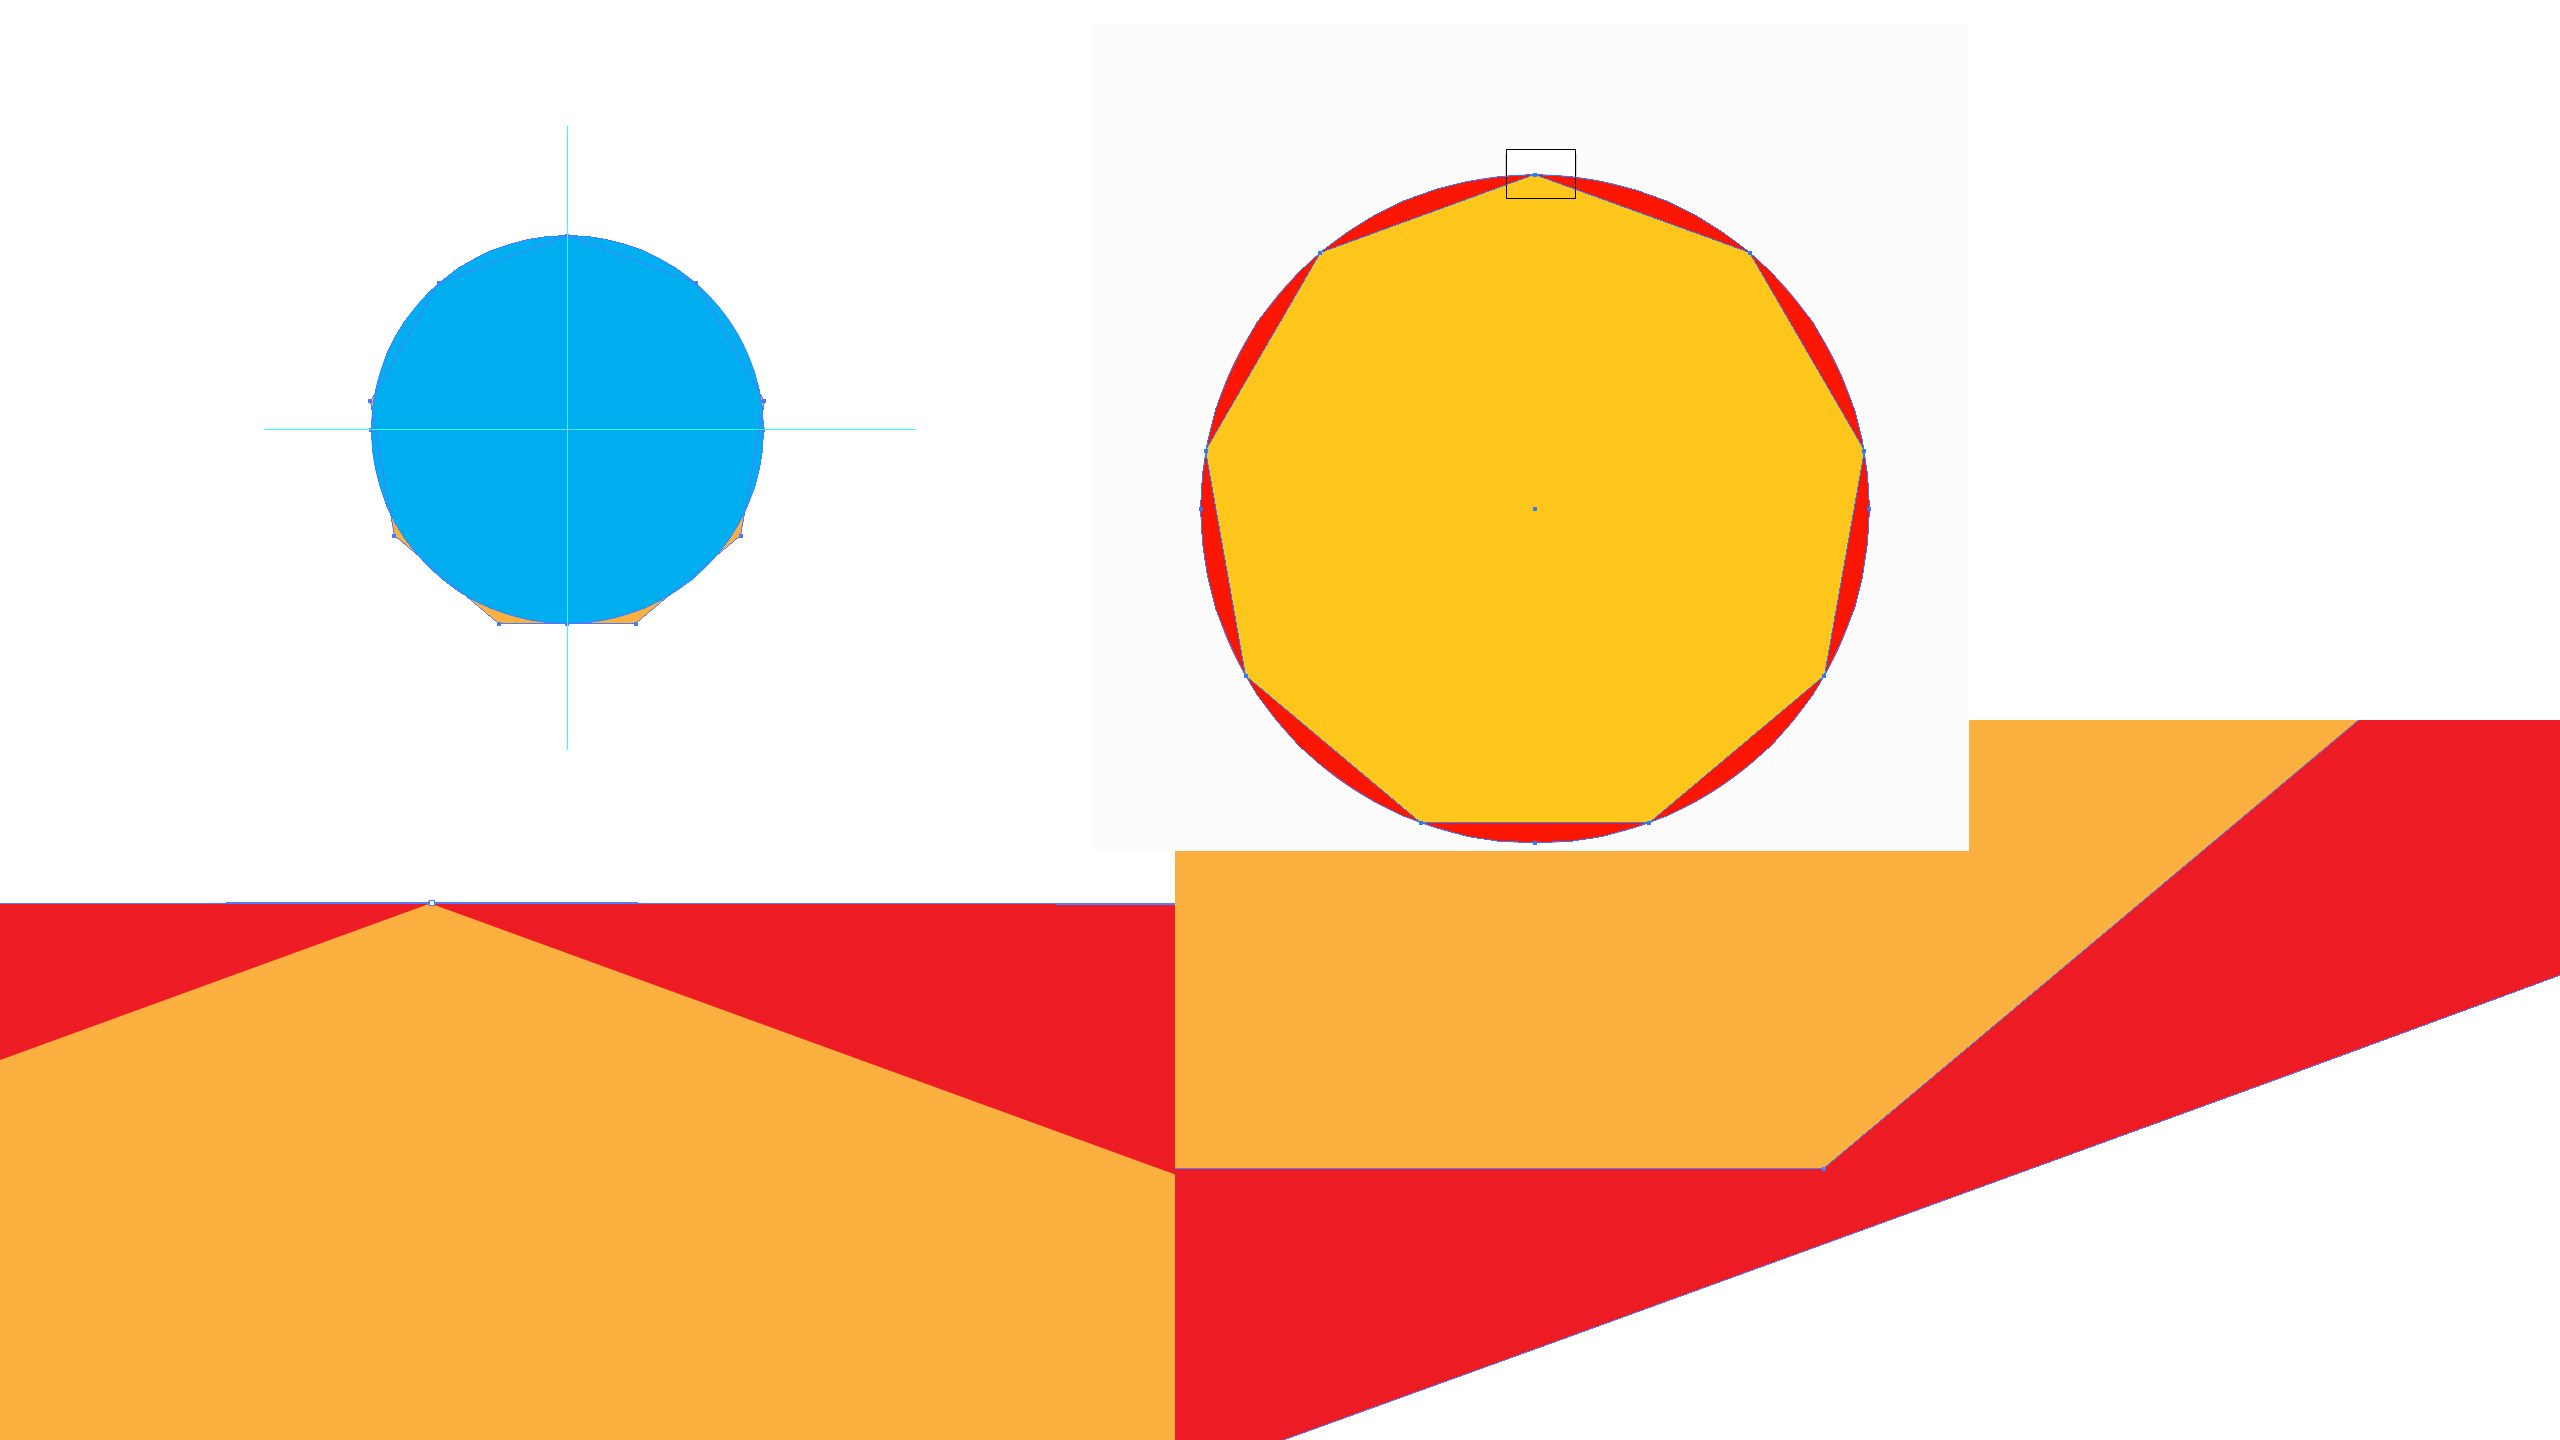
It's much easier than all that....
Select the object and use the Attributes Panel and tick the button to show center point.

That will show the center point of any shape regardless of what it's edges look like.

Copy link to clipboard
Copied
Scott you are usually right on but in this case you have missed the mark.
If you use the attributes panel to show the center mark it does so for the bounding box and not the object.
As illustrated here
With Kurts brilliant method which should be coded and placed in the control panel a a command you get the
the center of the object as well as with James' genius script. As Illustrated here:

Copy link to clipboard
Copied
I'm "simply" trying to add 9 shapes around a circle and I thought I could simply add a 9 point star/polygon to find the nine spots for the nine objects around the edge of the circle, boy, was I wrong. I have tried a few methods but then I gave up, googled and found this thread.
Instead of starting a new thread about the same thing I thought I would simply reply here.
Scotts method was way, way off. The other method using average attribute while being good it is still off center! I cannot believe how difficult something this "simple" can be so difficult. Here is an image showcasing how center still isn't perfectly centered(Scotts method result in top left corner):
http://img153.imagevenue.com/img.php?image=72261_offcenter_122_420lo.jpg
So I'm wondering is there any way to find the perfect center???? 
Copy link to clipboard
Copied
LordZarak,
In your case you may, Smart Guides being your friends:
1) Create the circle and copy the value in the W field of the Transform palette/panel,
2) Create a 9 point polygon, inserting the value from 1) and adding / and 2 in the Radius box to get the same size as the circle (or just use half the value),
3) Drag 2) by its top Anchor Point to snap to the top Anchor Point of 1), Smart Guides say anchor when you are there.
Copy link to clipboard
Copied
The other method using average attribute while being good it is still off center!
How so?
1. Polygon Tool: Click (don't drag). Enter 9 for number of sides; 3 in (or whatever) for radius.
2. Copy. Paste In Front.
3. Select>Object>DirectionHandles.
4. Edit>Cut. (Leaving just the anchors as stray points).
5. Object>Path>Average. That's the geometric center. If you don't believe it:
6. EllipseTool: Press and hold the Alt and Shift keys. Mousedown on the stack of stray points and drag upward, snapping to the top anchorPoint of the polygon.
JET
Copy link to clipboard
Copied
You don't need the polygon at all.
You could
a. create an elliptical raster with 9 dividers. When you're done arranging stuff, delete the dividers
b. use the script "Circle" from here http://park12.wakwak.com/~shp/lc/et/en_aics_script.html and create a cricle with 9 points.

Copy link to clipboard
Copied
Brilliant!!! And it's working. Thank you!

 AdChoices