 Adobe Community
Copy link to clipboard
Copied
How to produce (Ways) with adobe illustrator geologic block diagram with the quality of publications ?
 1 Correct answer
Reg,
I believe you will like the perspective grid,
If you have a (model) block to work from, you can redraw on top of that, of course; but working with the sides straight on and then map is much simpler, and more accurate.
0) To create the textured layers o
...Explore related tutorials & articles
Copy link to clipboard
Copied
You might want to show u an example.
Copy link to clipboard
Copied
Yes Monica, if it is possible, I would like to
Copy link to clipboard
Copied
Reg,
The best way may be to upload screenshots/images, using the Insert Photos button in the top row of the Reply box.
Copy link to clipboard
Copied
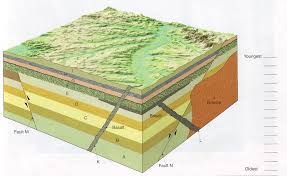
Good morning Jacob, like this image below
Copy link to clipboard
Copied
Have you worked with Illustrator and have some idea of how to manipulate objects? It's not hard but somewhat tedious. The top surface will require an image and the sides are just stacked blocks in various colors. I'm working on a iPad so typing is a bit of a drag. Give us some idea of your experience level, please.
Copy link to clipboard
Copied
Thank you Larry for your reply
My experience in illustrator is ok
But it's not a problem if you have a method and it takes a lot of learning, I'll do it
Copy link to clipboard
Copied
Reg,
I believe you will like the perspective grid,
If you have a (model) block to work from, you can redraw on top of that, of course; but working with the sides straight on and then map is much simpler, and more accurate.
0) To create the textured layers on the sides, you can use rectangular paths that serve as Clipping Paths for textures, or you can apply textures as fills; the former is more versatile/flexible, and simpler.
For the left side, which seems to have horizontal layers, working straight on you can proceed in a way something like this, using the Rectangle Tool for the rectangle (Smart Guides are your friends):
1) Create a rectangle as the whole side up to the top of the fault line and copy it behind itself (Ctrl/Cmd+C+B) and lock the copy to be used later;
The undistorted part above the fault line and other parts will be dealt with later;
2) Create each regular layer with the Rectangle Tool by Width (of the whole side) and Height (of the individual layer) as they are to the right, and apply the textures as described in 0);
3) Group the layers and copy the Group to the front (select all and Ctrl/Cmd+C+F), and lock the original Group;
You will have to deal with the extra top layer to the left;
4) Copy the top layer in front of itself (within the copy Group) and move the copy up by its height, then increase the Height (thickness) of the extra top layer to have at least the required height (it can be higher than needed), then lock the Group;
5) Draw the fault line with the desired Stroke (it can be straight or curved), then copy it behind itself (Ctrl/Cmd+C+B) and lock the original, which will remain visible by its Stroke;
6) Select the copy fault line and Object>Path>Divide Objects Below, then lock the right part;
This will divide the copy of the whole side up to the fault line from 1) into its parts on either side of the fault line;
7) ShiftClick the copy Group from 4) and Ctrl/Cmd+7 to form a Clipping Path, hiding the rightmost part of the copy Group (of layers);
6) While holding Alt/Option DirectSelect the copy Group (or Click it in the expanded Layers palette), then ShiftClickDrag it vertically downwards by the depth of the fault, or Object>Transform>Move it by the desired amount, or in one of other ways);
Only the part of the copy layers will show within the Clipping Path, so the outlying parts (top, right, and bottom) will be hidden outside the mask.
In this way you can also see directly what you are doing and no adaptation to the angle/shape of the fault line is needed, whether it is curved or not.
7) Add the undisturbed layers at the top, and the irregular (dark) layer to the right, to fill out the whole side;
8 ) Extend a copy of the side from 1) to cover the whole side;
9) Add the irregular slanting layer/whatever it is called to the right, on top of the rest, extending above/below the side, then use a copy of the whole side on top of it to form a Clipping Mask.
If the image had been a wee bit larger I could have (read and) used (more) proper terms.
Edit: Edited twice to cover all the components/details shown in the image; similar/others can be included in other cases.
Copy link to clipboard
Copied
A lot thanks for you Jacob
Copy link to clipboard
Copied
Reg,
I added some more.
Copy link to clipboard
Copied
REGHAIS5EC8, Hi.
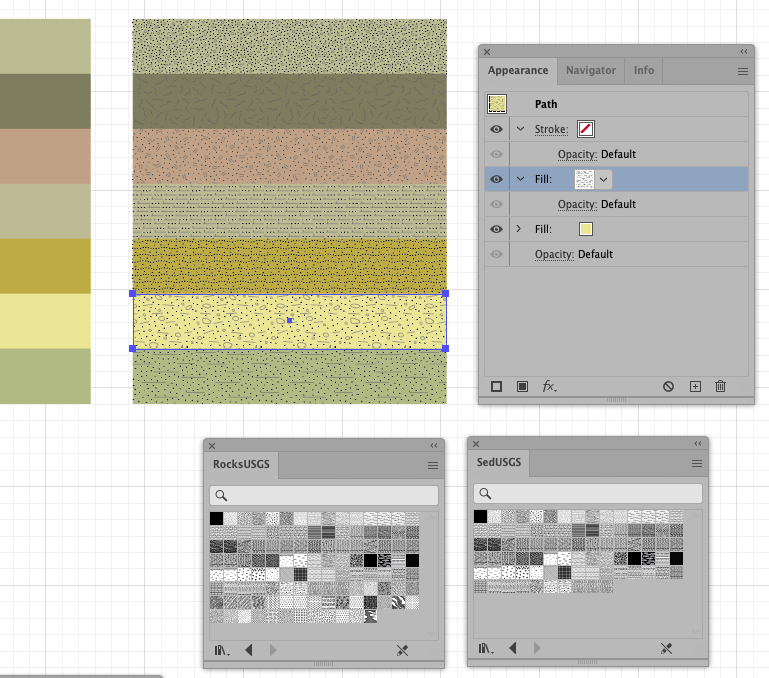
You may find this link very helpful. USGS Pattern Swatches for Illustrator.
Shown here, I created a rectangle with a Fill color.
In your Appearance Panel, (Fly out menu) Add New Fill
Select an USGS Pattern Swatch. You can play with Blend modes or opacity if you wish.
K
Copy link to clipboard
Copied
Very thanks
Copy link to clipboard
Copied
Looks like people have covered it fairly well. Good luck and please come back with an example of the results.
Copy link to clipboard
Copied
Reg,
And I elaborated a bit to cover all the details.


