 Adobe Community
- Home
- Illustrator
- Discussions
- Re: How do I create a circular multicoloured swirl...
- Re: How do I create a circular multicoloured swirl...

Copy link to clipboard
Copied
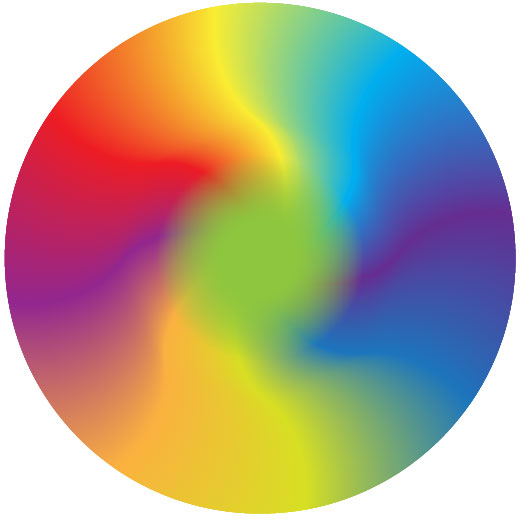
I would like the colours to merge into one another like a gradient..


 1 Correct answer
Wow, thanks Kurt Gold, perhaps you could elaborate?
Explore related tutorials & articles
 52
Replies
52
52
Replies
52

Copy link to clipboard
Copied
actually looking at your image, jacob's method is nice and efficient. mine makes a sort of galaxy thing.
Copy link to clipboard
Copied
Thanks Jacob, that looks very hopeful! I shall try it when I get home to my mac.

Copy link to clipboard
Copied
For my part you are welcome, Ludo.
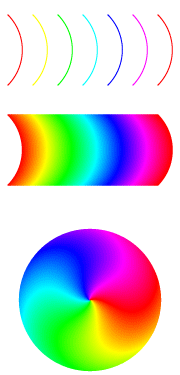
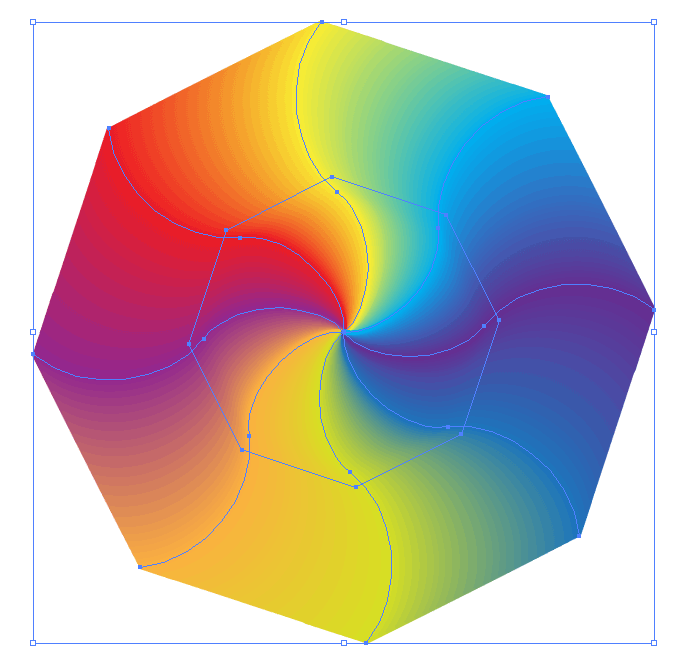
As you can see, it is doubly twirly, reversely near the centre. You may try different ways of curving, including (multiply) reversed curvatures of different shapes/lengths (as in the (different) rounded version(s) of Sowelu (limited to mirrored shapes)).
I hope you will share you findings, for everyone to enjoy.
Copy link to clipboard
Copied
Ludo,
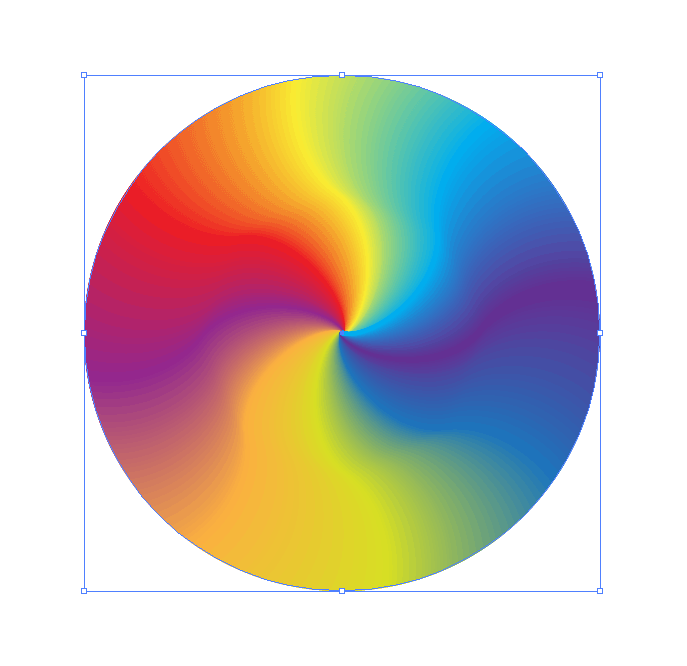
Just another set to show a more lively set of colours, using intermediate bright colours. Apart from the basic shapes and the range of colours, you may change the appearance by softening/extending (parts of) the transitions.
Copy link to clipboard
Copied
Hi Jacob,
Thanks for the second demo also.
I have tried several times and it works well up until the point when I create a circle and apply the art brush to it. I have tried making the path (Step 1) less curved but I always end up with a gap in the circle.
Could you think why this would be?
It seems that it must be a precise curve to join nicely in a circle, how did you calculate yours?
Or maybe it is an issue with my art brush settings? I have shown these to the right of my pic.
My steps:
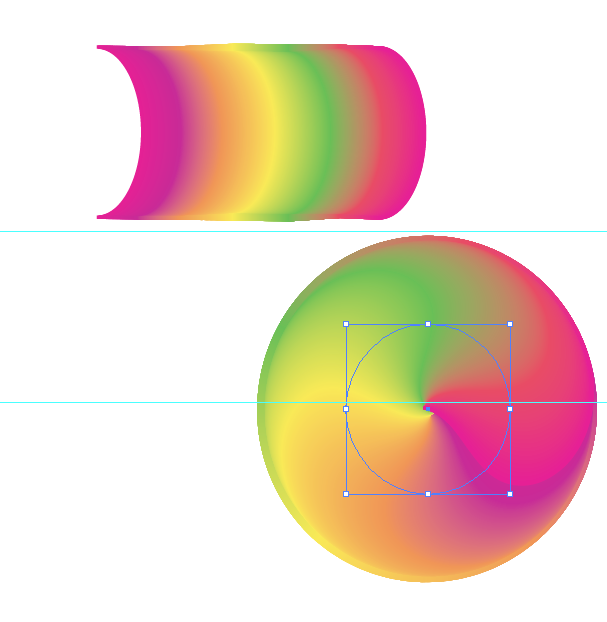
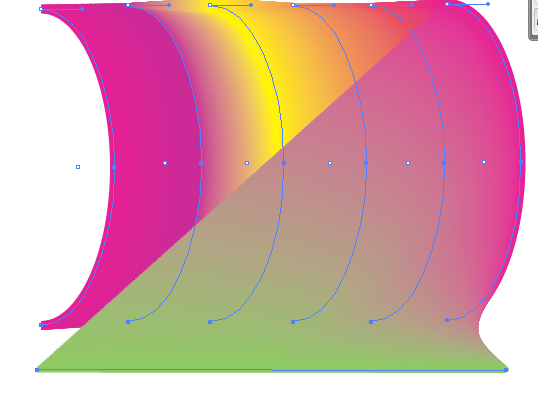
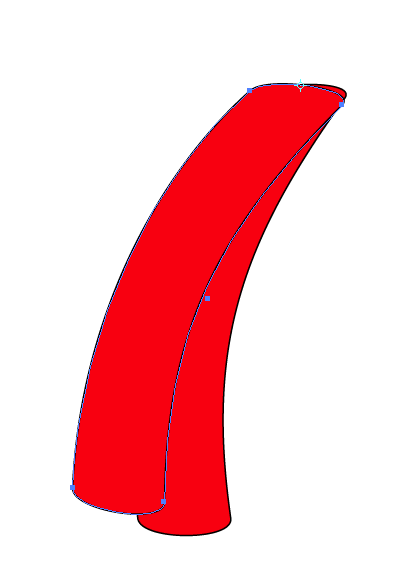
1. Draw a long oval with the elipse tool, delete the point on the left to leave 3 points. Colour the path with a 3pt stroke and keep duplicating and dragging to the right (all on one layer)
2. New art brush
3. Fill circle with new brush

Thanks for reading!

Copy link to clipboard
Copied
You need to create a bounding box for that brush which marks its begin and end. This rectangle has to be no fill and no stroke put in the back. Then create a brush.
Copy link to clipboard
Copied
Ludo,
Step 7) in post #10 is crucial:
7) Create a nofill/nostroke rectangle with the same height as the curved paths and a length equalling the total move and place it centrally behind the blend (which will overhang it at both ends;
Otherwise, the Art Brush will end where the outermost curved paths end. You can draw a line from the centre through those ends when applied to the circle, and that is what creates the gap.
So it seems that you have missed that step, which is basically identical to the suggestion that Monika made.
To avoid a smiling, or (almost literally) gaping swirl.
Copy link to clipboard
Copied
Thanks Jacob and Monika.
I think I misinterpreted that step.
Illustrator is pretty new to me as you may have guessed!
Back to the drawing board 🙂
Copy link to clipboard
Copied
I, and I am sure everyone else, look forward to the outcome, Ludo.
Copy link to clipboard
Copied
This post is just to celebrate our reaching 42, Ludo.
Copy link to clipboard
Copied
43, woah....
Thanks for your help Jacob and thanks to all for suggestions.
A circle- AMEN!
Copy link to clipboard
Copied
For my part you are welcome, Ludo.
Copy link to clipboard
Copied
Me again...
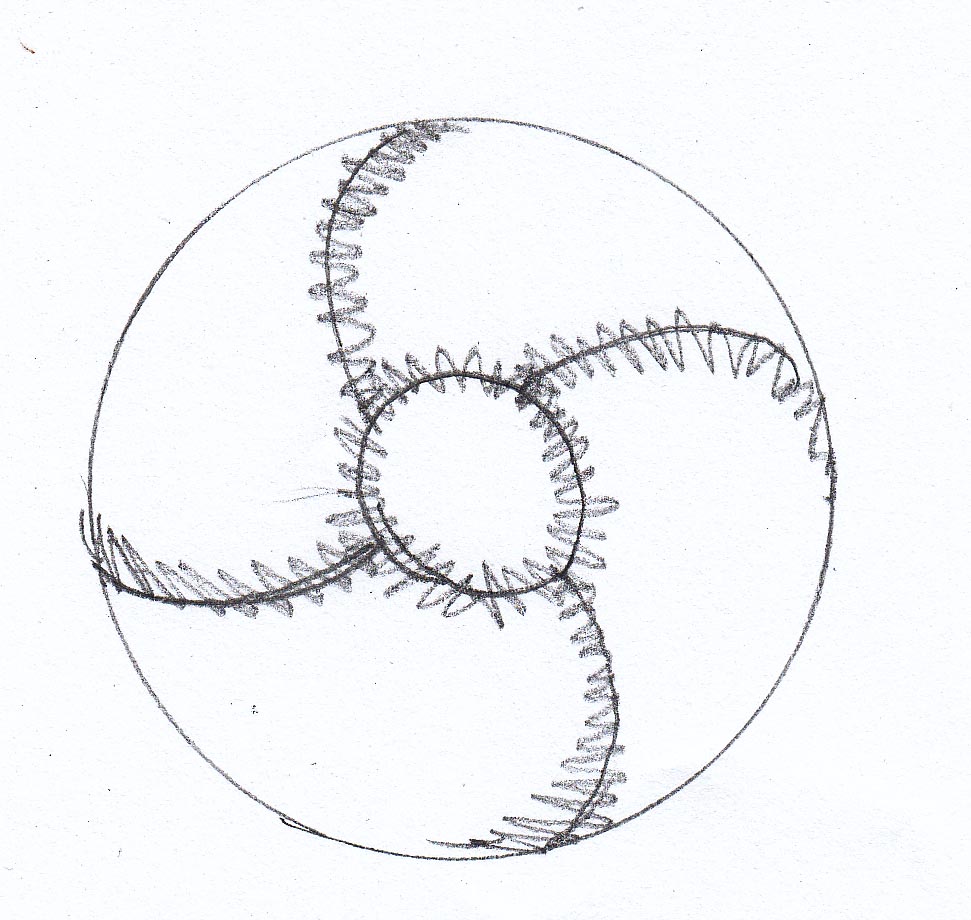
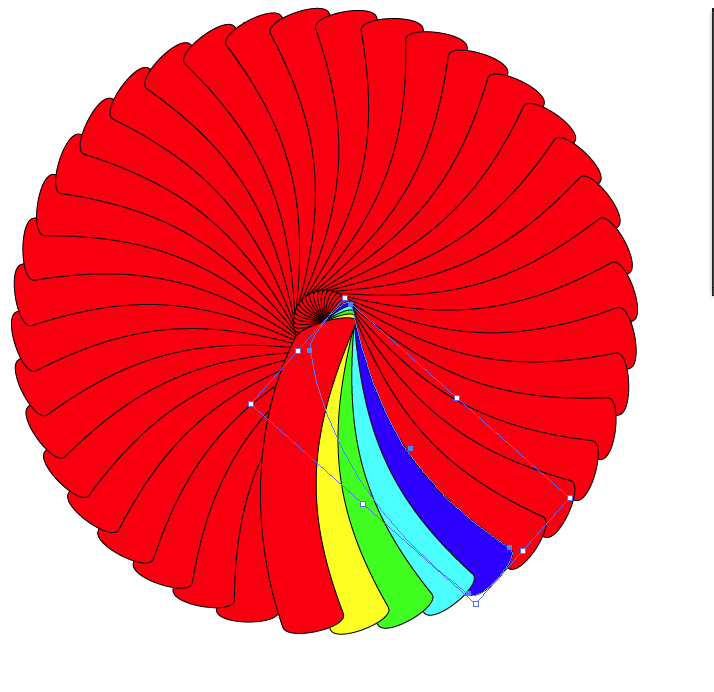
The client liked the result but has now decided he would like to see a spot green in the centre, blending into the swirl...so the same as before but with the green taken from the swirl and put in the centre)
I made some experiments but the results weren't good.
I have tried to sketch what I need below:
(I don't want it to look like a strange baseball,  the zig zag lines represent where each coloured section blends into the next.)


Copy link to clipboard
Copied
You could add a separate circle with a Feather Effect on top.

Copy link to clipboard
Copied
I think I like wah you did Barbara, verry nice indeed.
Copy link to clipboard
Copied
Ludo,
Another option might be a central circle with a radial gradient starting with the full green at the centre and ending in transparent at the edge, adjustable through the Gradient Slider parts.
Copy link to clipboard
Copied
Great, thanks both for suggestions- I'll give them a try.
Copy link to clipboard
Copied
Ludo,
I personally find the following technique easier to create, more flexible, and if necessary, easier to scale:
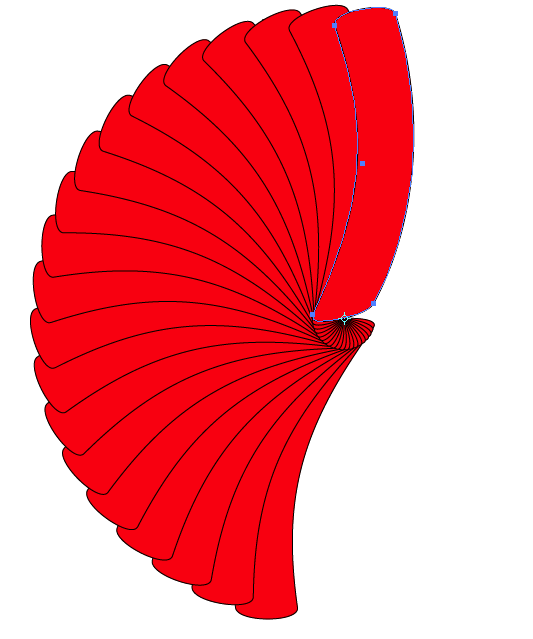
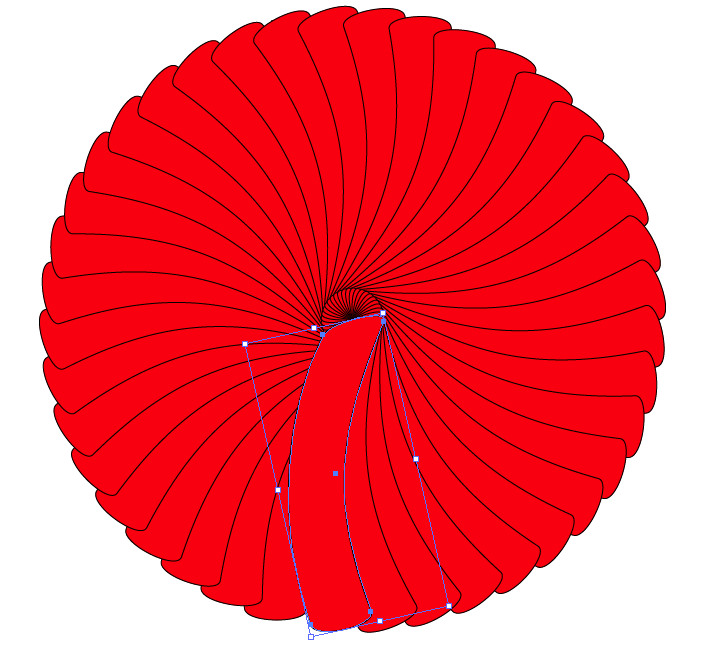
1) Create a wavy line with the Pen tool.
2) Rotate/Copy it.
3) Color each line.

4) Create a blend with a large number of specified steps, like around 200 steps.
5) Draw a circle within the blend.
6) Select the blend and the circle and choose Object > Clipping Mask > Make.
Copy link to clipboard
Copied
Thanks Barbara, this could work too.
Copy link to clipboard
Copied
?

Copy link to clipboard
Copied
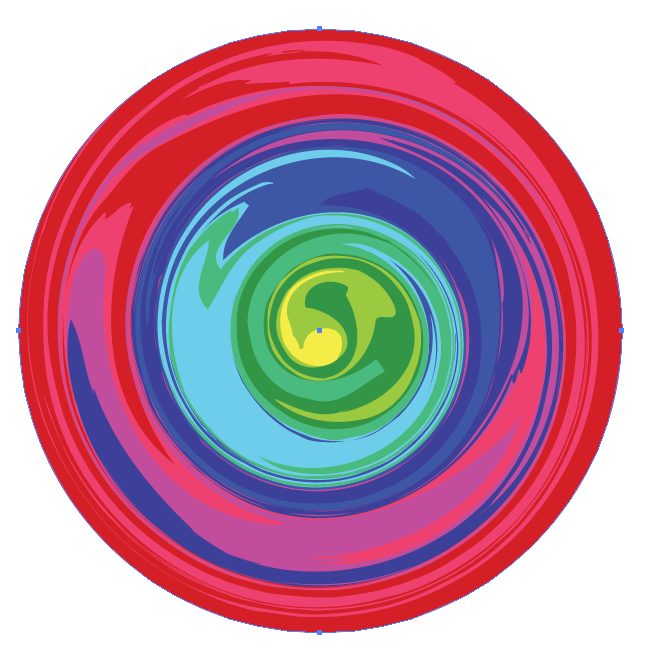
Wade,
I like the results you got. What steps did you use to create it?
Copy link to clipboard
Copied
Concentric cicles
didfferent color fills
twirl tool with large brush (setting to your desired effect)
I place a color filled circle path in the back to fill any outter gaps
and used a circle path on top to make a clipping mask.
Copy link to clipboard
Copied
Thanks, Wade.
I find the Twirl tool difficult to control, and it takes LOTS of experimenting. It doesn't seems to twirl if I click in the center of the shapes; it just adds anchor points. I have to click a little off the center for it to twirl, and then the center color isn't quite in the center any more.
Copy link to clipboard
Copied
take your gradient, make a rectangular bar (or whatever), fill it top to bottom, expand the fill, then use the Twirl tool with a brush size larger than your shape on the centre of it.
this is a bad method, because the expanded gradient produces many hundreds of paths, but it was just the first thing to come to mind.
Copy link to clipboard
Copied
Ludo444 wrote:
Thanks for your responses, the closest image I can find is on the link below:
http://www.webdesignhot.com/free-vector-graphics/colorful-swirl-backgr ound-vector-illustration/
The best way I can describe the effect I need is if you were to take a row of colour stripes, put your finger in the centre one and swirl it around.
I also need the colours to merge into each other like gradients.
I then need to drop this pattern into a logo.
I'm afraid I don't know the official terminology. I've tried twisting a striped gradient and envelope distorting with a spiral but I cannot get the desired effect..
In the example you provided, they created a single object for 1 color, they then rotated that object with a copy, then ctrl-d to repeat the process. Then they changed each object's color.


 AdChoices