 Adobe Community
- Home
- Illustrator
- Discussions
- How do I turn this '''thing''' into a solid shape?
- How do I turn this '''thing''' into a solid shape?
Copy link to clipboard
Copied
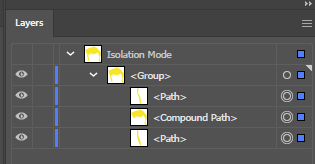
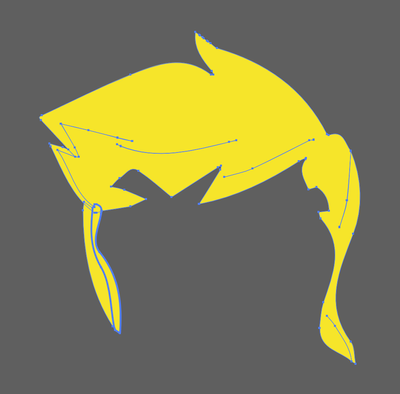
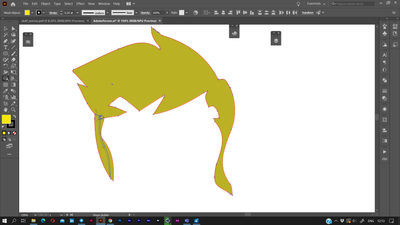
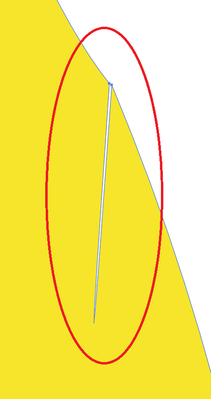
I'm about ready to pull out my hair. Let me preface this first - I'm making a VSG so I can use it in a die cut machine, but in order to cleanly cut it requires a solid outline of the object. As you can see in this, there are stray remnants from image trace, they also REFUSE to join. In the side panel, these are apparently a compound path for the top hair, and grouped for the other pieces.
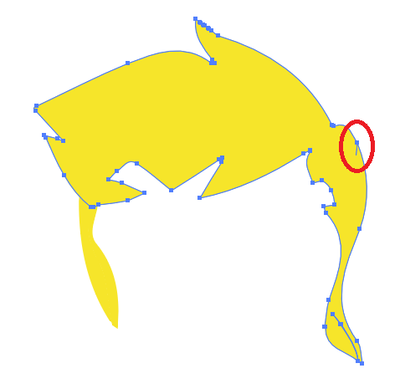
The issue is the die cut machine will literally cut every line, so those dangly bits of hair are not one piece, but 2. It also decides to cut up the single line on the right dangly bit of hair. I have been trying for hours, and I am so incredibly frustrated with AI right now. Is there NO WAY to just WELD it altogether so it's ONE seamless piece? I want it to join and fill in the slices. I've literally only been able to come up with one solution which is barbaric compared to what AI is capable of, zoom in, print screen, image trace it. That's so much added work when I have 30 of these per character to do.
Those straggler bits are pieces of path that are an absolute nightmare to remove and half of them I can't without affecting it's shape. I don't even know if this a PATH that has fill, or a SHAPE that has fill? I'm guessing path because shapes are created inside AI using the SHAPE tool, yes? Please help I am desperate here. It seems like such an incredibly simple thing to do yet this powerful software can't do it with 1 click. I've tried path erase tool which is a gong show of a time, I've tried path joining, shape builder tool, nothing works. Compound paths, uniting, grouping, joining. I'm not about to sit there and use a pen tool to create a new outline. Is there a way to do that faster and easier? Then I can just fill it?
 1 Correct answer
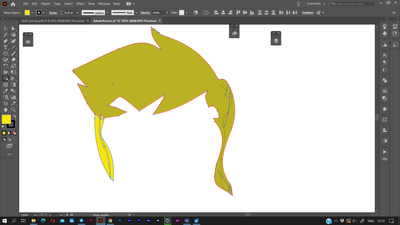
try this:
1. move an edge of any left shape a bit to overlap them
2. draw small shapes where the strayed lines (= narrow cuts) come to the main edge. The forms are up to you, just to close the holes
3. Use Shapebuilder to unite all. Shapebuilder can fill the holes inside the shape.
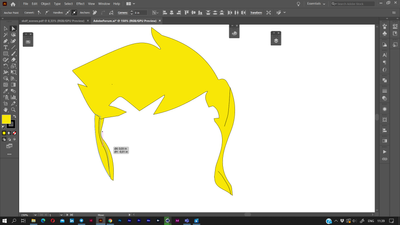
the final:
you can improve the shape a bit or keep it as is.
Explore related tutorials & articles
Copy link to clipboard
Copied
Selecting everything there and using Unite from the Pathfinder panel doesn't do what you want?
Copy link to clipboard
Copied
Unfortunately no. It doesn't turn it into a solid object. I want no lines, just a single outline. Pathfinder only does a rudimentary group job.
Copy link to clipboard
Copied
Do I see well that these separate lines are unwanted in the final shape? I guess, they are included in the Compound path. Try to release it to separate all the pieces.
If you can share the working file, I would try to repeat the issue. Meanwhile try the follow:
1. Select all items and unite them using Shape builder.
2. Another way: delete the separate lines, select Compound path and release it using Object > Compound Path > Release. Then select all and use Unite in Pathfinder panel.
Copy link to clipboard
Copied
Essentially I want one solid piece of hair, with a single outline perimeter around it. I'll give those a shot tonight but I believe I tried that already. Thank you both for the replies so far.
Copy link to clipboard
Copied
So when I tried using shape builder, it legit does nothing. I released the compound path, and did it, then did shape builder and it resulted in no change.
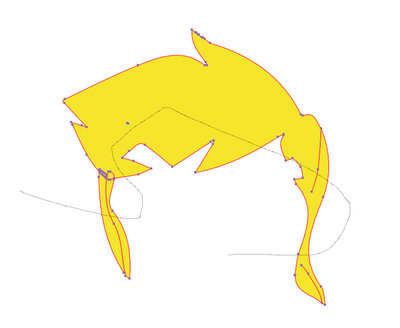
Then I tried releasing the compound path again, and used Unite in Pathfinder, and it got partly there. It's left with this;
The issue here is obviously the haggered lines - but for some dumb reason, even with the pen tool I have a hell of a time cleaning it up. Such as this;
When I delete either of those two anchors, it totally warps the shape. I've attached the file, hopefully you guys can help with this! Also thank you so much for the help so far!
Also not a clue why Adobe put me as female, and my avatar is a vampire? haha
Copy link to clipboard
Copied
Can you share your sample .ai file with the yellow objects?
Copy link to clipboard
Copied
Sure thing, I will do that now!
Copy link to clipboard
Copied
Copy link to clipboard
Copied
Pathfinder > Unite does do what you ask.
The problem is there are several long slits drawn into the shape that I would guess are undersirable. There is no way of removing those without manual work.
How was the shape made in the first place? Why might they be there?
Copy link to clipboard
Copied
That's what I was afraid of, it was done via image trace of an image. A cartoon drawing.
Copy link to clipboard
Copied
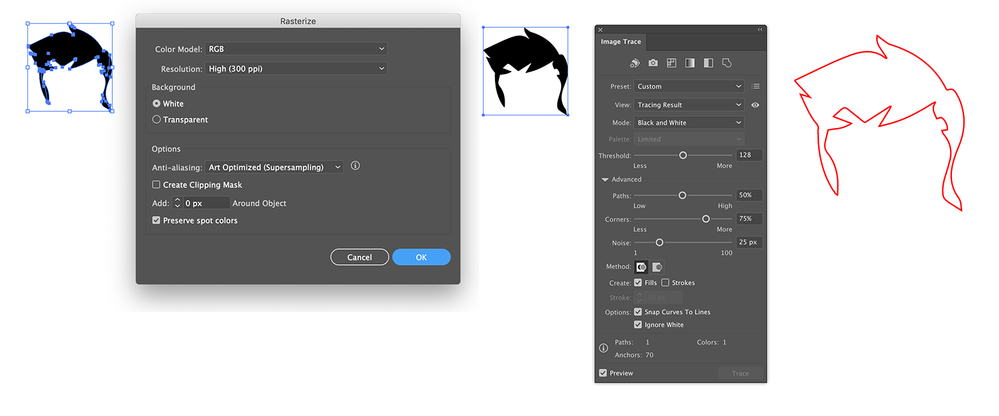
If it was done by tracing an image, you could try to do it again:
Fill with black instead of yellow.
Choose Object > Rasterize... and choose a high resolution.
Autotrace the result (with ignore white).
Expand the result .
Copy link to clipboard
Copied
Thanks for the reply! You know I thought about that but I was having issues after doing the rasterize, for some reason it would not let me trace it. The initial trace was a full blown character, so tracing + rasterizing could give me a solid character again, and I needed individual layers. How do I trace after rastereizing? It wouldn't allow me to.
Thanks!
Copy link to clipboard
Copied
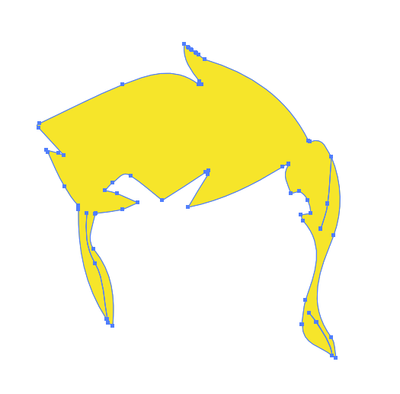
Should be easy, I added some images to show the steps.
Copy link to clipboard
Copied
try this:
1. move an edge of any left shape a bit to overlap them
2. draw small shapes where the strayed lines (= narrow cuts) come to the main edge. The forms are up to you, just to close the holes
3. Use Shapebuilder to unite all. Shapebuilder can fill the holes inside the shape.
the final:
you can improve the shape a bit or keep it as is.
Copy link to clipboard
Copied
You are an absolute legend Anna, thank you so much. It worked like a charm. I'm massively adept at PS and LR (photographer) but AI I am trying to learn and you have just made my life a billion times easier. I was working with a deadline, so what I ended up doing (while in throught 'man.. if I could just take a picture of it' - duh, screenshot) was a print screen, zoomed in super close, over to paint, cropped out the junk, back to AI, traced, and it worked. It made my edges a little sloppier but it did the job for what I needed. Now that you have greatly enlightened me I will be so much better off. I really do appreciate your help, thank you thank you!
To everyone else with suggests, I thank you too!
Copy link to clipboard
Copied
you're welcome! 🙂
Copy link to clipboard
Copied
In this specific case you may also just apply a very small (~ 0,03 mm) offset path to all objects (Object menu > Path > Offset Path), then select all and apply Pathfinder Add.
Copy link to clipboard
Copied
Anna on the previous page actually found a quick way to do it. Interestingly enough tonight I was going to try your method too. Great minds think alike!
Copy link to clipboard
Copied
Hi,
It might be worth a try to select all, go Object Expand and make sure you have fill and Stroke check if you get a pop up window.
Then try to Unite them wih the Pathfinder Tool.
Copy link to clipboard
Copied
I thought about this method as I perused the menus, but I got no pop up, it sat there and did nothing so I gave up on that idea. Still wouldn't work for me tonight, but Anna on the previous page had a genius solution. Thanks for your help thougth Simmer!
