• Global community
    • Language:
      • Deutsch
      • English
      • Español
      • Français
      • Português
  • 日本語コミュニティ
    Dedicated community for Japanese speakers
  • 한국 커뮤니티
    Dedicated community for Korean speakers
Exit
0

How to constrain colour blend to affect a single group?

Participant ,
Jun 05, 2021 Jun 05, 2021

Copy link to clipboard

Copied

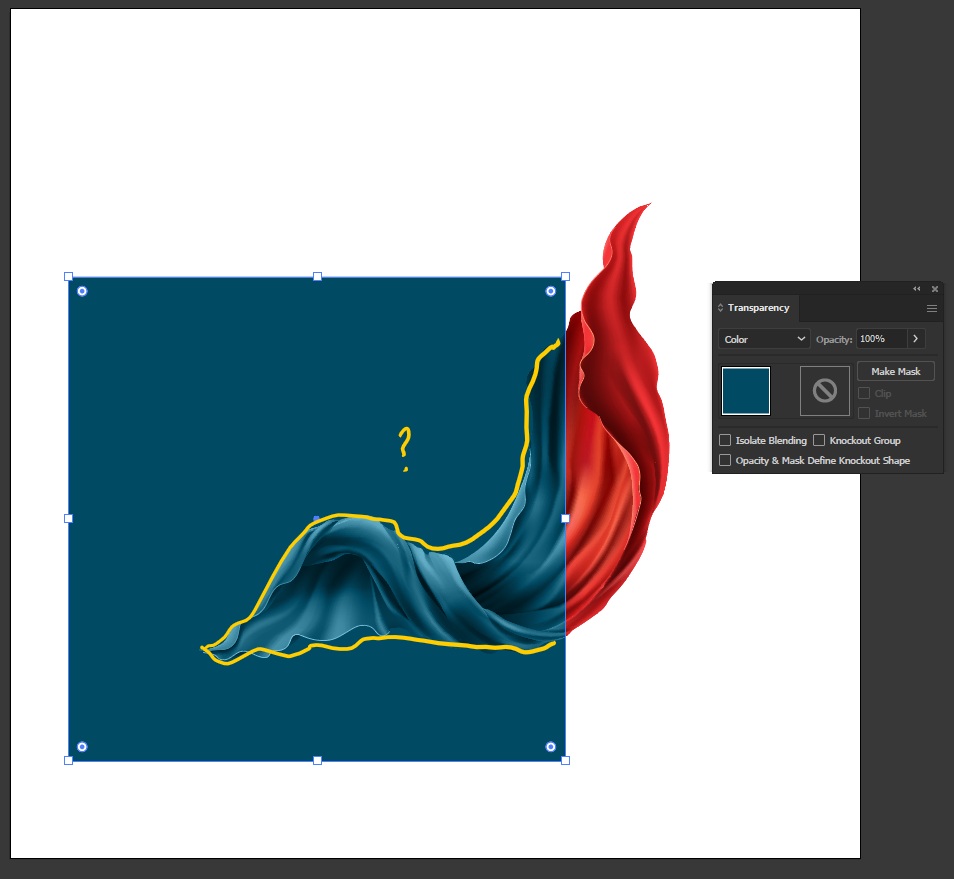
Hello. I'm facing a challenge that I don't seem to be able to solve. I have this red cloth group made out of different vector shapes and I'm trying to change its colour to a specific teal tint (RGB: 0 75 100). I made a square with that RGB value, changed its mode to Colour from the Transparency tab and moved it over the red cloth. I am trying to somehow 'constrain' or 'mask' this square shape to only affect the red coth beneath it but whatever I do, I can still see the rest of it. I tried to play around with the checkmarks in the Transparency panel but they don't seem to help either.

Can anyone give me a hand please? Thanks in advance.


VahePogossian_0-1622899019164.png


TOPICS
Draw and design

Views

506

Translate

Translate

Report

Report
Community guidelines
Be kind and respectful, give credit to the original source of content, and search for duplicates before posting. Learn more
community guidelines

correct answers 1 Correct answer

Participant , Jun 05, 2021 Jun 05, 2021

Thank you! I also seem to have found a solution. It was so simple I had the urge to facepalm myself...

I simply added the desired teal as a new fill color on the cloth and changed the Blend Mode of that fill to "Color". No squares or other masks. The result:


VahePogossian_0-1622907349907.png


Votes

Translate

Translate
Adobe
Community Expert ,
Jun 05, 2021 Jun 05, 2021

Copy link to clipboard

Copied

What happens if you put the red group above the flat teal object, select both and make mask with both Clip and Invert checked?

Votes

Translate

Translate

Report

Report
Community guidelines
Be kind and respectful, give credit to the original source of content, and search for duplicates before posting. Learn more
community guidelines
Participant ,
Jun 05, 2021 Jun 05, 2021

Copy link to clipboard

Copied

Hello. Thank you for your input. I tried what you said, unfortunately nothing happened, both objects simply became invisible.


Votes

Translate

Translate

Report

Report
Community guidelines
Be kind and respectful, give credit to the original source of content, and search for duplicates before posting. Learn more
community guidelines
Community Expert ,
Jun 05, 2021 Jun 05, 2021

Copy link to clipboard

Copied

Do you also have a Blend mode applied?

Votes

Translate

Translate

Report

Report
Community guidelines
Be kind and respectful, give credit to the original source of content, and search for duplicates before posting. Learn more
community guidelines
Participant ,
Jun 05, 2021 Jun 05, 2021

Copy link to clipboard

Copied

Yes, still nothing. Kindly attaching the EPS file if you'll have more time to look into it, I'd be most grateful.Essentially, what I'm looking for is the equivalent of the "Color Overlay" setting in Photoshop's Layer Styles.

Votes

Translate

Translate

Report

Report
Community guidelines
Be kind and respectful, give credit to the original source of content, and search for duplicates before posting. Learn more
community guidelines
Community Expert ,
Jun 05, 2021 Jun 05, 2021

Copy link to clipboard

Copied

I removed the Color blending mode from you green object and used the red group as a mask.

I put a copy of the red group filled with white behind it otherwise it would become semi transparent.


Votes

Translate

Translate

Report

Report
Community guidelines
Be kind and respectful, give credit to the original source of content, and search for duplicates before posting. Learn more
community guidelines
Participant ,
Jun 05, 2021 Jun 05, 2021

Copy link to clipboard

Copied

Thank you! I also seem to have found a solution. It was so simple I had the urge to facepalm myself...

I simply added the desired teal as a new fill color on the cloth and changed the Blend Mode of that fill to "Color". No squares or other masks. The result:


VahePogossian_0-1622907349907.png


Votes

Translate

Translate

Report

Report
Community guidelines
Be kind and respectful, give credit to the original source of content, and search for duplicates before posting. Learn more
community guidelines
Community Expert ,
Jun 05, 2021 Jun 05, 2021

Copy link to clipboard

Copied

LATEST

That is even better. When you hear the word mask when the problem is described, you start thinking about solving it with a mask, instead of thinking about a totally different way.

Good to hear you've got it solved.
Votes

Translate

Translate

Report

Report
Community guidelines
Be kind and respectful, give credit to the original source of content, and search for duplicates before posting. Learn more
community guidelines