 Adobe Community
- Home
- Illustrator
- Discussions
- How to create a specific shape/Blend circles of di...
- How to create a specific shape/Blend circles of di...
Copy link to clipboard
Copied
Hello my dears,
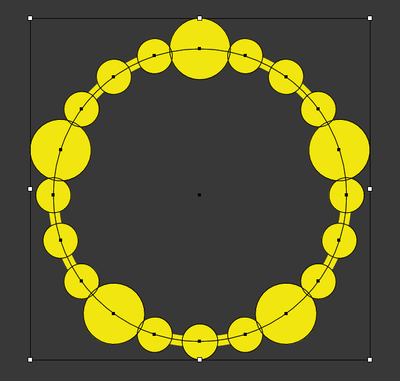
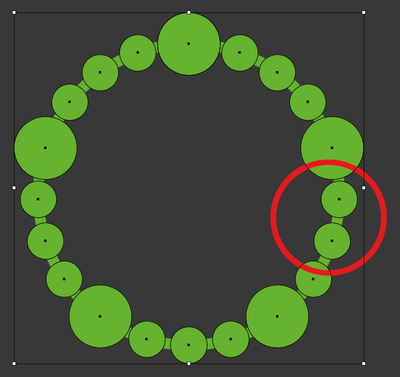
I need to create the shape from the image below and I don't know how. The blend option and the rotation option will work if all the circles shared the same size but those bigger ones are killing me. Is there any option to space the circles evenly having those different ones?
 1 Correct answer
Piter,
I (mis)read it in a third way which requires another approach which can be chosen among multiple options.
One is based on blends upon blends and requires much explanation.
Another is based on a Graphic Style and requires a bit of calculation but is easier to explain:
As I (mis)understand it, you wish to have 5 larger circles and 15 smaller circles placed evenly round a stroked circle of a certain size, evenly in the sense that you have the same space in between circles, correspond
...Explore related tutorials & articles
Copy link to clipboard
Copied
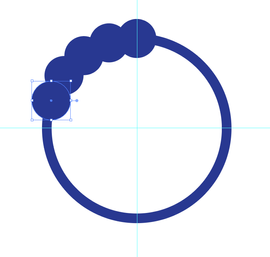
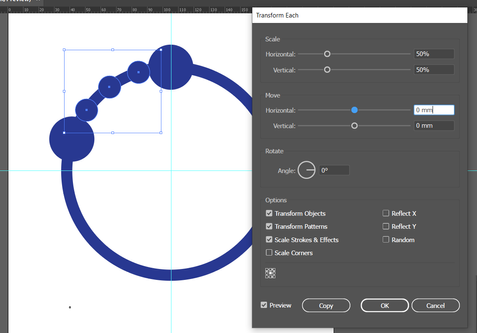
well, the easiest way is to create blend with the same size, then expand it (Object > Blend > Expand), select all the circles you need to grow and use Object > Transform > Transform Each (make sure to set the anchor point in center)
Copy link to clipboard
Copied
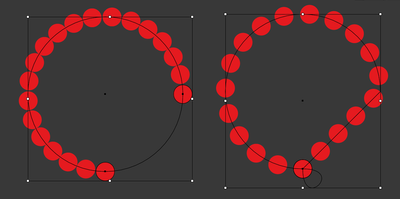
Hi Anna, thanks for your reply. However the blend option does not complete the circle and if I move the last one the shape makes a weird twist like seen here:
So the best solution to complete the circle is using the rotate function (360/20 with 18º as angle) but the spacing problem appears here. If I select the ones I need bigger the spacing remains the same and it looks like this:
I'm gonna try the other solutions now, Jacob seems to have gotten the final shape right.
Copy link to clipboard
Copied
Do you need to find a method to create similar ones or is it just about exactly this one?
If the latter: calculate the exact angles and then first do the big ones, then copy/rotate one of the small groups and then copy/rotate the group.
Copy link to clipboard
Copied
Hi Mon, the almost exact one as to position but I can change the sizes of the circles a bit cause the original ones are irregular shapes and I have chosen the closest sizes. Also, how do I calculate the exact angle being them circles?
Copy link to clipboard
Copied
I stopped with those mathematical/geometrical formulas when I didn't need them anymore, but probably calculations like this could get you closer: https://planetcalc.com/1421/
You would still need to consider the gaps between the circles in your calculation.
Copy link to clipboard
Copied
Piter,
I (mis)read it in a third way which requires another approach which can be chosen among multiple options.
One is based on blends upon blends and requires much explanation.
Another is based on a Graphic Style and requires a bit of calculation but is easier to explain:
As I (mis)understand it, you wish to have 5 larger circles and 15 smaller circles placed evenly round a stroked circle of a certain size, evenly in the sense that you have the same space in between circles, corresponding to Align>Distribute Spacing rather than Align>Distribute Objects (the latter having the same distance between centres or similar).
As the Graphic Style approach you can, see imagery at the end:
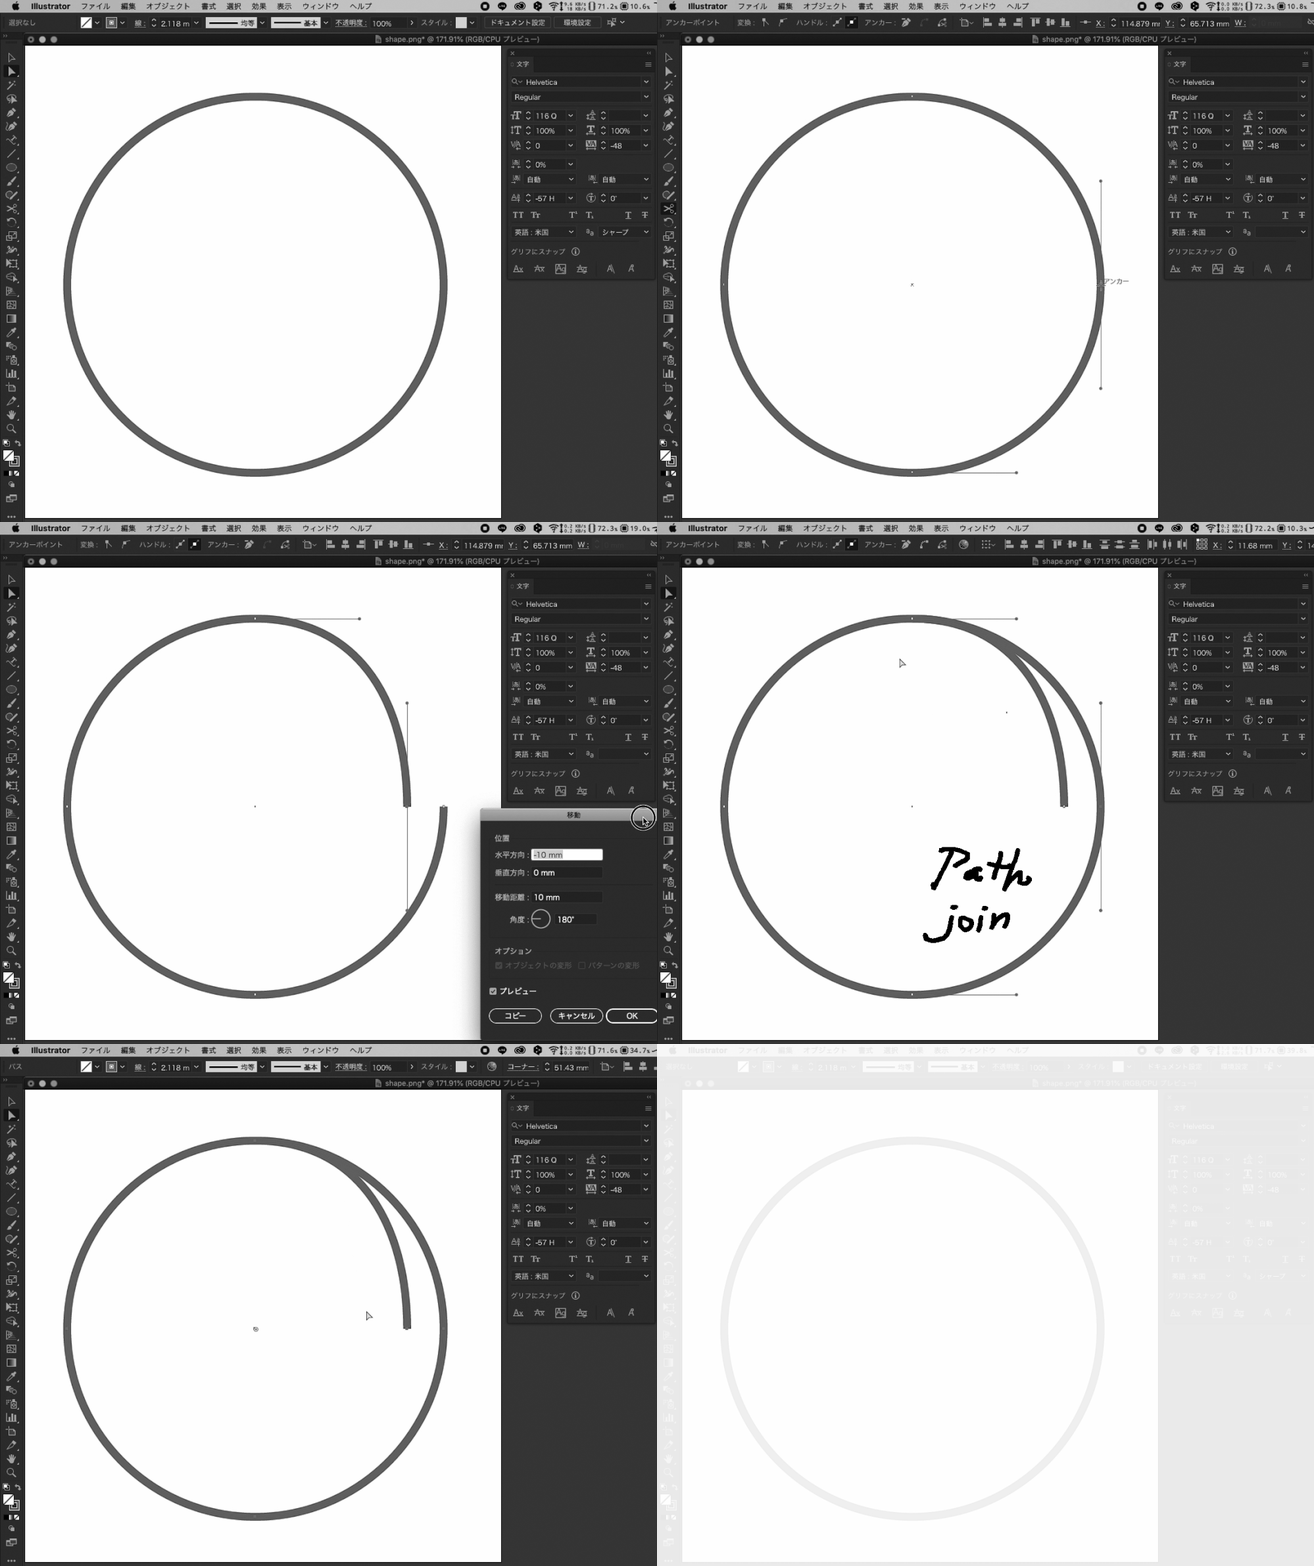
1) Create the circle with the desired W = H and the desired Stroke Weight with Round Cap and Round Join to form the background of the final shape or just a reference;
2) Ctrl/Cmd+C+F to create a copy on top, lock the original, and select the copy circle;
3) Use the free Divide script from the link (佐藤浩之, Satō Hiroyuki) below, then cut the circle at the top Anchor Point and at every fourth Anchor Point clockwise to get five separate paths;
or
3) Use the free Circle script from the link (佐藤浩之, Satō Hiroyuki) below, then cut the circle at all AnchorPoints;
4) Select (one of) the bottommost path(s) (the easiest one or any of the others), then:
4a) In the Appearance palette Add New Stroke and set the Stroke Weight to the W/H of the larger circles, then click Dashed Line and set the (first) Dash to 0 and set the (first) Gap to the Length value in Document Info (if the second circle fails to show reduce the Gap value a wee bit so it does;
4b) In the Appearance palette Add New Stroke and set the Stroke Weight to the W/H of the smaller circles, then click Dashed Line and set all Dashes to 0 and set all Gaps to the following value: use the Length minus the larger W/H and minus 3x the smaller W/H, the result divided by 4, and then add the smaller W/H (this looks wrong but only till the next step);
4c) Change the First Gap in 4b) by adding half the difference between the W/H of the larger circles and the W/H of the smaller circles (this ought to put it right);
The Graphic Style build up is shown separately in the imagery;
Now you ought to have a circle where the bottommost fifth has the desired appearance;
5) ClickDrag 4) into the Graphics Style palette (and name it as desired);
6) Select the four other fifths and click the Graphic Style from 5);
Now you ought to have the desired appearance of the full circle with circles;
7) Group everything, including 1) if desired, after unlocking it.
Link to the Divide script and others by (佐藤浩之, Satō Hiroyuki):
Edit: Missing parts in 4b and 4c added in red text.
Edit edit:
An alternative version of 3) using the Circle Script is shown in magenta;
The numbers shown in blue can be changed to make the solution work for similar shapes with other numbers of larger and smaller circles, just add or subtract 1 for each circle more or less (total number for larger circles (5 in this case) and number of smaller circles between each pair of larger circles (3 in this case)).
Copy link to clipboard
Copied
well, in eal work I would go follow:
1. Draw the main circle and the top bigger element.
2. Create 4 copies using 18° rotation
3. Change the size of internal circles using Object > Transform > Transform Each
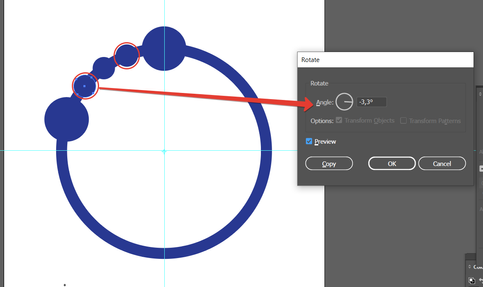
4. Rotate a bit the first and the third small circles to adjust the space. With my big/small proportions it was 3,3° and -3,3° respectively, yours may require some search but the needed angle is certainly between 3° and 4°.
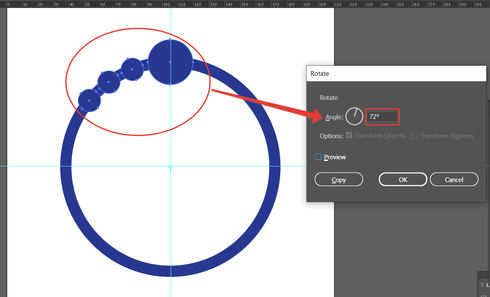
5. Delete the lower big circle, select all the left circles and copy them rotating on 72°
6. If you need the solid shape, then 2 more steps:
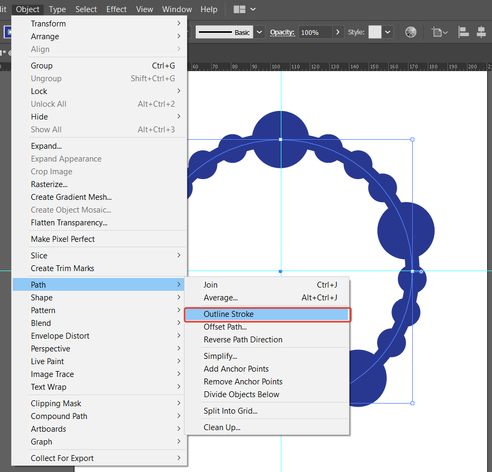
- Outline stroke of the main circle
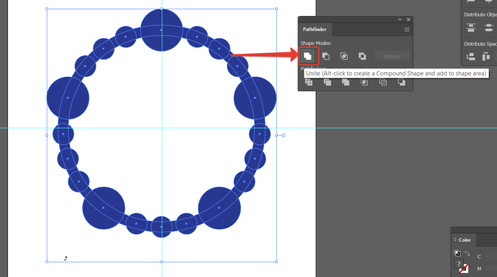
- Unite all the elements:
Looks long but really it took less than 5 minutes.
Copy link to clipboard
Copied
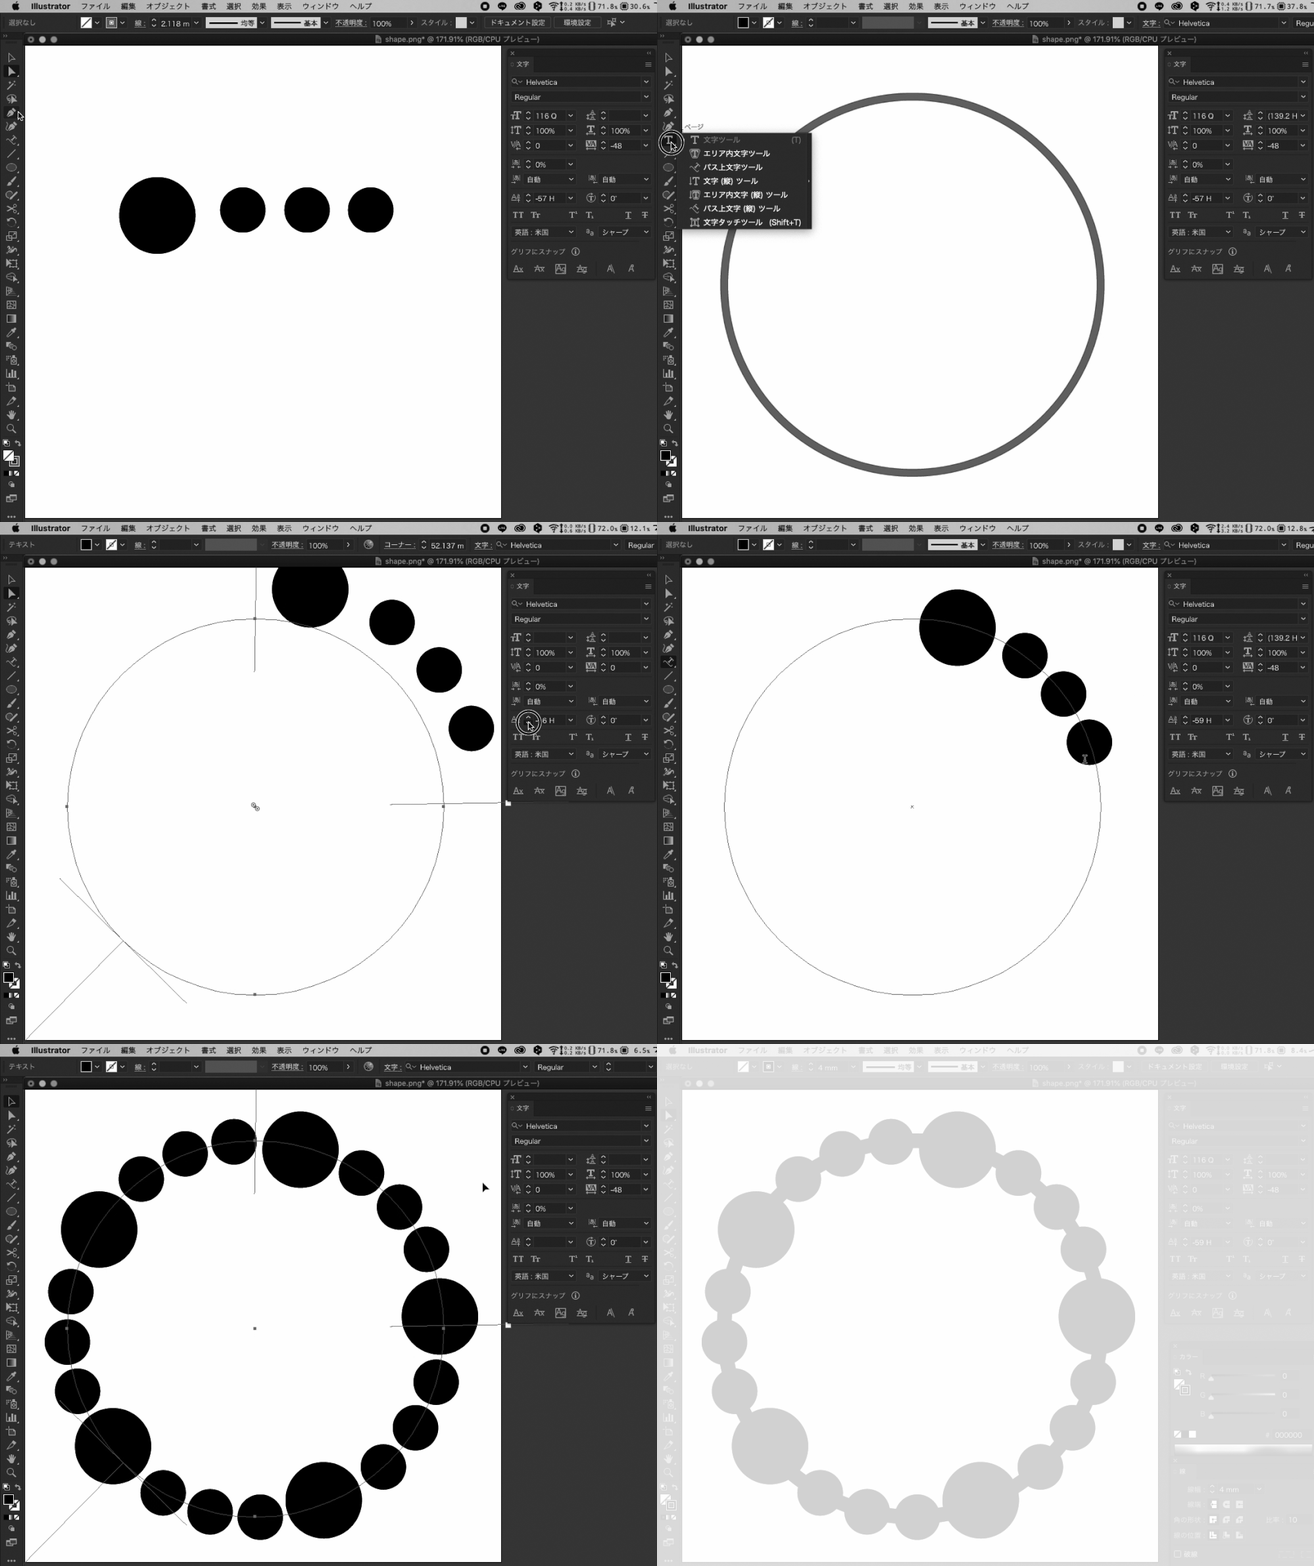
Another way
Using "Type on a Path Tool"
Make a partially doubled circle.
Create text to put on this path.
Adjust the position and spacing.
Copy link to clipboard
Copied
Piter,
Here is a Blend approach; it is easier to explain than I believed, and more straighforward than it sounds.
And, like the Graphic Style approach it is fully accurate in itself, no need for any adjustments (which may be less than fully accurate).
As I still (mis)understand it, you wish to have 5 larger circles and 15 smaller circles placed evenly round a stroked circle of a certain size, evenly in the sense that you have the same space in between circles, corresponding to Align>Distribute Spacing rather than Align>Distribute Objects (the latter having the same distance between centres or similar).
You can, see imagery below:
1) To create the overall circle, use the free Circle script from the link (佐藤浩之, Satō Hiroyuki) below, setting the number of Anchor Points to 5, then change the W = H to the desired value and the Stroke Weight to the desired value with Round Cap and Round Join to form the background part of the final shape; rotate it by 90 degrees to the one Anchor Point at the top;
2) Ctrl/Cmd+C+F to create a copy on top, lock the original, and select the copy circle, then cut at the top Anchor Point;
Now the overall circle is ready for the Blend;
3) Create the first of the larger circles at the desired W = H and fill/nostroke;
4) Ctrl/Cmd+C+F to create a copy on top, then change the W = H to that of the smaller circles, then select both and Click the larger circle once more, then Align>Distribute Spacing horizontally with the value 0, to have them beside each other (you can move the smaller circle in other ways, but you need the Distribute Spacing later so you may as well have an easy start);
5) Select the smaller circle and Object>Move a copy horizontally by its W = H value, then Ctrl/Cmd+D to repeat;
Now you have the first set of circles;
6) Select the circle set and Object>Move a copy horizontally by the sum of the W = H values (1x large and 3x small), then then Ctrl/Cmd+D four times to repeat;
Now you have 6 sets of circles;
7) Select the last 3 circles and delete them;
Now you have 5 sets of circles with an additional larger circle at the end;
8 ) Select the overall circle from 2 and pick the Length value in Document Info, then subtract 5x the W=H value of the larger circles and 15x the W=H value of the smaller circles, then divide by 20;
9) Select all the larger and smaller circles, then Click the leftmost one, then insert the value from 8 instead of 0 and Align>Distribute Spacing;
Now you have the right distances between the circles;
10) Object>Blend>Blend Options, set Spacing to Specific Steps = 1 and Orientation to Align to Path;
11) Object>Blend>Make;
12) Shift>Click the overall circle from 2) and Object>Blend>Replace Spine;
Now you have an orderly mess round the overall circle where every second circle is unwanted;
13) Object>Blend>Expand, then deselect, then ShiftClick with the Direct Selection Tool on all the unwanted circles, every second starting and ending beside one of the larger circles, then press Delete;
14) Unlock the original circle from 1), then select everything and Ctrl/Cmd+G to Group.
Now everything ought to look right;
15) If you wish, you can deselect and Direct Select the topmost larger circle which is a double, then delete it.
Link to the Circle script and others by (佐藤浩之, Satō Hiroyuki):
Click/RightClick to see full size, or Click Here to see it in Chrome
Click within the image to Zoom in.
Copy link to clipboard
Copied
Hello Jacob,
Thanks a lot for taking the time to explain in detail each step. I was actually in the middle of your previous approach and came here to ask you somehing as I was stuck in one step when I read the other options including the blend alternative. I'm overwhelmed by the amount of responses here and also all the possible ways to do the same shape.
So, as I couldn't complete it with the previous one I jumped to the blend option which kind of worked until I noticed 2 things, 1) The bigger circles are 16.6 px and the smalled ones are 9.6 px but all circles ended up with different sizes, (I must confess the blend is not my favorite as I had this problem before) see it here: https://recordit.co/yn1htSudIP
And 2) When I though I was finally done I noticed the circles are not evenly spaced:
I started the process all over again to make sure I wasn't making any mistake but then the result was even worst when replacing the spine:

Copy link to clipboard
Copied
Piter,
In the blend way, were you actually using a circle with 5 Anchor Points created with the Circle script to start with and then resized?
The images look as if you have Anchor Points at the sides corresponding your using/starting with a default circle 4 in total. Especially large/complicated Blends can be confused by less optimized paths are used as spines.
In the Graphic Style way you can also start with a 5 Anchor Point circle created with the Circle script. Can you show what you have made so far?
Copy link to clipboard
Copied
Hi Jacob,
I'm afraid you are right, I mistakenly grabbed the other circle which had 4 points instead of the script circle. That's because the script creates the shape at the center of the artboard and I was working outside of it. The first one with the wrong spacing was the 5 anchor points though.
As to the graphic style, I got stuck in step 4c (changing the first gap) these are my numbers:
49.895 (length)
- 16.6 (big circle)
- 28.8 (small circle 9.6 x 3)
/ 4 for each space
=
1.12375
Then I added 8.3 to that 1.12375 (half the W/H of the larger circles) to the first gap and this was the result:
I tried moving the numbers up and down, changing the dashing line options and couldn't get it right.
May I suggest that if you have a correction use the RecordIt program? I feel sorry for you typing so many steps.
Thanks!
Copy link to clipboard
Copied
Piter, I am sorry.
When I tried out your set I got the same strangeness; and then I realized that parts of the instructions in 4b) and 4c) were missing, lost between doing and describing.
I have added the missing parts in red in that post, and that changes the calculations as follows, changes shown in red:
49.895 (length)
- 16.6 (big circle)
- 28.8 (small circle 9.6 x 3)
/ 4 for each space
=
1.12375 + 9.6 = 10.72375
Then I added 8.3 to that 1.12375 (half the W/H of the larger circles) to the first gap and this was the result:
Then add 3.5 to that 10.72375 (half the difference between the W/H of the larger circles and the W/H of the smaller circles, which is 16.6 - 9.6 = 7), thereby getting a first gap that is 14.22375.
This ought to get it right, finally.
Copy link to clipboard
Copied
Hi Jacob,
That was it! That did the trick and got my shape right. Thanks a lot for your hard work, very much appreciated.
Just a question outside this shape. When I expand the graphic style, blends or use the "add" within the pathfinder option shapes change sizes. As you may have perceived I enjoy getting perfect results and it's beyond my understading as to why a shape that was 16.6 would be 16.6057 after expanding. Should I forget about numbers and trust that Illustrator is behaving correctly? Is this expected to happen? See here an example: https://recordit.co/c0fNsvsrim
Thanks again!
Copy link to clipboard
Copied
Thank you for your kind words, Piter.
For my part, I trust Illy (job description Adobe Illustrator) unconditionally.
When you Expand/Expand Appearance/Flatten Transparency/do other things to simplify the structure of objects, there is a possible/likely/inevitable loss, which may be in quality/flexibility/usability/reversibility/accuracy, so there is no reason to worry about a small change in numbers.
Always set a copy of the original artwork aside before your starting to destroy it.
To encounter inaccuracies, there is no need to look further than a default circle, one of the objects most used.
You can try to Click with the Ellipse Tool and set W=H to 1,000 or 10,000 pt, then Object>Transform>Rotate by 7.5 degrees and follow up by Ctrl/Cmd+D to repeat at least 5 times to reach 45 degrees rotation (or go all the way round), and enjoy or shudder as you look at the W and H values.
Edit: I have just extended the Graphic Style post to also include instructions for other numbers of circles.


