 Adobe Community
- Home
- Illustrator
- Discussions
- Re: How to create custom borders like classic Atar...
- Re: How to create custom borders like classic Atar...

Copy link to clipboard
Copied
Hello all...I am somewhat of a beginner in Illustrator, but I feel like if I can at least solve this "mystery" I can overcome a hurdle and learn more about this awesome program
I want to create multi-colored lined borders like what you see in these classic "old school" arcade game flyers BELOW...
It's a design motif used by Atari in their classic Arcade cabinets/marquees on the video games, and they used the same design style in these flyers...various colored lines are traced around as a border, almost like a road on a map
In Illustrator I have been trying to use the Arc tool and or Line tool to create the curved corners..but when I try to "stretch" out the ends to make the lines go straight, the curve is not smooth/continuous...I cannot quite figure out how to get illustrator to make a straight line a curve and then back to a straight line again in a different direction, as seen here
How can this style of borders be created in Illustrator (Tools used, etc?)-
MUCH THANKS


 3 Correct answers

Each one of your samples are significantly different. Each one would have its own approach. Given that, you have a few different options at your disposal. One is to create a brush using a segment of the border. Then, create a rounded rectangle and apply the brush to that. Those samples are each custom artwork. I would print each one as large as you can using whatever printer you have available. This will give you a chance to measure corner radius diameters to be applied throughout. In yo
...
Kapp,
For the asymmetrical paths in ATARI and ASTEROIDS, simple use of Art Brushes would seem an obvious choice as mentioned by John.
For the symmetrical paths in CENTIPEDE and POOLSHARK, you can use either Art Brushes or multiple Strokes, along with negative/inward Offset Path to get much of the shapes, with some afterwork including rounding, cutting/(re)joining, and copying (parts), and in CENTIPEDE an overlap of the yellow cenrtre band, and also Knockout Group based on a 0 Opacity outer p
...
Kapp,
As long as you use the Offset Path, Illy (Job description Adobe Illustrator) does the math for you, and she knows it by heart.
I believe there is no need to delete Anchor Points to round corners. If it cannot be done with Rounded Rectangles or Corner Widgets, you can use the free Round Any Corner (by 佐藤浩之, Satō Hiroyuki), available here along with many other valuable ones:
Explore related tutorials & articles
 9
Replies
9
9
Replies
9
Copy link to clipboard
Copied
Just to explain better what I've tried so far...
- I will use line tool to just make the straight lines in varied colors
- Bump up the stroke size to create "fat" lines
- Use the Arc tool to create the curves... Stroke size and color matched
- As can be seen in my example, these items are not one continuous line
- ...the broken line can easily be seen
I feel like theres a way to create an arc and then just "stretch" the top and bottom of the arc out, and have those lines be at 90 degree angles to the artboard's corners...
THANKS ALL for any suggestions
Copy link to clipboard
Copied
Each one of your samples are significantly different. Each one would have its own approach. Given that, you have a few different options at your disposal. One is to create a brush using a segment of the border. Then, create a rounded rectangle and apply the brush to that. Those samples are each custom artwork. I would print each one as large as you can using whatever printer you have available. This will give you a chance to measure corner radius diameters to be applied throughout. In your first sample. I would create the outside corner radius using the ellipse tool ( say one inch ) at around 12pt stroke, no fill. Discard top anchor point and right anchor point, should leave you with a corner. Select that segment and use Offset Path > experiement until you get the spacing you want > repeat for the third segment. When you have the three corner segments done, select all > covert to paths. You will now duplicate the three segments for each corner of your design ( if necessary ). You can now extend the ends of the corner to reach its destination. So, I have given you two ways to achieve the first sample: one using a brush, one creating the corner manually. Again, each sample is considerably different. You can also create a tracing Layer to help follow along the original artwork ( Place the image or artwork on a Layer, then create another Layer to use for your tracing ( artwork ).
Copy link to clipboard
Copied
This is incredible advice...
Major thanks!
...I will try these processes out!
Copy link to clipboard
Copied
Kapp,
For the asymmetrical paths in ATARI and ASTEROIDS, simple use of Art Brushes would seem an obvious choice as mentioned by John.
For the symmetrical paths in CENTIPEDE and POOLSHARK, you can use either Art Brushes or multiple Strokes, along with negative/inward Offset Path to get much of the shapes, with some afterwork including rounding, cutting/(re)joining, and copying (parts), and in CENTIPEDE an overlap of the yellow cenrtre band, and also Knockout Group based on a 0 Opacity outer part of the yellow(ish) path for POOLSHARK, to obtain (something close to) the appearances shown.
Below, you can see steps/layers in creating a crude Knockout Group sample corresponding to the top of the POOLSHARK.
Copy link to clipboard
Copied
@Jacob Bugge much thanks!
I will review some tutorials on those tools...that should help me to get a jump forward in creating this
(i.e. Art Brushes and setting Offset path)
Copy link to clipboard
Copied
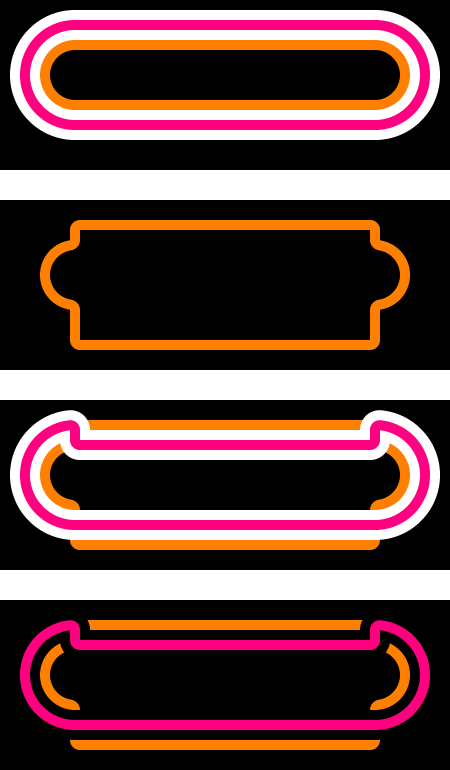
Alright...Been utilizing some of these techniques...creating a shape, deleting some of the anchor poinbts to get curved corners, then creating lines and jpining them to the path...
I am finding that I do seem to need to do some math to pick the correct size of circle to get this to work
However, getting there!
Here's a sample (having some fun here)

Copy link to clipboard
Copied
Kapp,
As long as you use the Offset Path, Illy (Job description Adobe Illustrator) does the math for you, and she knows it by heart.
I believe there is no need to delete Anchor Points to round corners. If it cannot be done with Rounded Rectangles or Corner Widgets, you can use the free Round Any Corner (by 佐藤浩之, Satō Hiroyuki), available here along with many other valuable ones:
Copy link to clipboard
Copied
Allright, all
I thank you all again...
I now have learend and understand how to use Offset Paths in combo with rounded rectangles, setting Miter, and deleting SOME anchor points
And, we've got "Retro early 80's stripe borders"
This is awesome...I'll be getting more knowledgeable on using this, including knockout groups, but here's one more sample - Major thanks to all on this

Copy link to clipboard
Copied
For my part you are welcome, Kapp.

 AdChoices