J,
In this case the properties/proportions are special, so you may do it in a special way, depending on what you actually have, including which form you have the letters in.
Smart Guides may be your friends.
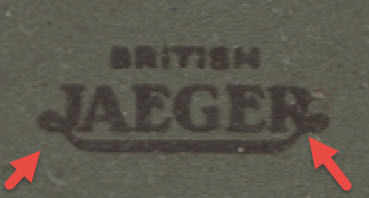
The middle part of the line is straight and has a large constant thickness (Stroke Weight), and it gets thinner and thicker again goind up and round to reverse into the letter parts.
You could place the locked image and redraw on top of it, starting with the letters in whichever way you have them. Then create a straight path corresponding to the thick middle part, which you can do by ShiftClickDragging from end to end with the Line Segmant Tool.
Then you could switch to the Pen Tool and ShiftClickDrag to the left from the leftmost end Achor Point of the straight path, then ShiftClickDrag to the left from the topmost point of the curve to the left, then (Shift)ClickDrag to the right (and maybe downwards) where the J ends, dragging into the direction at the very end of the J.
You may try quite a few times (Undo, Ctrl/Cmd+Z may be a good friend here) to get the right combination of positions and Handle lengths (and directions). You can also chnage the position of each Anchor Point underway by pressing the Spacebar without letting go (this will allow you to move it about while the Handles are locked, you can go back and forth between positioning and (Handle) shaping). Depending on the nature of the J, you may join in different ways.
You can work in the same way at the other end, with the R.
To create the curvy additions as separate paths (to be joined through the midmost part later), you may start each by first Clicking a bit off the end of the straight path, then press the Spacebar and drag to coincide (Smart Guides say anchor), then ClickDrag to create the Handles and go on from that. After that, you can Click both paths with the Selection Tool (or ClickDrag over the coinciding end Achor Point) and Ctrl/Cmd+J to join them, remember to tick Smooth.
Depending on the version, you may use the Width Tool to get the right distribution/transition of width/Stroke Weight, or you may use an Art Brush (this may require a number of attempts). When you have the shape right, you may Object>Path>Outline Stroke to get a closed fill/nostroke path, which may be joined with the fill/nostroke paths forming the (outlined) letters, if that is what they are, using Pathfinder>Unite. Or the joining can just an appearnce, keeping the paths/object separate.
Remember to keep copies of the artwork underway so you can fall back on an earlier version/structure.
This may be woollier than usual, but the challenge is also a bit woollier than usual, at least until the nature of what you have is known.


 3
Replies
3
Replies


 AdChoices