 Adobe Community
- Home
- Illustrator
- Discussions
- [NEED HELP] How to create these "Buttons" in illus...
- [NEED HELP] How to create these "Buttons" in illus...
Copy link to clipboard
Copied
Hey Guys,
hey guys, I'm new to this community and I have the first question right away:
I'm creating watchface content.
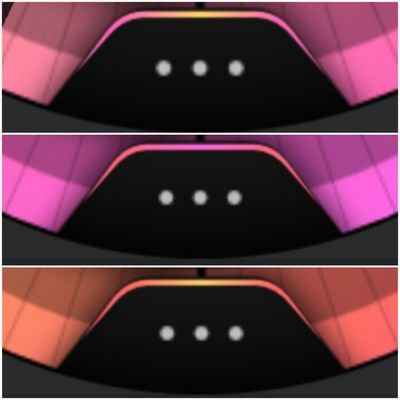
I'm trying to figure out how do I create these "buttons" can somebody tell me if this is a single element or is it created from more elements?
First thoughts I had was, creating the Kontur for the gradient as a single element and the black background as well, then group them together, because the pathfinder won't work with that. Everytime I use it the gradient won't work like I want them 🙈
It drives me crazy 🙈
Any help or workaround is appreciated 😊
Thanks in advance
 2 Correct answers
Fre,
As I (mis)understand it, you can proceed as follows, given the large circle (part at the bottom) after locking everything else:
1) Create one path, with a thin white (or red or other bright colour so you can see the (other parts of the) watchface below) stroke and no fill, in the overall shape that includes both the gradient area at the top and the black area with the three white dots below, basically comprising a straight horizontal segment at the top which passes through rounded corne
...This is a very easy drawing, many ways to do it
Just draw some basic shapes, curves and lines, using the Pathfinder and the Shape Builder tools I did a very close element
As will be very large to describe the process in words, Here you can download the .ai file where you can see how is constructed and painted, use global colors so you can change it to obtain the different versions easy just changing the color values.
Explore related tutorials & articles
Copy link to clipboard
Copied
Those are more than one path.
Can you show what you have accomplished by now?
Copy link to clipboard
Copied
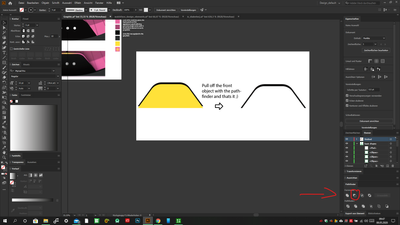
here you can see the important thing 🙂 its really easy. just create a polygon and cut them by half. Then round the upper edges. double it and put them over each other with a slightly differnece on the Y-axis (depending on how think you want it) then use the pathfinder - Pull off the front object to subtract the foreground element from the other. thats it. look here
Copy link to clipboard
Copied
Fre,
As I (mis)understand it, you can proceed as follows, given the large circle (part at the bottom) after locking everything else:
1) Create one path, with a thin white (or red or other bright colour so you can see the (other parts of the) watchface below) stroke and no fill, in the overall shape that includes both the gradient area at the top and the black area with the three white dots below, basically comprising a straight horizontal segment at the top which passes through rounded corners into the pair of straight slanting segments at the sides extending below the large circle and close the path with a straight segment at the bottom, then cut the bottom part off using a copy of the circle on top (you can use the Shape Builder Tool, see below);
2) Copy the path from 1) on top and lock the original, then move the copy vertically down (you may ShiftClickDrag or use the down arrow) until you have the (white line at the) top of the copy path where you wish to have the bottom of the horizontal part of the gradient area;
3) In the Transform palette click the top middle Reference Point, then downscale the copy vertically by multiplying/dividing the H value by the right number (smaller/larger than 1) to get the (white lines forming the) slanting lines cross the black shape where you wish to have the bottom sharp ends of the gradient area;
4) Unlock the original path, select both paths, and use the Shape Builder Tool or Pathfinder>Divide (Ungroup in the latter case), then delete the unwanted bits and apply a simple horizontal gradient as desired to the top path/part, and apply the black to the bottom path/part, and remove the white stroke(s).
https://helpx.adobe.com/illustrator/using/creating-shapes-shape-builder-tool.html
Copy link to clipboard
Copied
Big thanks to this workaround 🙂 I will looking into it right now and check this out 🙂 sometimes you cant see the woods in front of the trees 😄 can I contact you for further little questions about the workaround you wrote for this element? 🙂
Copy link to clipboard
Copied
This is a very easy drawing, many ways to do it
Just draw some basic shapes, curves and lines, using the Pathfinder and the Shape Builder tools I did a very close element
As will be very large to describe the process in words, Here you can download the .ai file where you can see how is constructed and painted, use global colors so you can change it to obtain the different versions easy just changing the color values.
Copy link to clipboard
Copied
WOW I dont know how to thank you. you have done really amazing work 🙂 i love it. thanks a lot for that now I can play around with it and check out how you made it 🙂 I will definetly lookin into it immediatley. Big thanks for your help 🙂
Copy link to clipboard
Copied
Ou man!!! Now I have checked how to create it.....oh man youre totally right its sooooo damn easy 😄 😄 The pathfinder is an amazing tool which is defintely underestimated from me :D:D thanks for pointing me in the right direction 🙂 its just a half polygon with round edges. to create the graident bar I only have to put them over each other and use the pathfinder to create the wanted barsize...bigger, smaller, brider, thinner.....everything I want....thanks again 🙂


