• Global community
    • Language:
      • Deutsch
      • English
      • Español
      • Français
      • Português
  • 日本語コミュニティ
    Dedicated community for Japanese speakers
  • 한국 커뮤니티
    Dedicated community for Korean speakers
Exit
1

Need help with creating logo.

Community Beginner ,
Dec 30, 2019 Dec 30, 2019

Copy link to clipboard

Copied

Hi, Does anyone know of a tutorial that will help me recreate the stroking and inside text design as shown in this example? Thank you! 

 lg20150723-5.png


TOPICS
Draw and design

Views

3.6K

Translate

Translate

Report

Report
Community guidelines
Be kind and respectful, give credit to the original source of content, and search for duplicates before posting. Learn more
community guidelines

correct answers 3 Correct answers

Community Expert , Dec 30, 2019 Dec 30, 2019

To me it looks like it's not made automatically. You can create guidelines by using Object > Path > Offset path with a negative offset value. From then on draw the necessary shapes. You can use the shapebuilder tools to create the final shapes.

Votes

Translate

Translate
Community Expert , Dec 30, 2019 Dec 30, 2019

It is in Illustrator and the appearnace panel.

https://www.youtube.com/watch?v=jHphDQrwdzw


https://www.youtube.com/watch?v=9X4aRWMMmkw


Votes

Translate

Translate
Community Expert , Dec 30, 2019 Dec 30, 2019

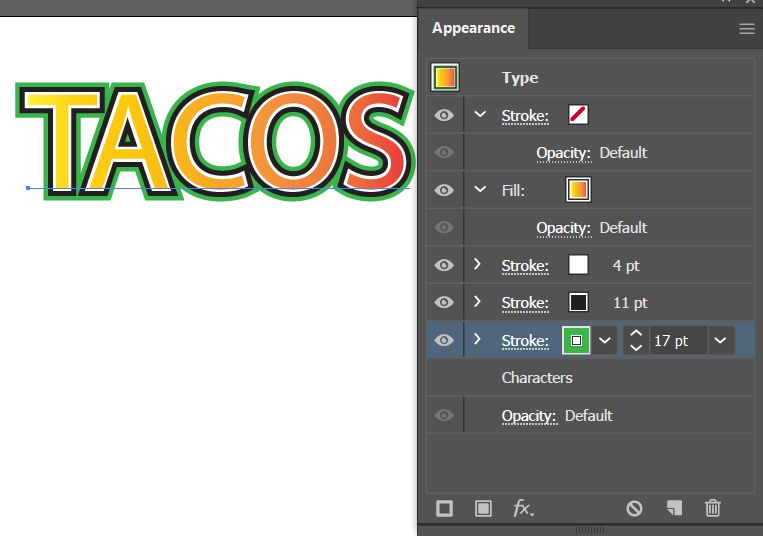
The key to doing this is the Appearance panel. You could start by applying a any fill and stroke. In the Appearance panel, click on the word Type to select it. In the Appearance panel menu in the upper right of the panel (little lines), choose Add New Fill, and add the gradient fill. Click on the Appearance panel menu again and add a new Stroke, following your example, make the stroke white. Add another new stroke and make it black, and increase the stroke weight to make it thicker. Add another

...

Votes

Translate

Translate
Adobe
Community Expert ,
Dec 30, 2019 Dec 30, 2019

Copy link to clipboard

Copied

To me it looks like it's not made automatically. You can create guidelines by using Object > Path > Offset path with a negative offset value. From then on draw the necessary shapes. You can use the shapebuilder tools to create the final shapes.

Votes

Translate

Translate

Report

Report
Community guidelines
Be kind and respectful, give credit to the original source of content, and search for duplicates before posting. Learn more
community guidelines
Community Beginner ,
Dec 30, 2019 Dec 30, 2019

Copy link to clipboard

Copied

Thank you so much, Monica. Let me give it a shot! 

Votes

Translate

Translate

Report

Report
Community guidelines
Be kind and respectful, give credit to the original source of content, and search for duplicates before posting. Learn more
community guidelines
Community Expert ,
Dec 30, 2019 Dec 30, 2019

Copy link to clipboard

Copied

It is in Illustrator and the appearnace panel.

https://www.youtube.com/watch?v=jHphDQrwdzw


https://www.youtube.com/watch?v=9X4aRWMMmkw


Votes

Translate

Translate

Report

Report
Community guidelines
Be kind and respectful, give credit to the original source of content, and search for duplicates before posting. Learn more
community guidelines
Community Beginner ,
Dec 30, 2019 Dec 30, 2019

Copy link to clipboard

Copied

Thank you, Channart! Going through all of this now! 

Votes

Translate

Translate

Report

Report
Community guidelines
Be kind and respectful, give credit to the original source of content, and search for duplicates before posting. Learn more
community guidelines
Community Expert ,
Dec 30, 2019 Dec 30, 2019

Copy link to clipboard

Copied

The key to doing this is the Appearance panel. You could start by applying a any fill and stroke. In the Appearance panel, click on the word Type to select it. In the Appearance panel menu in the upper right of the panel (little lines), choose Add New Fill, and add the gradient fill. Click on the Appearance panel menu again and add a new Stroke, following your example, make the stroke white. Add another new stroke and make it black, and increase the stroke weight to make it thicker. Add another new stroke (green), and make it even thicker. Arrange the various strokes and fills so that they are stacked properly. You should end up with something like this:

Untitled-1.jpg

Votes

Translate

Translate

Report

Report
Community guidelines
Be kind and respectful, give credit to the original source of content, and search for duplicates before posting. Learn more
community guidelines
Community Beginner ,
Dec 30, 2019 Dec 30, 2019

Copy link to clipboard

Copied

Thank you, Barbara! 

Votes

Translate

Translate

Report

Report
Community guidelines
Be kind and respectful, give credit to the original source of content, and search for duplicates before posting. Learn more
community guidelines
New Here ,
May 26, 2020 May 26, 2020

Copy link to clipboard

Copied

This is probably achieved through type or rather use of custome brushes. Looking into it there's a artistic features that would support my argument.

Cofounder at Insighta design company

Votes

Translate

Translate

Report

Report
Community guidelines
Be kind and respectful, give credit to the original source of content, and search for duplicates before posting. Learn more
community guidelines
Community Expert ,
Mar 10, 2023 Mar 10, 2023

Copy link to clipboard

Copied

LATEST

You may want to show what you already have and then someone might be able to tell you how you can do that ion Illustrator.

Votes

Translate

Translate

Report

Report
Community guidelines
Be kind and respectful, give credit to the original source of content, and search for duplicates before posting. Learn more
community guidelines