 Adobe Community
- Home
- Illustrator
- Discussions
- Re: "Display All Blacks Accurately" enabled. My Bl...
- Re: "Display All Blacks Accurately" enabled. My Bl...
Copy link to clipboard
Copied
I am creating artwork for a foil wrapper for a trading card pack.
The background color (a large rectangular path) will be blended with the foil in a sort of multiplicative printing pass, but there are several other elements which we want to appear true to color. In order to do this, our printer is having us create a white layer, where any assets in black will receive a white color pass before the color pass, to make them print accurately and not in that multiplicative way previously described.
The color layer is composed of raster images (character art and company logos) and vector elements (text, paths, ec).
I have a duplicate of all those elements for the white layer, where all the elements are black. Herein lies my issue.
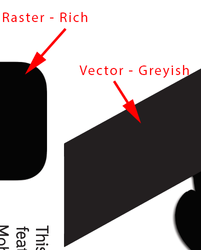
I have the project settings set to: Display All Blacks Accurately and Output all Blacks Accurately. I am setting my paths not to 0C 0M 0Y 100K black, but rather to a Rich Black setting of 70C 50M 30Y 100K. However, all my paths in the white layer appear greyish, as you would expect 100K black. The raster elements in the white layer are appearing rich black, as intended.
I tried to do this also by making a spot color swatch in rich black, but no luck there. If I change my output to Output as Rich Black, that doesn't seem to do the trick either when I output to PDF.
I'm fairly new to this and am totally lost as to the proper way to set this up. Can someone point me to the right way to set up such a white layer?
Thanks!
Using Illustrator 2020 (21.4.3) and OSX Catalina 10.15.5
 1 Correct answer
All you should need to do is to make sure that the objects are 100% black and in Preferences > Appearance of Black, choose Output all blacks as rich black.
Explore related tutorials & articles
Copy link to clipboard
Copied
Using 4 colors as Rich Black.
Use Pantone Black special color if possible.
Rich Black and K: 100 don't look the same.
You made the right choice in the Preferences settings.
Therefore, you can see the difference between normal cmyk black and rich black.
The design you have prepared will be printed on a flexible material, and if it will be produced with Flexo, WHITE is first printed under the design. The local WHITE PLAN is prepared. I hope I don't get it wrong.
Rich Black, Pantone Black, Cmyk BLACK are not the same, they will not look the same.
Copy link to clipboard
Copied
Yes, this is all correct.
However, no matter the value I try to give the paths in the "White Plan" as you describe, they look like 100K. I cannot seem to get them to change, no matter the swatch I apply.
Copy link to clipboard
Copied
All you should need to do is to make sure that the objects are 100% black and in Preferences > Appearance of Black, choose Output all blacks as rich black.
Copy link to clipboard
Copied
So, oddly, I've done exactly this. Everything looks correct in AI when I "Display As Rich Black." I set "Output All Blacks as Rich Black" as well. I then select Save as > PDF and choose Acrobat 8. No compression, no color profile. I get greyish blacks in the file for every path. My raster graphics appear as rich black, however.
Copy link to clipboard
Copied
When you save as PDF, are you choosing Preset Color Unchanged and Preserve, Standard PDF/X-4:2010, Color Conversion: No conversion.


