 Adobe Community

Copy link to clipboard
Copied
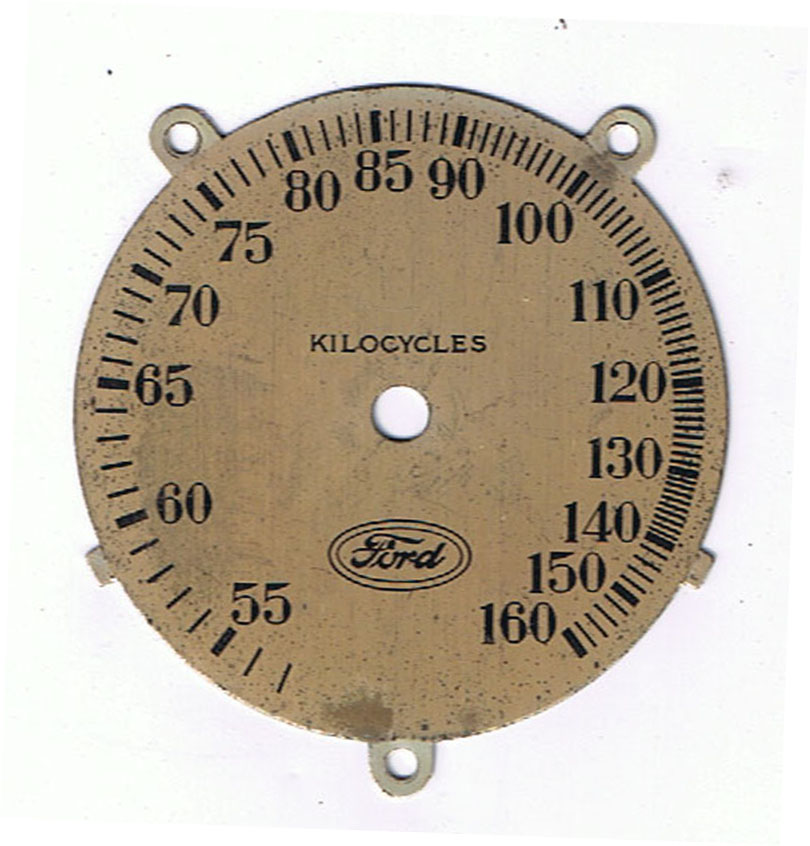
I now need to recreate the hash marks for this 1934 Ford Radio Dial. My problem is the gap between each and every single hash mark being different. I don't know how to make the usual method of drawing circles and creating one main hash mark then transform/copy to get all the hash marks. How can I digitally recreate this so that the hash lines are exactly as shown? Any ideas would be greatly appreciated. (this dial is 2 3/16 diameter)


 1 Correct answer

dsaf
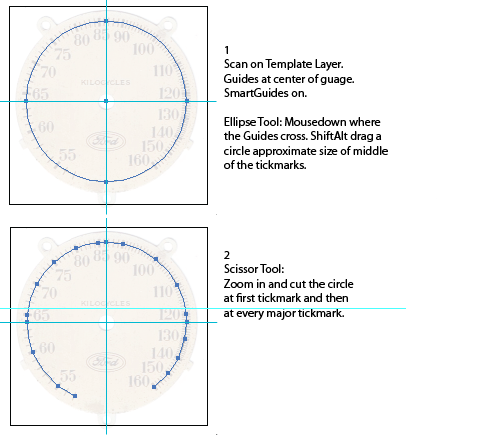
After the above:
1. Select All.
2. Expand Appearance
3. Ungroup completely
4. Use Object>Transform>Transform Each to scale the tickmarks to the proper length, all at once.
5. Select the major tickmarks and increase their stroke weight.
If you need to move the tickmarks further/nearer from the center, use the Scale Tool, setting the center of transformation at the intersection of the two Guides.
JET
Explore related tutorials & articles
 10
Replies
10
10
Replies
10

Copy link to clipboard
Copied
Jber,
You may:
0) Place a locked image of the original in the back, maybe on its own layer,
1) Determine the centre and widths (diameters) of the two circles corresponding to the inner and outer ends of the hash marks, yoiu may keep the outer circle with no stroke/nofill,
2) Create a stroked path corresponding to the length and thickness of the original thick hash marks maybe along with a nostroke path,
3) You may create a nostroke path ending at the centre and group it with 2), and/or group 2) with the outer circle,
4) Repeat 2) and 3) for the thin hash mark,
5) Rotate each kind of hash mark round the centre (maybe using the nostroke path) and either click the centre to have it as the key point for rotation or just rotate using the outer circle until it covers the first hash mark of its kind on the original image,
6) Rotate copies in the same way to cover the subsequent original hash marks.
Copy link to clipboard
Copied
Thanks Jacob, I'm really new to using Illustrator so forgive me for being dense. I'm going to give this try using your instructions but I'm a bit muddled on the rotation part. I just can't visualize how rotating all the thick lines together and then going back and rotating all the thin lines together will get the property spacing. Perhaps it's something I just need to do before it makes sense to me.
Much appreciated.
Copy link to clipboard
Copied
dsaf
After the above:
1. Select All.
2. Expand Appearance
3. Ungroup completely
4. Use Object>Transform>Transform Each to scale the tickmarks to the proper length, all at once.
5. Select the major tickmarks and increase their stroke weight.
If you need to move the tickmarks further/nearer from the center, use the Scale Tool, setting the center of transformation at the intersection of the two Guides.
JET
Copy link to clipboard
Copied
Wow. I'm so impressed with both of you, thank you so much for all the help. I've really been wanting to work some with brushes and this gives me that opportunity thanks again.
Copy link to clipboard
Copied
Yay!!! It worked beautifully!!! Thank you so much for the complete, consise instructions with pictures! This was a fantastic tutorial and I truly appreciate the help.

Copy link to clipboard
Copied
Gentlemen, why brushes? Why not just dashed strokes, perhaps with the little perpindicular arrowhead style applied to either end, for where the thicker tick marks are dividing the "sections"?
Copy link to clipboard
Copied
Out of curiosity I tried it both ways (brushes and dashed strokes) and found James's method with the brushes to be much faster and very accurate with no fussing around with gap values in each major interval. Elegant.

Copy link to clipboard
Copied
Because when using dashed strokes, you won't be able to expand them into single linies with just two points. Instead you will get trapezoid shpes with dashes.
Copy link to clipboard
Copied
For my part you are welcome, Jber.
My suggestion was to treat each hash mark individually. I apologize for my failing to state that sufficiently clear.
This was based on the ny (over)intrepretation of the wording,
How can I digitally recreate this so that the hash lines are exactly as shown?
noting the irregularities.
Obviously, they may be reproduced by nudging each after expanding.
You fooled me this time. In your other thread you stated that exact reproduction was not critical.
Copy link to clipboard
Copied
Sorry about that Jacob lol, sometimes I get fooled too with it being exact or not, it really depends on the customers desires. I also need to be careful on how I word things, because going from hand drawn to digital, the "exact" is not possible and I should remember to say "near exact" because to recreate the irregularities would get very expensive for the customer and I'm not sure it's even possible. But I do like knowing how to treat each hash individually as well because that will certainly come in handy.

 AdChoices