 Adobe Community
- Home
- InDesign
- Discussions
- Re: PDF Export, Bleed Marks guffed up
- Re: PDF Export, Bleed Marks guffed up

Copy link to clipboard
Copied
Ok, what I usually do when exporting a pdf to send to the press I use the export setting "Use Document Bleed Settings" then I ensure all else is unchecked except the slug area. Then when I get the file into acrobat I add the bleed marks etc. I would prefer to be able to do all in one shot in inDesign, but every time I try to add bleed marks in inDesign it adds about .125 inch of white space then puts the bleed marks in .125 inches away from where they need to be or it crops the document bleed area off and adds white space and places bleed marks. Here's the settings I use:
My Bleeds are set up as .125 inch in document setup.
PDF Export Settings are as follows:
"Use Document Bleed Settings" is checked
Above that is the Marks area where "Bleed Marks" are checked
weight is .125, offset is 0 (also tried .125 with same results)
All else is unchecked
When I export every time it just adds the white space and puts the bleed marks in .125 inches away from where they should be and out in the white space.
I've tried unchecking the "Use Document Bleed Settings" then checking the Bleed Marks box in which case on export it adds the bleed marks in the correct location, but crops off my bleed area of my document and adds white space.
Could someone tell me how to export from inDesign with bleed marks placed correctly on my document without adding unwanted whitespace and most importantly without cropping off my pictures bleed area?


 1 Correct answer
Did you read my comments in the other thread carefully? BLEED marks are useless to you. They align with the outer limit of the bleed, NOT where the page needs to be trimmed. You want CROP marks to show where the cut should be. A bleed mark without a crop mark doesn't provide the cutter operator with any visual clue as to how wide the bleed margin really is and where his cuts should belong, and it's almost a certainty that the work will be trimmed to the outside of the bleed using the only marks
... 9
Replies
9
9
Replies
9
Copy link to clipboard
Copied
Are we talking about bleed marks, or crop marks -- they are not the same thing. Both of them should be offset enough that they appear OUTSIDE the bleed area so they get cut off during trimming, and they should be surounded in white because of that. For a .125, the offset should also be a minimum of .125. One of my favorite printers like me to use .2917 as that offset added to the length of the crop marks adds exactly half an inch, which works well fo the way they impose, fold and trim.
Copy link to clipboard
Copied
When the print shop prints the image they cuts off the extra (bleed or crop) if the bleed is in the white area then only white area will be cut off the paper which often time leaves a thin white line next to your images on the cover of the book or printed material. This is why I need to be able to have the background picture extend off the page into the bleed area then have the bleed marks placed overtop of the final image (in the corners) to let the press know where the bleed marks/crop marks are when they go to cutting the pages. Some of the background images is cutt off which is expected since it's in the bleed area, but instead of leaving a white line when the cut is done it infact leaves only the color of your background image. That's what I useually set up in Acrobat, but would like to set up in InDesign.
Copy link to clipboard
Copied
Rather than go through a bunch of stuff twice today, and seeing as it's lunch time, please take a look at http://forums.adobe.com/message/4031092#4031092
Copy link to clipboard
Copied
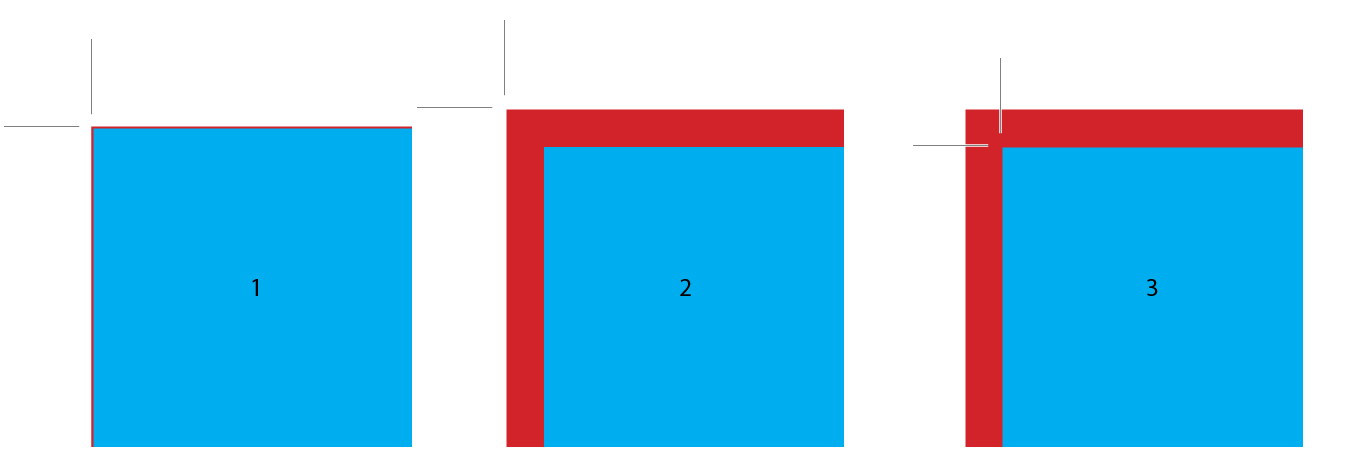
The images that tman69 shows of the settings are basically what I'm doing minus checking the crop marks. Just as I indicated in my first post. This is what's giving me the undesireable effects. Purhaps you are like me and need to see an image of things to better understand what someone is trying to say. Bellow you will find 3 options. 1 is based on one setting I've mentioned when it corps the red area (bleed area) then places the bleed marks on white space. 2 is based on another setting (see tman69 settings on the forum link you provided) where indesign ignores my background image adds .125 inches extra bleed then places the bleed marks on the white area. 3 is what I usually set up in Acrobat after exporting from inDesign and is what I'm trying to get done in inDesgin alone. In 2 and 3 you will see the edges of the background image which is in red and will be cut off in the final cut because the red area is in the bleed. The blue is the actual document size. Does this help illustrate what I'm trying to do?
Copy link to clipboard
Copied
Did you read my comments in the other thread carefully? BLEED marks are useless to you. They align with the outer limit of the bleed, NOT where the page needs to be trimmed. You want CROP marks to show where the cut should be. A bleed mark without a crop mark doesn't provide the cutter operator with any visual clue as to how wide the bleed margin really is and where his cuts should belong, and it's almost a certainty that the work will be trimmed to the outside of the bleed using the only marks you've supplied.
Crop marks align with the page edge, where the bleed allowance starts. Since the purpose of bleed is to allow for the posibility of shift in the printing or on the cutter that results in a cut not falling exactly on the mark, some portion of the bleed allowance may wind up on the page (and a corresponding amount of the real page area may be cut off the opposite edge). In order to prevent any marks from accidentally showing, crop marks should be offest at least as much as the bleed allowance so they are outside any area that might get used, and as such they will be in a white border area added to the page size outside the bleed box. your illustration # 3 has the correct mark alignment realtive to the page edge, but they need to be moved away from the page edge (inicrease the offset) so they are outside the bleed area. They will get further apart as they move away from the corner, and if you were to take a pencil and extend them, the bleed corner of the bleed would make a nice little square where they intersect.

Copy link to clipboard
Copied
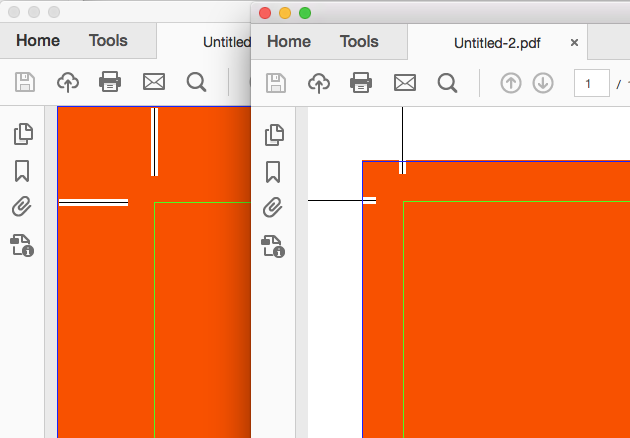
I am getting the same thing, white space around the edges for no reason with an extra set of crop marks. I do not want the white border and extra crop marks. How do I get rid of it without having to crop each of the 20 pages in the document? See screen capture.

Copy link to clipboard
Copied
I do not want the white border and extra crop marks.
The extra marks are Bleed marks. Make sure you only have Crop marks checked when you export. Also your bleed amount would have to be large enough to clear the mark offset and its dimension. The default marks are .2" plus .1" for the offset, so you would need a .3" bleed with no bleed marks to prevent any white area outside of the bleed.
Copy link to clipboard
Copied
Oh, ok, I see what you are saying. Thank you for clarifying!

Copy link to clipboard
Copied


 AdChoices