 Adobe Community
- Home
- Lightroom Classic
- Discussions
- Re: Batch Processing with Bordering and Watermarki...
- Re: Batch Processing with Bordering and Watermarki...
Batch Processing with Bordering and Watermarking

Copy link to clipboard
Copied
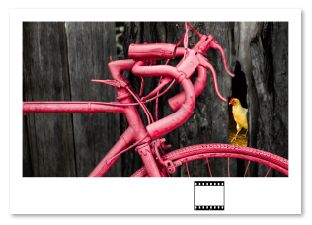
I'm looking for a solution to batch processing images where I can add white bordering and my signature/watermark inside the bordering, like shown below;
Probably hard to see on this forum due to the white background, but the signature is sitting in a white border frame.
Thus far I have done this process by taking the image to PS (if not already in PS) and then increasing Canvas size and dragging my PNG water mark inside and resizing and positioning it (ZZzzzz....)
It's ok when doing it for a shot here or there, but I also do event work (paid and non paid), the non paid stuff I tend to always watermark like this, but if there are 20, 40, 100 shots like this... that means popping into PS for each and every shot (for this process) whereas it's quite feasible I edited things purely in LR (and used Syncing features) to be quick about things, popping into PS for this process for each and every shot kinda defeats the purpose. There has to be a quick way to handling this, even outside of LR/PS?
Thus far I tried the LR/Mogrify2 plugin. It was ok, but it seems restrictive with applying bordering in terms of only pixel parameters and not percentage. Even if two images are same aspect ratio, if one is heavily cropped and the other native, applying the same border will mean different thickness. The same can be said for watermarking.
I don't even mind sorting the images out in terms of orientation (portrait shots vs landscape), and then processing them separately, but the Mogrify 2 has no preview mode, so you're also just having to wait for the export of 'x' amount of shots, then go back and see which images have the bordering and watermark in really bad placements and go back and try fixing again.
I'll have a look again, I might be missing some options, I don't know the plugin that well.
I dunno.. it strikes me this part of photography isn't getting enough attention, is there an advanced program that might do what Mogrify 2 can do but better, with previews etc?
TIA!
Eddy


 10
Replies
10
10
Replies
10
Copy link to clipboard
Copied
You might be able to accomplish what you want by creating a template in the print module. Then instead of printing to paper Print to: JPEG file. Little bit of a work around but possibly better than doing one offs.


Copy link to clipboard
Copied
I agree with cmgap
With a Print template you can batch export multiple files (hundreds!) with one [Print to File].
The 'pros' are-
Easy layout design for page borders (define the cell) and add Identity Plate (logo) and Watermark with positioning.
You can select Print resolution & custom paper sizes, etc, in the 'Print Job' panel.
Save your print designs as templates. Your saved Templates are readily available to reuse at any time.
The steps then are - Simply select multiple (Landscape) photos from Grid view, go to Print module, select your (landscape) template, [Print to File], select 'Folder'
The 'cons' are-
You can only print to JPG. (no other formats)
You cannot use the Filenames of the originals. (a big disadvantage!)
The 'exported' JPG files adopt the Filename of the Folder where you 'Print to.." (eg. select {Exports} folder and the JPG files are named Exports-1, Exports-2, Exports-3, etc)
Copy link to clipboard
Copied
I thought about using the Print Module, but will it actually work via a percentage scheme vs pixels?
Lets say you have one image that is 36mp and native aspect ratio 3:2. You want to add border (but not lose image size or pixels, add means ADD), and also have the watermark in the border like shown above.
But then another image is taken with a 24mp camera and made to 1:1 aspect ratio.
The idea is that the program or output will put the SAME thickness of bordering around each image, without compromising the size of the image, and also adding the watermark and automatically resizing it so that it fits in the bordering and appears the same, regardless of size of file, aspect ratio and such.
TBH I think I can handle the renaming of files, not a biggy, and Jpg export is fine.
I'll have a look at it again, it just appeared on first glance to not being up to the task.
Copy link to clipboard
Copied
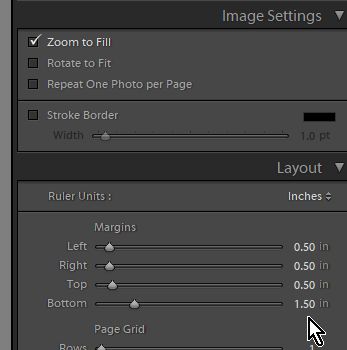
To achieve the same thickness of border around each image and regardless of aspect ratio- you would need to set the margins first then let the images 'FILL' the defined cell.
An image that is 1:1 would need to 'FIT' into a landscape defined cell but your margins would be different on the paper. That is not avoidable, unless you define a suitable template. You might. for a 1:1 image design a vertical 'portrait' template
You do not have to worry about 'pixel' size, or the image 'mp'- Lightroom handles all that when you define the ppi resolution and paper size. (eg. set paper size to 8x10, 12x16, etc)
The old adage- "you cannot fit a square peg into a round hole" applies equally well when you are trying to fit square 1:1 and rectangular 4:3 images into the same format photo cell/margins- something has to adjust -either the 'borders'/margins or the photo aspect ratio.

Copy link to clipboard
Copied
This doesn't address watermarking inside the border though.. or does it?
I saw this today, thought this might work if I use 'percentage' instead of pixels?
Photoshop action for adding border to multiple images with different aspect ratio - YouTube
But then I still have to work out a process to then add the watermarking, to be scaled and fit right inside the applied bordering... hmm...
Copy link to clipboard
Copied
dunker56 wrote
This doesn't address watermarking inside the border though.. or does it?
I saw this today, thought this might work if I use 'percentage' instead of pixels?Photoshop action for adding border to multiple images with different aspect ratio - YouTube
But then I still have to work out a process to then add the watermarking, to be scaled and fit right inside the applied bordering... hmm...
In Lightroom-
Watermarking can only be applied over/across/onto the image area.
Identity Plates can be placed anywhere on the paper page- so that can be on the image area or on the defined white border. Identity plates can be very creative using text or images as logos (Create logos with transparency as PNG files), and also set for Opacity, Scale, etc.
The linked youtube video is for Photoshop, and as illustrated, canvas size can be increased by an action with many options, but this does not address the 'Paper -size and ratio' that you intend to finally print (Not a problem if you intend to supply digital image files). But yes you could define actions that might do what you want- even multiple steps to widen the lower border and 'place' a logo, etc.
Using "percentage" in the Photoshop canvas size will not create fixed size borders, as every image may have different 'pixel' dimensions to base the percentage on (unless you are working with images of same pixel dimensions- exported by Lightroom?).
And from Photoshop it will always be a double-step to Export to Photoshop, apply actions, then Save from Photoshop (unless you can use image processor to batch the changes)
There is much to think about doing your borders with Photoshop, and possible-
But, Lightroom makes it simpler! Select, choose template, Print to File, (rename). Done!
Lightroom 5: Print the Perfect Image - YouTube
Quick Tips for the Lightroom Print Module - YouTube
Helpful Hints for Creating Actions in Photoshop - YouTube

Copy link to clipboard
Copied
WobertC wrote
And from Photoshop it will always be a double-step to Export to Photoshop, apply actions, then Save from Photoshop (unless you can use image processor to batch the changes)
You can make this more efficient by saving the action as a droplet. Then you set the droplet as an external editor in LR, or you specify it in the Post Processing Step of LR's export dialog. So in LR you would either Edit With or Export, and the droplet automates the rest (simple example here).
PS actions can include some conditionality, or call scripts which might contains some custom requirements.
Copy link to clipboard
Copied
Cool, didn't know that.
I guess the video shows a border solution only, much like the LR Print module ideas do too, but none of these suggestions can solve the idea of placing the watermark in the bordering as well, or do they? I mean from a purely batch process perspective.
I just finished an album, 169 images where I had to do this. LR/Mogrify 2 enabled me to do 135 in one go pretty swiftly, meaning it managed the bordering AND watermark in one batch process. But this was because each of the 135 images from the 169 were very similar, 3:2 ratio, very close in megapixel size etc. There are variances but not enough to really nit pick over. What was annoying were the other 34 images, they didn't do very well batch wise, hence this thread.
I'm now wondering if perhaps I need a border with a jpg of the signature embedded, and then a batch process to have that applied (as a layer?) to the images and scaled (percentage overlap, 110% etc) to the image regardless of aspect ratio and mega pixel and then outputted via Image Processing or something...
Just trying to think outside the box.
The problem I think with that is then when the ratio changes the font/signature would too, get squished or stretched... urgh...
Copy link to clipboard
Copied
Well there's a work around for that too. Create a collection > Export collection and check 'Add collection' to catalog > Export collection with Watermark > Print module to create you template. Again this is not as elegant as one would like - a couple of steps - however once it's set up it's a quick workflow.
Copy link to clipboard
Copied
Not with using LR/Mogrify 2, you can apply the watermark off the image and onto the finished border (because it adds the border to the image and then adds the watermark after (technically onto the 'new' image which now has border added).

 AdChoices