


Copy link to clipboard
Copied
Hi,
I've not long started shooting in RAW with my Nikon D700 and have had some pleasing results so far. However, I've just started editing in Lightroom and have noticed that my RAW images are incredibly grainy. I don't think it's the ISO because this has happened across the board ... even with a very low ISO. Obviously the jpegs seem much better as they've received treatment, but no amount of tweaking the details section of Lightrom seems to solve the problem. My work flow was: Shoot in RAW + jpeg > Manually upload the files to my PC > Add the raw files to Lightroom > Edit them via the developing module.
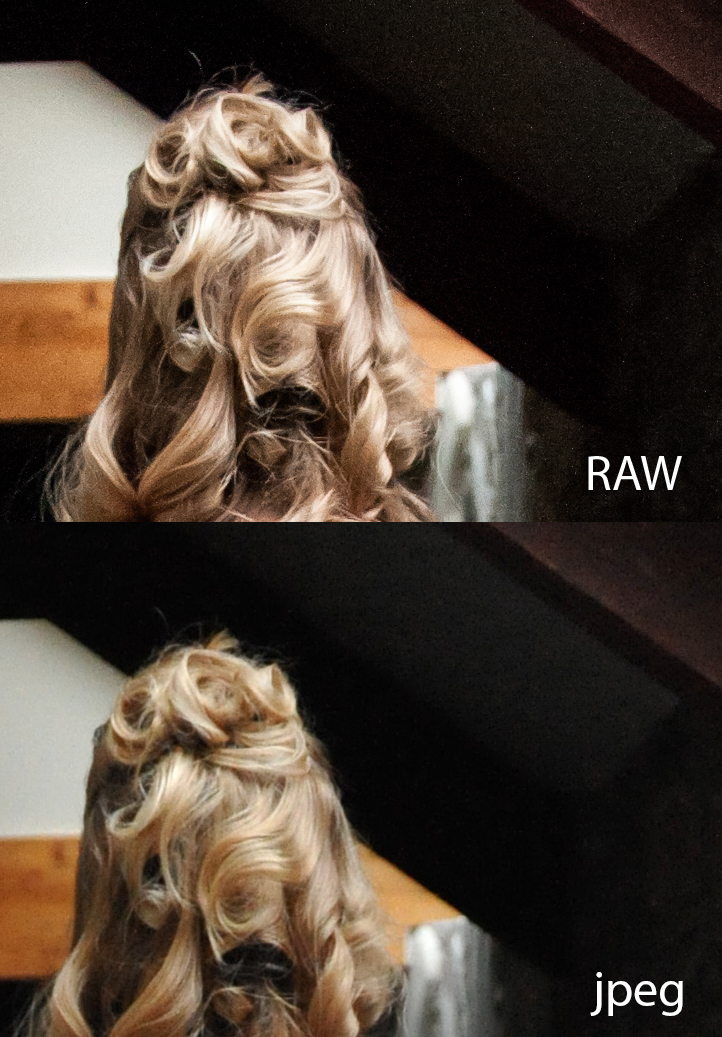
I've uploaded a cropped version of one of the images. Please note the white specks in the dark area of the RAW image 
Any help/advice would be greatly appreciated!!
Thanks


 1 Correct answer

The tradeoff between noise and plastic-looking smoothness is what everyone deals with.
The Sharpening Masking slider should be up most of the way. It controls whether sharpening is applied to the entire image (including all the noise) or only high-contrast edges. Hold down the Alt (or Option on Mac) key while moving while moving the Masking slider, and you’ll see what areas the sharpening will be applied to as white and you don’t need smooth areas sharpened at all, just the edges.
When you say t
... 19
Replies
19
19
Replies
19

Copy link to clipboard
Copied
To me this just looks like very aggressive NR in the jpeg. You can see some detail is also lost, specifically the loose strands of hair.
But I can't make out the white specks, I've never seen anything like that.
Copy link to clipboard
Copied
The grain in your side-by-side example looks normal to me although the shot is probably not the lowest ISO.
Turning up the sharpening mask most of the way, using the Alt-key to judge when only the edges are sharpened, will help, and turning up the Luminance NR slider obviously gets rid of the grain, too, but don’t go overboard, leave a little grain, because when reducing the size, the export sharpening or output sharpening for printing can use something to bite on, and smoothing too much will remove this. You can always use an Adjustment brush to selectively reduce the noise problem areas without destroying detail across the whole image.
I have my Sharp Mask set to 85% by default in LR, but sometimes tweak it a little more especially low- or especially high ISO images.

Copy link to clipboard
Copied
You need to make more use of the Detail panel, specifically the Luminance noise reduction. As twenty_one has said, the in camera noise reduction is quite aggressive.

Copy link to clipboard
Copied
Kate, a few quick questions (really just capturing what's already been written):
- What ISO is this image?
- What settings are you applying in the Detail panel?
- Are you sharpening in the Output dialogue? What settings?
- Are you making use of the Masking slider in the Detail panel?
On this last: if not, Google "Lightroom + masking" - this is an incredibly useful and easy-to-use tool for managing noise.
Copy link to clipboard
Copied
Thank you for the replies!
I'm not actually sure what the ISO was for this particular image ..... Maybe 800? Although that really shouldn't be problem as my camera (D700) copes extremely well in low light and performs very well with a high ISO. Plus this problem is across the board ... even for photos taken in good light with a low ISO. It's not just the shadows either (although my example was probably misleading!) - It's happening with faces and highlights as well.
I'm not really sure about the details panel 😕 (I'm very new to Lightbox ... Sorry!). I've tried lots of combinations and none seem ideal. I'm torn between losing the noise and making the image look fake, and would very much appreciate some guidelines on the minimum/maximum recommended slider positions. At the moment I'm (very roughly) using:
Sharpening:
Amount: 20
Radius: 0.5
Detail: 10
Masking: 0 (Not too sure what this does if I'm honest)
Noise Reduction:
Luminance: 40
Detail: 10
Contrast: 0
Color: 50
Detail: 50
Does the clarity also affect the grainy appearance?
"Are you sharpening in the Output dialogue? What settings?" .... Once again I'm not familiar with this. Sorry!! What do you mean by Output dialogue?
I'm new to editing in RAW, and whilst I can totally see what all of the fuss is about in most areas, this problem is making me want to revert to using jpeg instead .... Which would no-doubt be a great shame. Tempting though unless I can find a solution to this problem!!
Thanks again 🙂
Copy link to clipboard
Copied
Just to give a different perspective:
When you go pixel-peeping it's tempting to think that you need to get rid of every last grain of noise, but in reality a little noise doesn't always hurt the image.
I started out in the analog age, and for B&W my all time favorite was Tri-X developed in Rodinal (those old enough will nod in recognition) - that combo had incredibly crisp and pronounced grain, almost to the point where it could be out of focus and still look sharp...it was great for action shots.

Copy link to clipboard
Copied
twenty_one wrote:
a little noise doesn't always hurt the image.
I agree, and in fact I much prefer more uniform noise/grainy-ness to:
* noise reduction over-smoothness or NR artifacts.
* the alternating smoothed and grainy regions which comes from using sharpen masking (it took me a few years to learn not to like this, I used sharpen masking a lot in the early days, but now: not so much...).
That said, my biggest problem with PV2012, noise-wise, is the excessive shadow noise which sometimes presents - since the other noise is simply grainyness, which can be easily controlled (but not eliminated), whereas the shadow noise can be "hotspot" pixels (or pixel "clusters") - like in Kate's example above, that are hard to knock down, even with boosted NR (or sharpen masking)... - even with strong locals.
To each their own.
Rob
Copy link to clipboard
Copied
I do things on purpose so if I increase the Color NR slider it is because it needs it.
Copy link to clipboard
Copied
ssprengel wrote:
I do things on purpose so if I increase the Color NR slider it is because it needs it.
I thought you might, but my reply was aimed at other readers who may not have been clear about it. - it sounded like you did it "across the board" as worded:
Steve Sprengel wrote:
|> I also adjust the Color NR slider up from 25 to 50 or higher for high-ISO images.
R
Copy link to clipboard
Copied
The tradeoff between noise and plastic-looking smoothness is what everyone deals with.
The Sharpening Masking slider should be up most of the way. It controls whether sharpening is applied to the entire image (including all the noise) or only high-contrast edges. Hold down the Alt (or Option on Mac) key while moving while moving the Masking slider, and you’ll see what areas the sharpening will be applied to as white and you don’t need smooth areas sharpened at all, just the edges.
When you say the camera copes very well with high-ISO that just means the in-camera noise-reduction significantly suppresses noise, but the noise is there in the sensor, anyway, so you have to deal with it in Lightroom.
For the values of the Detail sliders, I usually use the defaults except I turn up the Masking slider significantly, I adjust the Luminance NR slider higher for high-ISO images, and I also adjust the Color NR slider up from 25 to 50 or higher for high-ISO images.
Copy link to clipboard
Copied
ssprengel wrote:
I adjust the Luminance NR slider higher for high-ISO images, and I also adjust the Color NR slider up from 25 to 50 or higher for high-ISO images.
Just a reminder: color NR is "adaptive" (is up-throttled automatically in response to more color noise), so you may not need to increase it, even on very-high-ISO images. Don't get me wrong, you are probably more likely to want to increase color NR on high ISO images, but I would *not* recommend doing it universally. Why? Because (@PV2010) color NR is a primary robber of dark tones (and other coloration) which may be part of the image, and not noise at all. My advice: stick with 25 (regardless of ISO) if it's enough, and raise only if it's not enough. Luminance noise reduction, reduced sharpening/detail, and sharpen masking if you like that, should be the primary controls for grainyness noise (along with locals, when warranted).
Reminder: color noise reduction detail slider can preserve some of the aforementioned dark tones, but only to a limited extent. PV2010+ color NR is awesome, but I still have some pics I keep in PV2003 because PV2010+ color NR gobbles up too many important image pixels mistaking them for noise.
YMMV
Cheers,
Rob
Copy link to clipboard
Copied
Kate_Fierek wrote:
I'm not actually sure what the ISO was for this particular image ..... Maybe 800?
I doubt it. The D700 should not have this much noise at ISO800. That looks like more noise than a D300 at ISO800. I'm guessing ISO2000+, eh?
Note: Lightroom's raw conversion algorithm does tend to be highly-detailed, albeit a little on the grainier side. It's one of it's signature qualities, and it takes some getting used to if you come from the land of jpegs or camera mfr software. So, learn to control noise as need be, but also give yourself time to adapt to Lr's different raw conversion style... - know what I mean??
Rob

Copy link to clipboard
Copied
For me it was the color in NR. It absolutely fixed my problem  thank you all!
Copy link to clipboard
Copied
Kate_Fierek wrote:
I don't think it's the ISO because this has happened across the board ... even with a very low ISO. ... no amount of tweaking the details section of Lightrom seems to solve the problem.
I agree with most of what's already been said, i.e. in-camera has *a lot* of noise reduction applied, but also:
The PV2012 algorithm leans toward having max detail in shadows, even at the cost of exacerbated noise. If you switch to PV2010 for comparison, you'll see what I mean. Once you get whatever mileage you can via global noise reduction (luminance), reduced sharpen detail (and maybe amount), and sharpen masking (I don't use sharpen masking m'self - reasons available upon request, but lots of people like it), consider dealing with the remaining excess shadow noise via paint brush. Desharpening at -50 (exactly), negative clarity, noise reduction, and in the blacks you can drop exposure way down too.
In my opinion, PV2012 rocks in a big way, but I agree there is some cost in the shadows/blacks noise-wise.
Rob

Copy link to clipboard
Copied
Hey everyone! I was having this same issue. My photos looked wonderful in Lightroom and Photoshop but once saved to my desktop, Windows Viewer would display them are extremely grainy. Turns out (because I married I genius... An IT guy) we both did some research and it's because the file was too big and the computer couldn't compress it correctly, thus making it very grainy. Once I saved my photos as a smaller file, they looked perfect. It had nothing to do with my ISO settings, nothing to do with improper lighting, it was all about the file size. Bigger isn't always better. Hope this helps everyone!
PS
I've been posting this everywhere because I couldn't find any help on it either.

Copy link to clipboard
Copied
Copy link to clipboard
Copied

Copy link to clipboard
Copied
I'm losing my marbles over this!! What size did you find worked best??

Copy link to clipboard
Copied
Thankssss

 AdChoices