 Adobe Community
- Home
- Lightroom Classic
- Discussions
- Re: LR classic export with mask issue
- Re: LR classic export with mask issue
Copy link to clipboard
Copied
working with LR classic. Able to make mask adjustments(easy & wonderful) BUT cannot get to export edited image with new mask applied. Working on MAC version. 11.6
 1 Correct answer
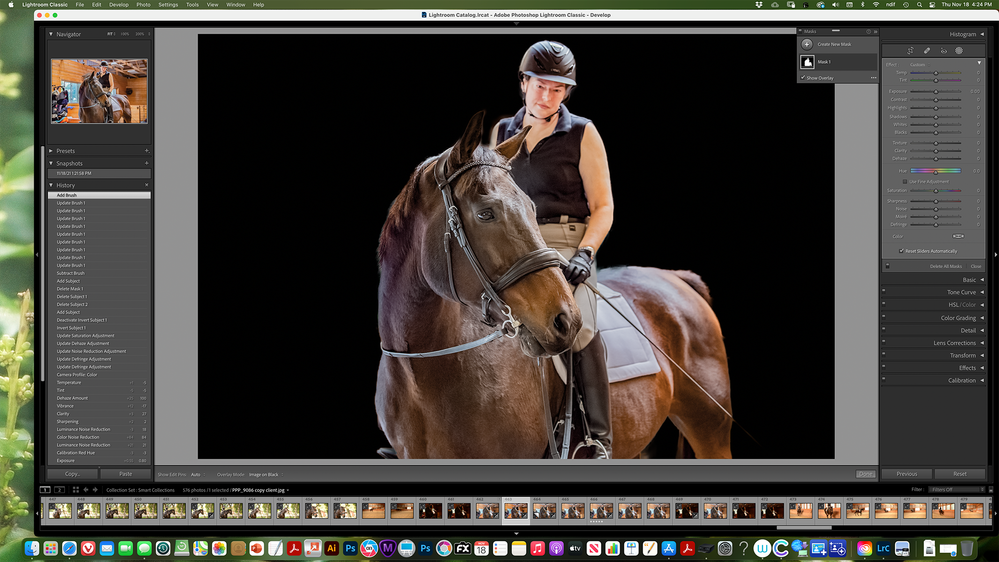
This is a common misunderstanding of how masks work. What your screenshot shows is that the background is black as a result of using the 'Image on black' mask overlay. A mask overlay is just a way to view the mask however, it is not an image adjustment in itself. The screenshot also shows that you did not make any adjustments in the mask panel. That is why the exported image does not show any results of your masking. If you want the background to become black, then try adding a -5.0 Exposure adj
...Copy link to clipboard
Copied
Hi there,
We're sorry for the trouble with Lightroom Classic. Would you mind telling us the version of Lightroom Classic you're on? Please share the System Info by going to the Lightroom Classic app > Help> system Info, copy the info and send it to us.
Could you please elaborate on the issue more, what's happening while exporting the edited image? Are you getting any error messages? Since when are you seeing this issue? Also, which file format are you trying to export?
We're here to help. Just need some info.
Regards,
Tarun
Copy link to clipboard
Copied
Edit image in Develop with overlay, select object looks perfect then go to export, export as as jpeg but file is saved without the mask overly
SYSTEM INFO:
Lightroom Classic version: 11.0.1 [ 202111111509-eae8952e ]
License: Creative Cloud
Language setting: en
Operating system: Mac OS 11
Version: 11.6.0 [20G165]
Application architecture: x64
Logical processor count: 16
Processor speed: 3.8GHz
SqLite Version: 3.36.0
Built-in memory: 16,384.0 MB
Real memory available to Lightroom: 16,384.0 MB
Real memory used by Lightroom: 1,521.8 MB (9.2%)
Virtual memory used by Lightroom: 14,061.0 MB
Memory cache size: 31.3MB
Internal Camera Raw version: 14.0 [ 950 ]
Maximum thread count used by Camera Raw: 5
Camera Raw SIMD optimization: SSE2,AVX,AVX2
Camera Raw virtual memory: 571MB / 8191MB (6%)
Camera Raw real memory: 820MB / 16384MB (5%)
Displays: 1) 5120x2880
Graphics Processor Info:
Metal: AMD Radeon Pro 5500 XT
Application folder: /Applications/Adobe Lightroom Classic
Library Path: /Users/kmf24/Pictures/Lightroom/Lightroom Catalog.lrcat
Settings Folder: /Users/kmf24/Library/Application Support/Adobe/Lightroom
Installed Plugins:
1) AdobeStock
2) Aperture/iPhoto Importer Plug-in
3) Athentech Perfect Exposure
4) Athentech Perfect Eyes
5) Athentech Perfect Skin
6) Athentech PerfectlyClear
7) Facebook
8) Flickr
9) HDR Efex Pro
10) HDR Efex Pro 2
11) Macphun Creative Kit
12) Nikon Tether Plugin
13) Noiseless CK
14) ON1 Photo RAW 2019
15) ON1 Resize 10
16) ON1 Resize 2019
17) Perfectly Clear Complete
18) Perfectly Clear Complete v3
19) Snapheal CK
Config.lua flags: None
AudioDeviceIOBlockSize: 512
AudioDeviceName: $$$/dvaaudiodevice/SystemDefaultAndEffectiveDeviceName=System Default - iMac Speakers#{comment}DVAAU-4201250: Open the audio hardware preferences page.
AudioDeviceNumberOfChannels: 2
AudioDeviceSampleRate: 44100
Build: LR5x38
CoreImage: true
GL_ACCUM_ALPHA_BITS: 0
GL_ACCUM_BLUE_BITS: 0
GL_ACCUM_GREEN_BITS: 0
GL_ACCUM_RED_BITS: 0
GL_ALPHA_BITS: 8
GL_BLUE_BITS: 8
GL_DEPTH_BITS: 24
GL_GREEN_BITS: 8
GL_MAX_3D_TEXTURE_SIZE: 16384
GL_MAX_TEXTURE_SIZE: 16384
GL_MAX_TEXTURE_UNITS: 8
GL_MAX_VIEWPORT_DIMS: 16384,16384
GL_RED_BITS: 8
GL_RENDERER: AMD Radeon Pro 5500 XT OpenGL Engine
GL_SHADING_LANGUAGE_VERSION: 1.20
GL_STENCIL_BITS: 8
GL_VENDOR: ATI Technologies Inc.
GL_VERSION: 2.1 ATI-4.6.20
OGLEnabled: true
GL_EXTENSIONS: GL_ARB_color_buffer_float GL_ARB_depth_buffer_float GL_ARB_depth_clamp GL_ARB_depth_texture GL_ARB_draw_buffers GL_ARB_draw_elements_base_vertex GL_ARB_draw_instanced GL_ARB_fragment_program GL_ARB_fragment_program_shadow GL_ARB_fragment_shader GL_ARB_framebuffer_object GL_ARB_framebuffer_sRGB GL_ARB_half_float_pixel GL_ARB_half_float_vertex GL_ARB_imaging GL_ARB_instanced_arrays GL_ARB_multisample GL_ARB_multitexture GL_ARB_occlusion_query GL_ARB_pixel_buffer_object GL_ARB_point_parameters GL_ARB_point_sprite GL_ARB_provoking_vertex GL_ARB_seamless_cube_map GL_ARB_shader_objects GL_ARB_shader_texture_lod GL_ARB_shading_language_100 GL_ARB_shadow GL_ARB_shadow_ambient GL_ARB_sync GL_ARB_texture_border_clamp GL_ARB_texture_compression GL_ARB_texture_compression_rgtc GL_ARB_texture_cube_map GL_ARB_texture_env_add GL_ARB_texture_env_combine GL_ARB_texture_env_crossbar GL_ARB_texture_env_dot3 GL_ARB_texture_float GL_ARB_texture_mirrored_repeat GL_ARB_texture_non_power_of_two GL_ARB_texture_rectangle GL_ARB_texture_rg GL_ARB_transpose_matrix GL_ARB_vertex_array_bgra GL_ARB_vertex_blend GL_ARB_vertex_buffer_object GL_ARB_vertex_program GL_ARB_vertex_shader GL_ARB_window_pos GL_EXT_abgr GL_EXT_bgra GL_EXT_bindable_uniform GL_EXT_blend_color GL_EXT_blend_equation_separate GL_EXT_blend_func_separate GL_EXT_blend_minmax GL_EXT_blend_subtract GL_EXT_clip_volume_hint GL_EXT_debug_label GL_EXT_debug_marker GL_EXT_depth_bounds_test GL_EXT_draw_buffers2 GL_EXT_draw_range_elements GL_EXT_fog_coord GL_EXT_framebuffer_blit GL_EXT_framebuffer_multisample GL_EXT_framebuffer_object GL_EXT_framebuffer_sRGB GL_EXT_geometry_shader4 GL_EXT_gpu_program_parameters GL_EXT_gpu_shader4 GL_EXT_multi_draw_arrays GL_EXT_packed_depth_stencil GL_EXT_packed_float GL_EXT_provoking_vertex GL_EXT_rescale_normal GL_EXT_secondary_color GL_EXT_separate_specular_color GL_EXT_shadow_funcs GL_EXT_stencil_two_side GL_EXT_stencil_wrap GL_EXT_texture_array GL_EXT_texture_compression_dxt1 GL_EXT_texture_compression_s3tc GL_EXT_texture_env_add GL_EXT_texture_filter_anisotropic GL_EXT_texture_integer GL_EXT_texture_lod_bias GL_EXT_texture_mirror_clamp GL_EXT_texture_rectangle GL_EXT_texture_shared_exponent GL_EXT_texture_sRGB GL_EXT_texture_sRGB_decode GL_EXT_timer_query GL_EXT_transform_feedback GL_EXT_vertex_array_bgra GL_APPLE_aux_depth_stencil GL_APPLE_client_storage GL_APPLE_element_array GL_APPLE_fence GL_APPLE_float_pixels GL_APPLE_flush_buffer_range GL_APPLE_flush_render GL_APPLE_object_purgeable GL_APPLE_packed_pixels GL_APPLE_pixel_buffer GL_APPLE_rgb_422 GL_APPLE_row_bytes GL_APPLE_specular_vector GL_APPLE_texture_range GL_APPLE_transform_hint GL_APPLE_vertex_array_object GL_APPLE_vertex_array_range GL_APPLE_vertex_point_size GL_APPLE_vertex_program_evaluators GL_APPLE_ycbcr_422 GL_ATI_blend_equation_separate GL_ATI_blend_weighted_minmax GL_ATI_separate_stencil GL_ATI_texture_compression_3dc GL_ATI_texture_env_combine3 GL_ATI_texture_float GL_ATI_texture_mirror_once GL_IBM_rasterpos_clip GL_NV_blend_square GL_NV_conditional_render GL_NV_depth_clamp GL_NV_fog_distance GL_NV_light_max_exponent GL_NV_texgen_reflection GL_NV_texture_barrier GL_SGI_color_matrix GL_SGIS_generate_mipmap GL_SGIS_texture_edge_clamp GL_SGIS_texture_lod
Copy link to clipboard
Copied
Copy link to clipboard
Copied
With the mask, as in the overlay., or as in the edits? (such as exposure, etc)
Copy link to clipboard
Copied
Overlay
Copy link to clipboard
Copied
Copy link to clipboard
Copied
An export will have all the develop mods baked into it. It will not have the various steps included.
So, you create a mask, say a Radial Gradiant, you increase the exposure in that mask, Fine, now you export the image. The new image should look like where you left off in the original photos edits, that area you brought the exposure up, should look as expected. What you will not see is the mask, not the pin for the mask, not the mask, not the overlay for the mask.
Copy link to clipboard
Copied
This is a common misunderstanding of how masks work. What your screenshot shows is that the background is black as a result of using the 'Image on black' mask overlay. A mask overlay is just a way to view the mask however, it is not an image adjustment in itself. The screenshot also shows that you did not make any adjustments in the mask panel. That is why the exported image does not show any results of your masking. If you want the background to become black, then try adding a -5.0 Exposure adjustment and see if that is enough to make that background black. If it isn't, then copy the mask so you have two exposure adjustments.
Copy link to clipboard
Copied
Thank you SO SO much for your well put explanation and the time you took to help me!
Copy link to clipboard
Copied
Somehow I suspect I am reading your problem incorrectly.
Ok, looking at that nice photo you posted, I notice the following
- Mask in use appears to be Select Subject
- Overlay appears to be on
- Overlay in use appears to be Image on Black
- Last develop (in mask) edit, has not yet been fully commited to vy moving on, or just pressing done, not a big deal as to issues at hand.
note, tested this on one of mine as to clarify in my mid that thosevare the steps that may have occured. And I notice, that the history panel does not show the change in overlay in use.
So, that nice black background, is not a background, it is not an edit to the image, it is just the overlay for the mask currently in use.
What shows up if you click on done (or move on to another develop mod), Probably nothing new as no sliders appear to have been moved.
If you want that nice black background, this is not it.
Copy link to clipboard
Copied
PS GOT IT!
Copy link to clipboard
Copied
I am having a similar problem. I edit the photo, but the edit does not stick. I created a new mask and chose the "Select Sky" option. I used the colour option ot make the sky consistently blue. When I leave the photo, the mask overlay goes away, and I cannot export the changed image, only teh underlying one. What am I doing wrong or failing to do?
Copy link to clipboard
Copied
The mask overlay is only a visual aid to indicate the part of the image that will be affected by your edits.
So setting the mask overly color to blue does not give you a blue sky.
Although you can do your edits with the color overlay showing, it will be very hard to see what you're doing.
So turn the overlay off (press O), then do your edits.
See also the post by @JohanElzenga above.
Copy link to clipboard
Copied
Thank you for your reply and suggestion. I had noticed the @JohanElzenga post before I sent my question in.
Different from the observation in the Johan post, I did make adjustments while the mask was on by selecting Sky, and then adding the color, so I thought this should be the solution.
If I read your and Johan's comments right, and if what I did does not make a “save-able” change to the picture, the Select Sky mask would only be a different view of the photo, and would make no changes. If this is correct, there are 2 consequences - 1 is that there is no way to use the Select Sky (or any other option within Mask) to edit the photo for export or other purposes, and the other would be that all the information Adobe has put up about masking is incorrect, as editing is not possible in the Mask. I must be missing something, as I can find no place with the Mask overlay off to make such edits.
Any help you can provide would be greatly appreciated.
Thanks,
Francis
Copy link to clipboard
Copied
Maybe you should post a screenshot, because it's unclear what you did and what you did not do. Like explained already, the mask overlay is not an edit. It's just a way of showing what areas of the photo will be affected by the mask if you use the sliders of that mask. So if you change the color of the mask overlay to blue, then you do not change the image. You just changed that view.
To make the masked sky blue, you need to make a slider adjustment. The best way (in my opinion) is to use the Temperature slider.
It's possible that the mask slider section is collapsed, so you do not see any mask sliders. Look for a small triangle next to 'Effect'. That should point downwards. If it does not, then click on it.
Copy link to clipboard
Copied
Hello Johan,
I think I now understand. I did what you suggested, and it worked. I did not learn that from the Adobe material. The biggest thing is that the mask overlay color is not an edit at all. Thank you for the clarity - much appreciated!
Francis
Copy link to clipboard
Copied
In case an analogy is helpful, one can think of the paper stencils that people sometimes use with spray paint.
The particular colour of paper a given stencil has been cut from, makes zero practical difference. The end result depends, only, on whatever paint has been sprayed on (through this stencil, and then remaining on the surface after you've put the stencil away).
Copy link to clipboard
Copied
Hi,
It seems there's some confusion on your question that the Adobe team might not understand what are needs are, and I'm glad you've brought it up.
We all know how to create masks in Lightroom. The challenge you're referring to, if I understand correctly, is how to export these masks as layers so that they can still be utilized when the image is opened in Photoshop.
A potential solution could be for the programmers to enable the masks created in Lightroom to function as Alpha channels. This way, an artist or retoucher could continue to use these masks in Photoshop.
This would support a non-destructive workflow, which is fundamental in digital art and photo retouching. Unfortunately, it seems this option hasn't been included in the current version.
Your point is very valid and I think it's something that the developers should seriously consider for future updates.
I’m hoping that my explanation makes sense for a programmer developers at Adobe.
Copy link to clipboard
Copied
I don't think the Adobe team ever intended LrC to create masks as layers that can be used when opened in Photoshop. I doubt its that they don't understand, I'm think it was never a goal.


