 Adobe Community
- Home
- Lightroom Classic
- Discussions
- Re: Setting limits to the sliders in Develop modul...
- Re: Setting limits to the sliders in Develop modul...
Setting limits to the sliders in Develop module
Copy link to clipboard
Copied
Hello,
is it possible to set custom limits on the slider controls in the basic develop module? For example, stopping the shadows slider to dropping below ten or the highlights slider going over 245 in the histogram. This would be useful for me to be able to customise these limits but I haven't seen anywhere that says you can do this.
Thanks
Copy link to clipboard
Copied
You haven't seen it, because you can't.
Copy link to clipboard
Copied
That's a shame, I could save hours over the course of year if I didn't have to be checking images for slight blown or clipped sections, setting a customisable limit would be a very useful thing to have for editing imo.
Copy link to clipboard
Copied
I'm not sure I understand. You are setting the sliders yourself, so what stops you from not pushing them too far? Or do you mean that you use Auto Tone, and you don't want Auto Tone to clip blacks and whites (as it always does)? In that case, have a look at this plugin: http://regex.info/blog/lightroom-goodies/bag-o-goodies
Copy link to clipboard
Copied
I shoot a lot of landscape stuff and sometimes, all I need to change is in the basic develop module because of the quality of lenses I use. Setting limits would mean I would know nothing was blown or cropped if I wanted to create strong contrast. The histogram is fine for general info but I need to check very small areas using the soft proof feature because small areas don't always show on the histogram ( and that has happened to me on quite a few times). Again, it was just a thought for me to help simplify my workflow.
Copy link to clipboard
Copied
If you aren’t doing this already, one thing to consider is Shift-double-clicking the Whites or Blacks slider. That sets each of them to the Auto value, which is image specific. If you don’t like the Auto clip points for Whites or Blacks, you could adjust them using the plug-in Johan linked to.
@neilp93685941 wrote:
The histogram is fine for general info but I need to check very small areas using the soft proof feature because small areas don't always show on the histogram
The histogram is definitely not useful for clipping, because it only shows you that clipping might exist, but the histogram can’t tell you where in the image the clipping is. I prefer to use the blue and red visual clipping clipping indicators that display over the image because then I can see if the clipping is acceptable (areas that really should be total black, or specular highlights that really should be total white), but are you saying the visual clipping indicators don’t give you the information you need?
@neilp93685941 wrote:
Setting limits would mean I would know nothing was blown or cropped if I wanted to create strong contrast.
It doesn’t seem like uniform limits would be the best solution, because unlike the Auto feature or clipping indicators, hard limits would not take into account the specific content of each image. For example, uniform limits might be more likely to incorrectly set the white clipping value on an image with specular highlights.
Copy link to clipboard
Copied
I live and photograph in Scotland so do a fair bit of mountain and rocks. That textured uneven surface can be problematic, the histogram doesn't accurately convey all areas and I have found that using soft proof and hovering over the area with the cursor is the only way that gives me accurate readings on very small areas. Totally black is a no go for me, personal thing, hence my original question. As others have pointed out, it's not as simplistic as I hoped it may have been.
Copy link to clipboard
Copied
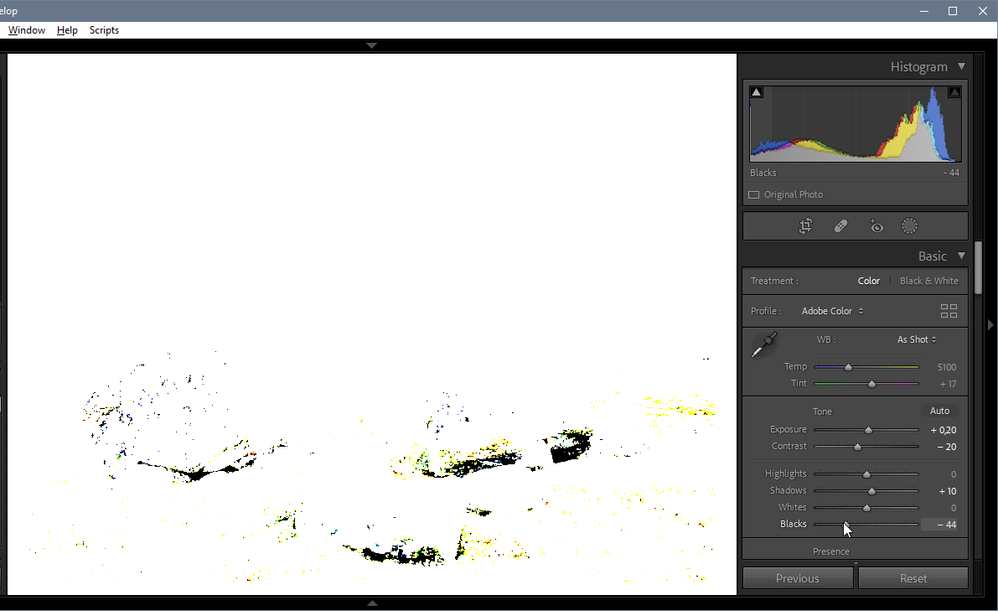
In addition to the red and blue clipping indicators (press J in Develop), you can also drag the sliders while pressing the Alt key, which will indicate the clipped areas, and also what colors are being clipped.
This works with the Exposure, Highlights, Shadows, Whites and Black sliders.
Copy link to clipboard
Copied
Brilliant, thanks Per
Copy link to clipboard
Copied
You may want to look at a plug-in, specifically "Jeffrey Friedl's “Bag-o-Goodies”" Plugin" and within that plug-in see the "Personalized Auto Tone"
at: http://regex.info/blog/lightroom-goodies
scroll down to the Utility Plug-ins, and clcik on "“Bag-o-Goodies”, that will take you to:
http://regex.info/blog/lightroom-goodies/bag-o-goodies
You will need to read the directions via that page as the plug-in is a bit complex, but once understood, it will work. Using the Personalized Auto TOne is a two step process, first you need to set it up, then run it.
Copy link to clipboard
Copied
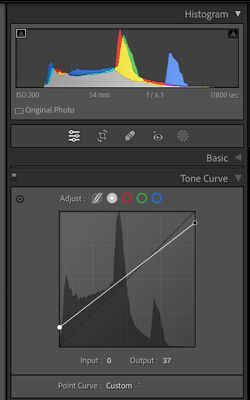
You could set your Tone Curve like this with the Right/Left side set to your chosen values and then the Basic sliders will never cause the Histogram to go beyond these values for Whites and Blacks
Copy link to clipboard
Copied
Bob, how do you alter those points please?
Copy link to clipboard
Copied
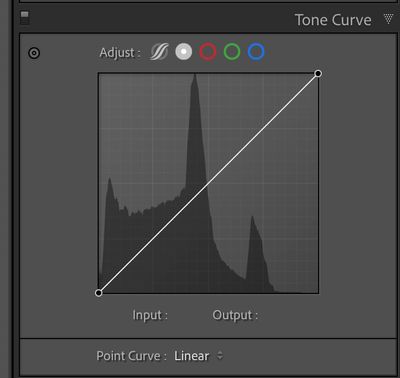
Same as you make any other adjustment on the Point Curve, Click, Hold and Drag. Start out with a LINEAR point curve by resetting it. It will look like this.
Then click/hold/drag the left bottom circle STRAIGHT Up so Input is 0 and Output is 10. Then do the same dragging straight down with the top right circle so the values are 255/245 to use your original numbers.
I would never do this myself but instead use Per's method but it does what you originally wanted.
Copy link to clipboard
Copied
The points can be altered in three ways, similar to how it’s done in Photoshop:
- Click the curve to add a point, drag that point to adjust its In/Out values. Now, to control clipping, you don’t actually have to add any points — just drag the two end points (0/0 and 255/255) that are already on the curve from the start.
- Click the Target Adjustment Tool (or use Tools > Target Adjustment > Tone Curve or its keyboard shortcut on that menu command), then drag up and down on the part of the image that you want to adjust. For adjusting clipping, this is probably not the most efficient way. But the one thing you get out of the Target Adjustment Tool is that when it’s active, you see a “preview” point on the Tone Curve representing the tonal level on the image under the current pointer position. If you click or drag the Target Adjustment tool at that position in the image, the preview point shows where the point will be added on the curve.
- Select a point, then click the Input or Output value to edit it. It’s not obvious from the UI that those numbers can be clicked and edited, but they can be. So if you select the black point at 0/0 and you want it at 0/4, you just click the Output value and type 4 so you don’t have to try and drag the point to 4 with tiny mouse moves.
Note: If at the bottom of the Tone Curve panel you see the word Region and four sliders, the Tone Curve is in Parametric Curve mode where you edit by tonal range, not points. To edit using curve points, switch it to Point Curve mode by clicking the second icon (the open gray circle) after the word Adjust.
Also, if the curve end points are already at 0/0 and 255/255 and there is clipping you want to back off from, you’d want to increase the Output value of the black point or reduce the Output value of the white point. But check carefully to see if it would be better to extend the overall tonal range by backing off on the Blacks or Whites values in the Basic panel.


