 Adobe Community
- Home
- Lightroom Classic
- Discussions
- Re: Trouble syncing manual exposures: auto tone co...
- Re: Trouble syncing manual exposures: auto tone co...

Copy link to clipboard
Copied
I'm shooting 360° panoramas, stitching multiple photos for each one. I have all settings manual (WB, f stop, shutter speed, ISO). My workflow is shooting 4 shots around, and then one shot down at the ground.
When I make develop adjustments to one of the around shots, and then sync images, the down shot gets darker, even though I can confirm that exposures were locked down, and develop settings are exactly the same (for exposure, contrast, etc).
When I advance from an around shot to down shot, I see LR making the image darker; see video linked below. I don't think this is the common preview-build thing that happens on import and sometimes causes confusion; for one thing, the shift doesn't happen when going from down shot to around shot, only the other way around:
pano with darker nadir - YouTube
I'm wondering if the auto setting in tone panel might have something to do with this; that's a feature I've never used and am not familiar with. In the example at video link, I don't think auto is in play, because the develop setting are the same for all shots. And auto would only be enabled if I click on the auto button, right?
I want all exposures to be the same, as shot, but with the exact same develop settings for all images. Anyone have any ideas what's going on?


 1 Correct answer

jimtron wrote
No, it's a significant issue because my exports show darker nadir, so I can't get seamless stitching. Even after resetting prefs, resetting develop settings, re-building 1:1 previews after adjusting highlights, etc. I am not able to export TIFs with matching nadir.
Without a reference (white balance card) in both the nadir and surround image with the same measured scene referred lighting it's difficult to determine the relative brightness difference. However, PTGui easily reveals t
... 39
Replies
39
39
Replies
39
Copy link to clipboard
Copied
To get Adobe to resolve this we need to confine the images to LR. if you use the above example Adobe will just say it's an issue with PTGui. Perhaps try to shoot an image pair that has the same illumination and place a piece of white copy paper at the nadir center and at the surround image center that has the same light level. That way you can measure it inside LR and demonstrate they are different exposures.
Copy link to clipboard
Copied
https://forums.adobe.com/people/Todd+Shaner wrote
To get Adobe to resolve this we need to confine the images to LR. if you use the above example Adobe will just say it's an issue with PTGui.
I agree, let's set PTGui aside, I don't want that to muddy the waters. My main concern is that develop sync is not working properly. I want to use the highlights and shadows controls, and have my images match when synced (when they are all shot with identical settings).
I'll try to shoot the test with paper today.
Copy link to clipboard
Copied
JIm, did you read Issue #2 above? It's caused by the 12mm lens focal length settings that reveals the image circle in the corners (i.e. solid black corners). Process Versions 3, 4, and 5 use image adaptive controls that causes them to produce different results with the lower dynamic range nadir image files. Shooting images with copy paper will help to demonstrate the difference for both issue #1 and #2, but they are two separate issues. The only possible workaround is for Adobe to provide a user selectable crop area that can used to calculate and apply the Basic panel and Local Tone controls settings. In your case the crop should be set to exclude the dark corners. Not sure how this could be implemented for circular fisheye images since LR doesn't have a circular selection tool. If you add this to your existing report please make sure to state that it is a separate issue form the Library and Develop preview difference, which should be easily for Adobe to fix.
I wish there was an easier solution, but the only one I can think of is to use the 15mm lens setting. I'll ask again–Is there any reason why you can't do that?
Copy link to clipboard
Copied
Todd:
Yes, I read #2 and I understand your point; the nadir is getting different settings because LR is adapting for the image content (this is along the lines of how I mistakenly thought this had to do with auto tone). Good to know about process v. 2, although I find the later versions much more effective in reducing highlights and increasing shadow detail (and panos usually inherently have a very high dynamic range, with sky and ground, as you know).
So there's no way to apply develop settings that don't involve input from the image data--highlight adjustments inherently involve input from the target image (brightness levels), right?
I did shoot nadir and around shots at same settings with gray card today, if that helps; .arw files here:
https://drive.google.com/open?id=1Mq2yBsc2oHlxe3PoDod1APcBw6nszWW9
"I wish there was an easier solution, but the only one I can think of is to use the 15mm lens setting. I'll ask again–Is there any reason why you can't do that?"
My preferred pano workflow is best at 12mm, that way I only need 4 shots around, plus nadir. With 15mm, as I recall 6 shots around are needed. Also, what I previously had been doing is not shooting a nadir shot, but using Photoshop content aware fill for nadir holes. That works well with grass and pavement and other uniform ground patterns, but it gets really difficult with something like an oriental rug. So recently I've begun shooting nadirs more regularly (FWIW, here is my pano website: https://www.panoramiceye.com).
Copy link to clipboard
Copied
jimtron wrote
So there's no way to apply develop settings that don't involve input from the image data--highlight adjustments inherently involve input from the target image (brightness levels), right?
You can try a camera profile for the Sony A7R III I created using DNG Profile Editor and Adobe Neutral with the linear tone curve selected. You'll need to place it in the below user folder and restart LR.
EDIT: The Adobe Neutral Profile can't be selected inside DPE so I've created a profiles using Adobe Standard with a linear tone curve. It appears to work fine with your image files.
Dropbox - Sony ILCE-7RM3 Adobe Standard Linear Tone Curve.dcp - Simplify your life
Dropbox - Canon EOS 5D Mark III Adobe Standard Linear Tone Curve.dcp - Simplify your life
Windows—C: \ Users \ [your username] \ AppData \ Roaming \ Adobe \ CameraRaw \ CameraProfiles
Mac—Macintosh HD / Users / [your username] / Library / Application Support / Adobe / CameraRaw / CameraProfiles
With the Sony ILCE-7RM3 Adobe Standard Linear Tone Curve camera profile selected, Process Version 5 selected, and ALL the basic panel controls at their 0 defaults I see no significant highlight or shadow clipping in your two most recent ARW files. If you do see clipping lower the Exposure slightly as necessary and sync that as well. It shouldn't affect the nadir image. Sync these settings to the other raw files and export to TIFF file format. Stitch your panorama using PTGui and then edit the TIFF file in LR. You may want to create or use one of provided LR Tone Curves to restore the contrast lost with the Linear Tone Curve applied to the raw file. Not sure if this will affect stitching accuracy due to the lower contrast but give it a try! Since there's no highlight or shadow clipping in the TIFF files this may be a viable solution.
BTW- You've got some nice work on your site!
DPE Tone Curve Selector

Copy link to clipboard
Copied
Thanks for that profile Todd. It's really important for me to use highlight and shadow control though; even if I don't have clipping, I much prefer the results when I bring highlights down, shadows up, increase contrast and vibrance. One idea I'm trying is to just manually adjust nadir shot after sync to get it to match.
Copy link to clipboard
Copied
jimtron wrote
It's really important for me to use highlight and shadow control though; even if I don't have clipping, I much prefer the results when I bring highlights down, shadows up, increase contrast and vibrance.
I apologize for not explaining in more detail the workflow when using a camera profile with a linear tone curve. What you are trying to do is "partially" process the image raw data to create a demosaiced lower contrast image (think compressed dynamic range). All of the Tone controls are left at 0 setting except perhaps a slight Exposure adjustment, which will prevent the differences seen in the nadir image rendering. You also are applying White Balance, Sharpening, Noise Reduction, Chromatic Aberration correction, Defringe (more on this later) and perhaps Lens Profile Vignetting, but NOT Distortion (set it to 0). You can create a Develop preset to apply these settings as just mentioned.
What I forgot is that you're creating VRML files. The above procedure works for conventional stitched panorama TIFF files. The final stitched TIFF file can be brought back into LR and then use the Basic panel and other controls for highlight and shadow recovery, Tone Curve, and color enhancements. I have no idea how this workflow could be incorporated when creating VRML files. If there's an intermediate step where you can pull the stitched file(s) back into LR to make these adjustments it will work.
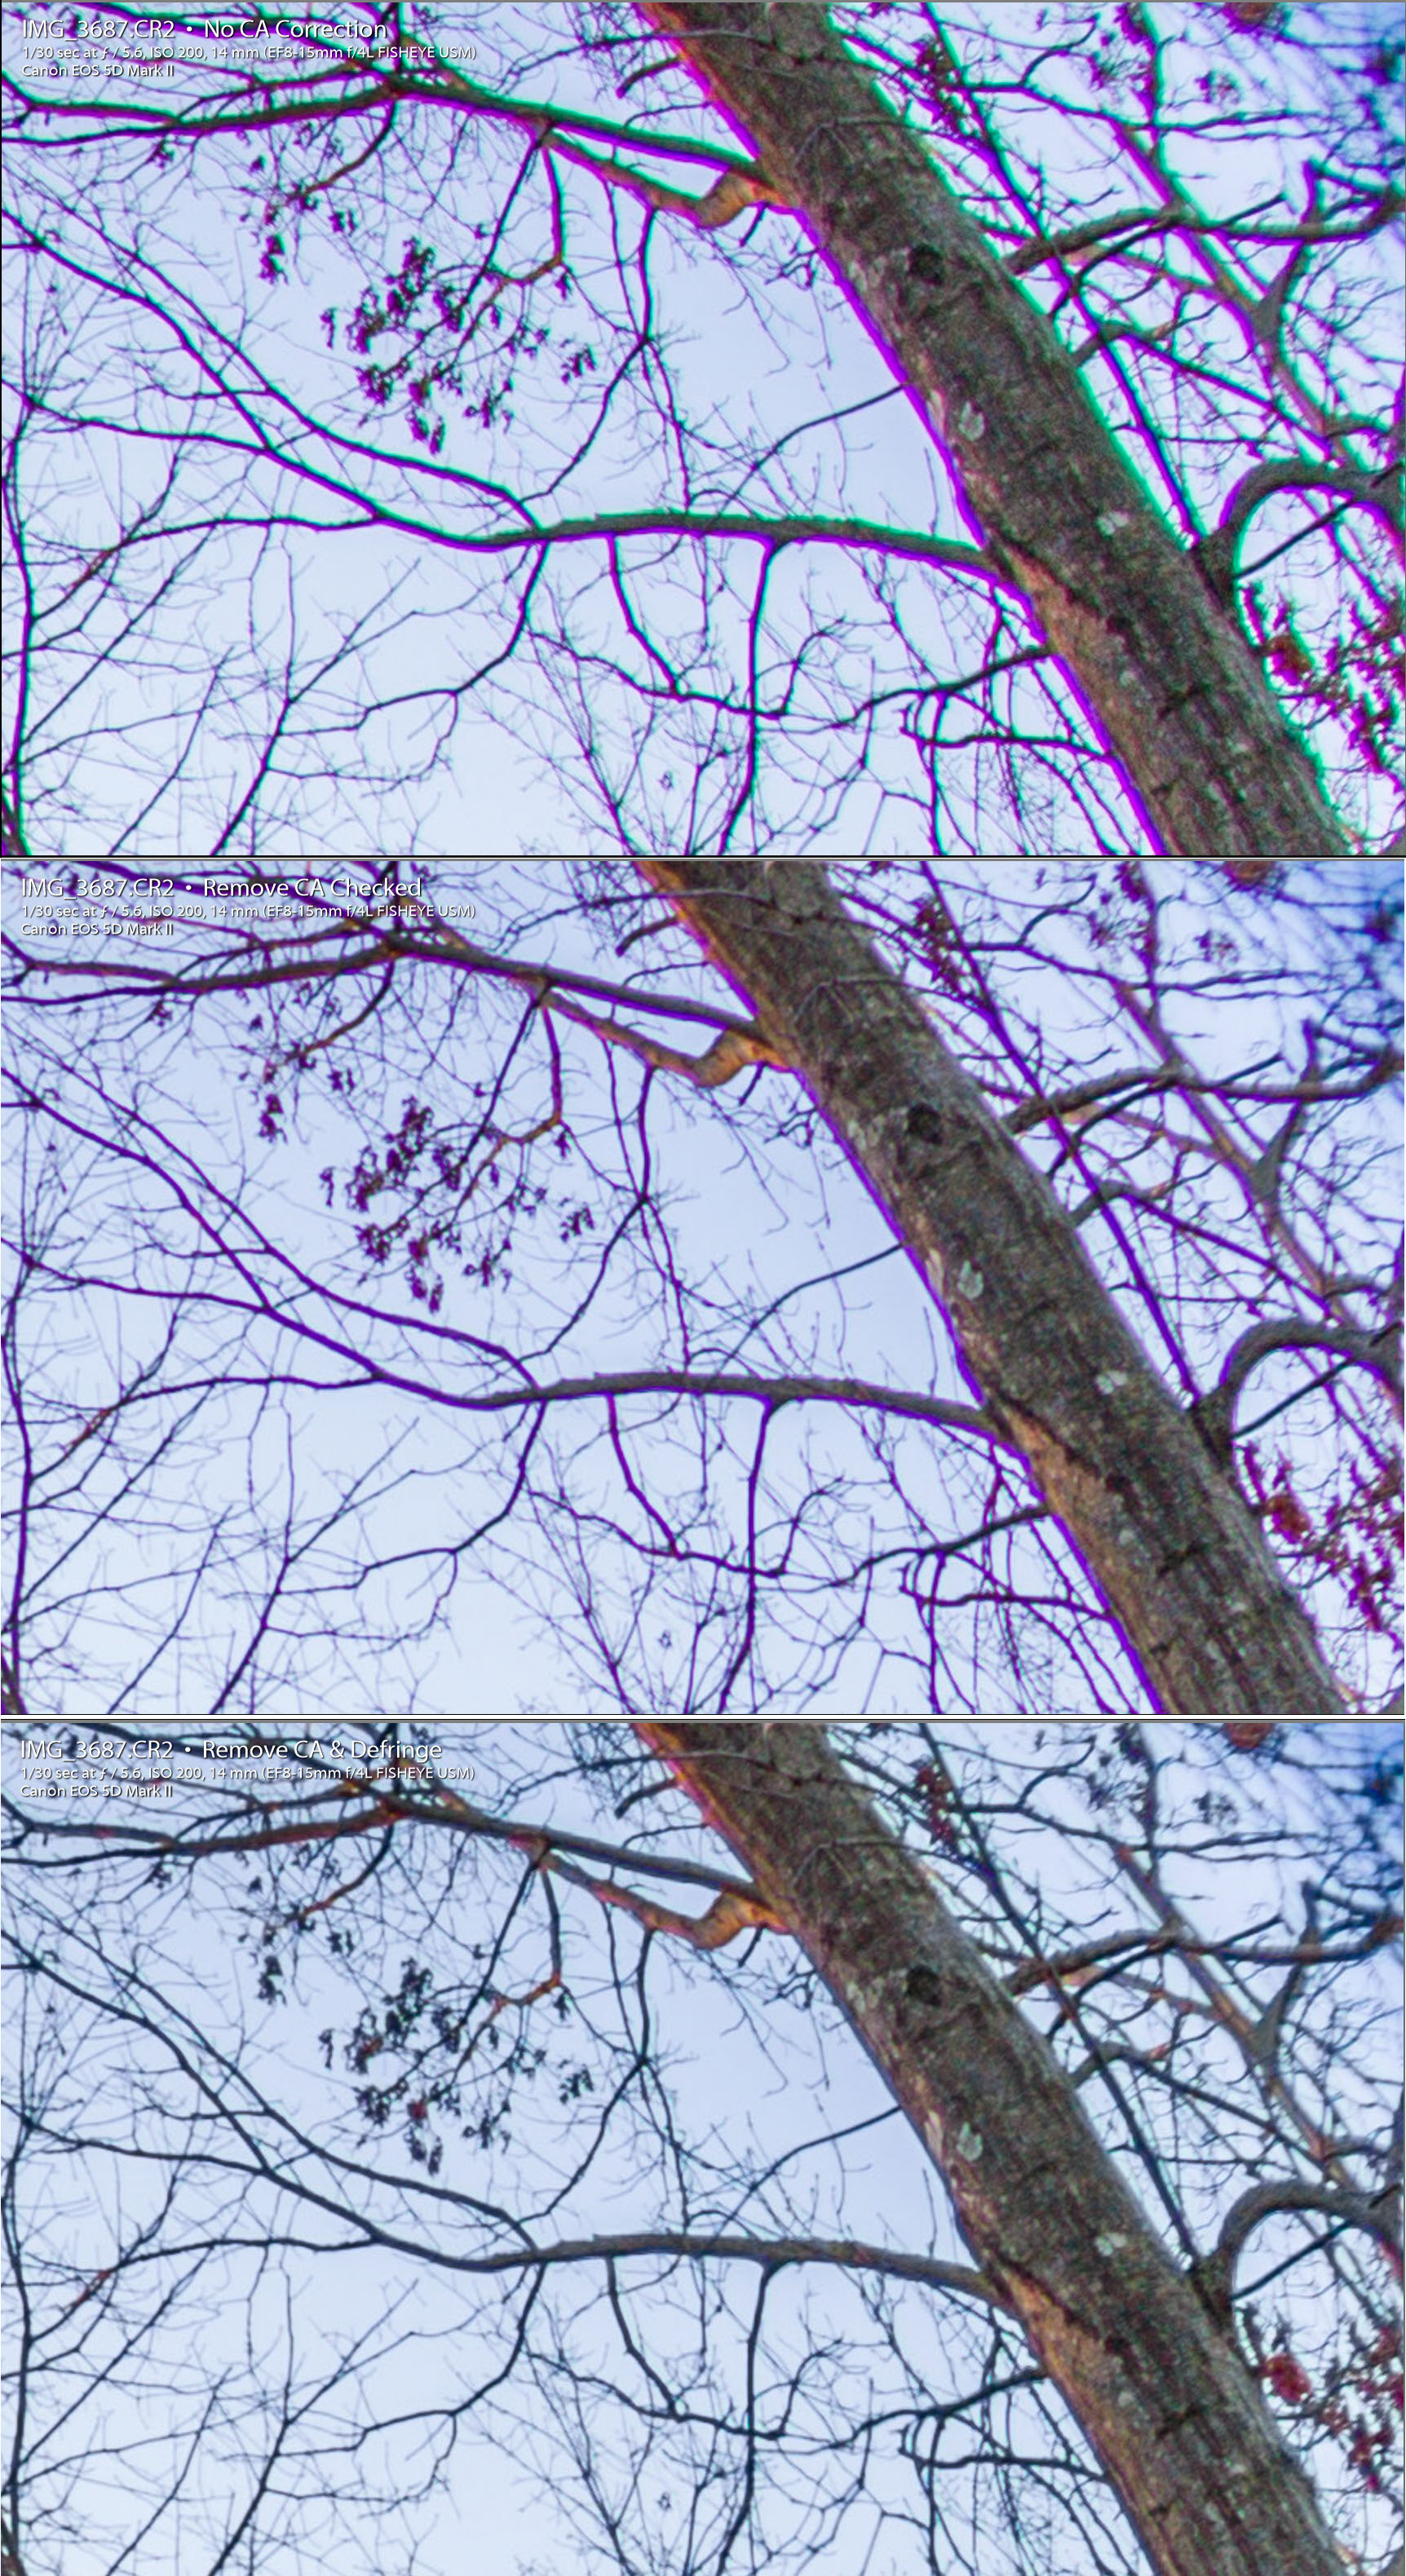
Concerning chromatic aberration the Canon 8-15mm F4/L has plenty! Make sure to check 'Remove Chromatic Aberration' in the Lens Corrections Profile tab. I also apply Defringe in the 'Manual' tab based on focal length as shown below. I also have Vignetting set to 50 in the profile tab, which works well.
8mm-12mm Focal Length

13mm-15mm Focal Length

Here's what 1_ No CA correction, 2) Remove CA Correction Only, and 3) Remove CA + Defringe Correction looks like.
2:1 Zoom View
Copy link to clipboard
Copied
jimtron wrote
One idea I'm trying is to just manually adjust nadir shot after sync to get it to match.
Yes, simply raising the nadir file's Exposure control to match the surround images may be the simplest solution. Let me know if that works.
Copy link to clipboard
Copied
Thanks for the clarifications, Todd. Yes, I usually see a lot of purple fringing/CA with that Canon wide zoom and often add manual adjustments to eliminate that, and always check "remove chromatic aberration."
I installed the camera profile into directory for Mac you specified, and re-started LR. But how to apply it to images?
Copy link to clipboard
Copied
jimtron wrote
I installed the camera profile into directory for Mac you specified, and re-started LR. But how to apply it to images?
You need to click on the Profile Browser and in the Basic panel then on the 'Profiles' selector as shown below. Hover over the 'Sony ILCE-7RM3 Adobe Standard Linear Tone Curve' and click on the star icon. The profile will now appear in the Basic panel Profile drop-down list.


Copy link to clipboard
Copied
Jim, I've just posted a request, which will fix the nadir sync settings issue if Adobe implements it. I've expanded it to include both Manual and Auto Tone control settings calculations using a Center-Weighted Option for Auto and Manual Tone Settings.
Center-Weighted Option for Auto and Manual Tone Settings | Photoshop Family Customer Community
Please add your 'Me To' vote, Follow,' and any supporting comments. Thank you.
Copy link to clipboard
Copied
"hanks for posting that request Todd, I voted for it and am now following it. And I was able to apply the camera profile to my photos.
I appreciate all the help!
Copy link to clipboard
Copied
jimtron wrote
No, it's a significant issue because my exports show darker nadir, so I can't get seamless stitching. Even after resetting prefs, resetting develop settings, re-building 1:1 previews after adjusting highlights, etc. I am not able to export TIFs with matching nadir.
Without a reference (white balance card) in both the nadir and surround image with the same measured scene referred lighting it's difficult to determine the relative brightness difference. However, PTGui easily reveals this difference when trying to stitch the images. Following what you're seeing with the export files in PTGui I gave this some more thought and we do have two issues:
1) The nadir image file Develop preview and Library previews do not match unless 1:1 Previews are built after applying the Develop settings. This is what has been reported in the Photoshop Family forum and demonstrated with my Canon 5D MKII CR2 files shot using the same EF 8-15mm F4L Fisheye lens. This is clearly a bug since 1:1 Previews should not have to be built for reviewing image files at Fit view in the Loupe. Why this only happens with the fisheye lens when shooting nadir image files still remains a mystery.
2) Even with 1:1 Previews built so the Library and Develop module previews match the exposure level in the nadir image file is lower (darker) than the surround image file. This one I can explain as follows.
You are shooting theses panorama images with the Canon EF 8-15mm F4L Fisheye lens set to 12mm. This reveals the image circle in the four corners as full black level image data, which remains the same regardless of subject or light levels. Starting with Process Version 3 (2012) all of the Tone controls are "image adaptive" with Recovery and Fill replaced by Highlight and Shadow controls. These controls act differently on the image data based on the exposure level and dynamic range of the image data. The surround image files have a wide dynamic range extending well into highlight clipping (+100% level). Conversely the nadir images have a much lower dynamic range with most of the image data falling below the 50% Histogram level. ERGO: Nadir images render differently (i.e. darker) to the Highlights control than surround images.
One solution is to use Process Version 2, which only has two image adaptive controls (Recovery and Fill). I tested this below and it appears to provide better exposure matching than Process Version 3-5. The downside is that Process Versions 5 is much better at recovering highlights and shadows as well as better noise reduction. A better solution is to set the Canon EF 8-15mm F4L Fisheye lens to 15mm, which will create 180° diagonal full-frame images without dark corners. Panorama image file sets shot with the full-frame 15mm setting should not exhibit any of these issues. Is there a specific reason why you are using the 12mm focal length?
.jpg)
Copy link to clipboard
Copied
Is a year too late for a reply? Todd, thanks again for all your help with this; the issue hasn't been coming up for me lately but it did just come up again with a current project, so I came back here to referesh my memory on what was discussed.
To answer your question (below): I use 12mm, because that requires only 4 shots around plus a nadir shot (for a spherical 360° pano). At 15mm, you need to shoot 5 shots around, plus zenith and nadir shot, IIRC. So 12mm is more streamlined for shooting and post-processing.
"A better solution is to set the Canon EF 8-15mm F4L Fisheye lens to 15mm, which will create 180° diagonal full-frame images without dark corners. Panorama image file sets shot with the full-frame 15mm setting should not exhibit any of these issues. Is there a specific reason why you are using the 12mm focal length?"
Copy link to clipboard
Copied
I reset preferences (and didn't change any prefs after reset), and re-imported the two .arw files that I linked to above (after moving duplicate files to a new folder). I was careful to not add any develop preset, metadata etc. upon import. I also built new 1:1 previews after importing, and reset dev just in case.
Then I made dev adjustments, synched, and nadir still gets measurably darker.
-
- 1
- 2

 AdChoices