


Copy link to clipboard
Copied
Hello,
I wanted to take portraits with clean white background, spent couple of hours fiddling with 2 backlights pointed toward a white background; kept positioning the lights (alienbees 800) till I got Blinkies on my Nikon d810. I took several portraits and was very happy. Now, when I transferred the pictures to Lightroom 5 on my laptop, the white background looked more toward pinkish and no Blinkies whatsoever ( arrow up ON on histogram), I had to crank the whites to 100 and still not fully overexposed. Is this normal? What gives??
Thank you,
Mohamed Mami


 1 Correct answer

Lightroom does some automatic highlight recovery when rendering the raw file, but it doesn't show on the sliders, they stay at 0.
I think this was introduced in Process version 2012.
But you should still be able get a white background using the Whites and/or Highlights sliders if the background is almost white to begin with.
As for changing the contrast of jpgs, and consequently the camera display, try Menu > Shooting menu > Set picture control > Neutral.
 12
Replies
12
12
Replies
12

Copy link to clipboard
Copied
White areas looking pinkish ... can you show us a screen capture so that we can also see histogram and the sliders in the panels on the right side of the develop module.
Have you calibrated your monitor recently?
Copy link to clipboard
Copied
Hello,
My monitor is indeed calibrated, I was hesitating mentioning the pinkish cast and that is
Not really the issue; what I observed is that if my camera shows blinkies everywhere then I would expect Lightroom to show some signs of overexposure in the white area, there is absolutely nothing?? The pictures were shot in RAW.
This is very puzzling to me.
Thank you, Mohamed Mami
Sent from my iPhone
Copy link to clipboard
Copied
mohamedm36267947 wrote:
Hello,
My monitor is indeed calibrated, I was hesitating mentioning the pinkish cast and that is
Not really the issue; what I observed is that if my camera shows blinkies everywhere then I would expect Lightroom to show some signs of overexposure in the white area, there is absolutely nothing?? The pictures were shot in RAW.
This is very puzzling to me.
Thank you, Mohamed Mami
Sent from my iPhone
So essentially you have not provided the other information that @richardplondon or myself have asked for. We need that information to help answer your question.

Copy link to clipboard
Copied
Your camera will show "blinkies" and a histogram based on an internal conversion to an 8 bit jpeg preview using a preset in the camera.
That does not mean that the pixels in the individual channels are blown totally and camera raw/lightroom will show it's histogram and clipping warnings based on the camera raw settings acting on the full (12 or 14 bit raw data).
Use the exposure and White s slider to turn them completely white if you want them to clip
Dave
Copy link to clipboard
Copied
mohamedm36267947 wrote:
Hello,
...if my camera shows blinkies everywhere then I would expect Lightroom to show some signs of overexposure in the white area...
Not necessarily! Your camera is showing the blinkies based on the JPG preview created by your firmware and by your display setting. It is possible to change the blinkies by changing the contrast of your camera display. I have done this on my Nikon D7000 to reduce blinkies based on the fact that these areas were not truly clipped and this was causing me to shoot again when it was not necessary.
Copy link to clipboard
Copied
I am not sure what you mean by contrast setting; I have a D7100, can you described the menu setting. Thank you.
Copy link to clipboard
Copied
Lightroom does some automatic highlight recovery when rendering the raw file, but it doesn't show on the sliders, they stay at 0.
I think this was introduced in Process version 2012.
But you should still be able get a white background using the Whites and/or Highlights sliders if the background is almost white to begin with.
As for changing the contrast of jpgs, and consequently the camera display, try Menu > Shooting menu > Set picture control > Neutral.
Copy link to clipboard
Copied
This is exactly what I am experiencing, i recover the "pure" white background by simply adjusting white and highlight in Lightroom; this makes sense to me. Thank you all for your replies and comments.
Copy link to clipboard
Copied
mohamedm36267947 wrote:
I am not sure what you mean by contrast setting; I have a D7100, can you described the menu setting. Thank you.
Check your camera manual index for Picture Controls. In the camera select SHOOTING MENU > Set Picture Control > highlight one of the in-camera options. I highlighted LANDSCAPE and then press the right side of the control wheel. You should see a menu where you can adjust, among other things, "Contrast" between -3 to +3. Choose negative values to reduce highlight blinkies. You can also create a custom Picture Control by selecting SHOOTING MENU > Manage Picture Control. I created a Landscape 03 custom menu. You might want to choose Portrait to change the settings.
Note, this does not change your Raw files; it simply reduces the Blinkies in the camera display so you can get closer in camera to what you are seeing in Lightroom.
Copy link to clipboard
Copied
Is it possible you may have "Apply auto tone adjustments" checked, in your Default Develop Settings? (presets tab of LR preferences) - or else as part of the action of a Develop preset that you are applying either at import, or subsequently.
The usual "aim" of such an option is (among other matters) to resist blowing out highlights by all available means - via contrast, exposure, highlights, etc. However in this usage, allowing highlights to blow out is precisely what you DO want!
Copy link to clipboard
Copied
Auto Tone is not turned ON in my default settings. I purposely want pure white as portrait background but I want to achieve that in the camera and not in Lightroom; we are not talking about a handful of portrait but rather hundreds!

Copy link to clipboard
Copied
Hi
I have been doing the following in Photoshop, but it can be done in Lightroom as well.
Here is a histogram of a photo I took against a white background before I start processing it:
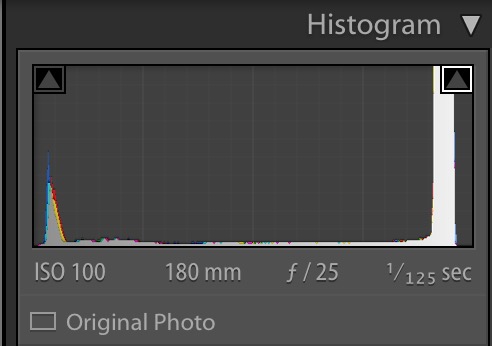
Note that I have selected the triangle at the white end of histogram.
Now I go to the Tone Curve and grab the curve until all the "near white" points are actually white. Because I selected the triangle above, Lightroom gives me feedback by showing the points that hit pure white by making them red in the image.
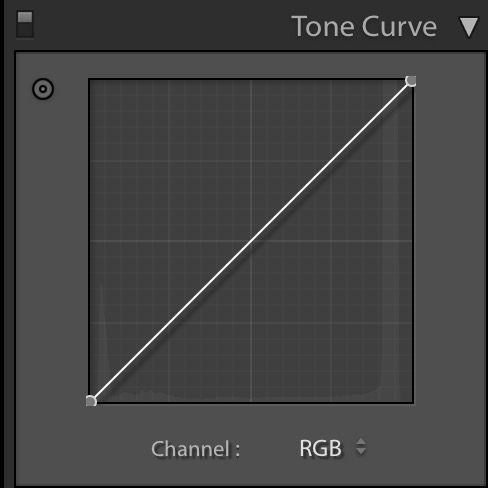
Once you get the whites where you want them, then bend the tone curve back to linear for most of its range. This will put about 90% of the tones where you want them (depending on how many highlights you have in the image).
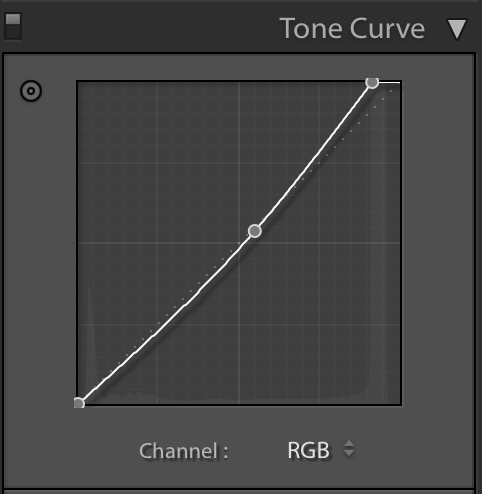
Now you can fine-tune the tone curve and make additional edits.
I prefer doing this in Photoshop because of the additional control it offers, but depending on your image, this should work fine in Lightroom.
And, BTW, I think you do want your "white" background to come in around (250, 250, 250) and then move it to (255, 255, 255) in Lightroom -- the brighter your background is, the more glare and other artifacts you'll suffer from. It is easier to get it "close" in the camera and fix the last bits in Lightroom.
Oh, and be careful using the exposure controls in Lightroom -- these will move the whites as well as the image. If you just use the tone curve, you can be sure that your whites remain pinned at (255, 255, 255).
A

 AdChoices