 Adobe Community
White Clipping
Copy link to clipboard
Copied
I would like to apologise for my question yesterday on this subject. I now realise that the red tone exists only in the develop mode and is not present in the library mode. It is obviously very useful for showing when the brightest parts of the image are reaching their maximum and enables the balancing of exposure and lightening of the darker areas. I had not noticed that the signal vanishes in the library copy.
Copy link to clipboard
Copied
Hi Sockit,
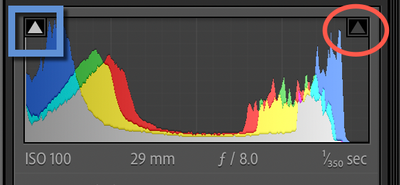
I'll make it even easier for you: on your histogram you may or may not have noticed two little trangles in the upper corners.
The one on the right (red circle) will turn on or off any blown out over exposed regions and will show up red.
The one on the left (blue square) will turn on or off any underexposed regions in your image and will show up blue.
By using these, you can easily see regions in your images you need to be concerned about. IF you take raw imagse, you can probably recover and lost data by turning down the Highlight slider or sliding up the Shadow slider in addtion to changing the overall exposure. There are many other options for both controlling and enhancing the over or under saturated parts of your image but this will get you started.
But no, you do not have to "accept" seeing red or blue on your image while in the Develop mode.
Copy link to clipboard
Copied
Gary. That is fascinating and very helpful. I have now started taking Raw images as they are so much better than JPEG's I have been balancing the highlight and shadow sliders with the exposure to get the best balanced picture, and find that the high clipping signal is very useful. I have never seen the blue signal but will try to turn it on to try it out.
Thanks for your kind help
Terence
Copy link to clipboard
Copied
Gary So far I have been unable to examine the undersaturated situation; I had thought you meant something less black than could be displayed but then realised that you can't have less then no light in the visual world. So I don;t understand what undersaturated means. Is it just a washed out image? How does lightroom identify an undersaturated image? How do you use this when editing?
Thanks
Terence
Copy link to clipboard
Copied
P.S. While I have you can I ask you about the hisrogram. As I visualise it, the hitogram shows the distribution of the colour across the width of the image. However at any point is the levle the sum of all of the strength of illumination in each colour from top to bottom or is ir just the brightest point in the colum? I don't know how I can use the information as the colours are determined by the boundaries of each objects in the picture.Is there a way of changing the colour intensity in a point in the histogram? To do that it would seem that you would need to access the function that descibes the shape of that curve. Bt uf you did that you would alter the appearance of the whole vertical slice of the image which would not be useful.. I just don;tt understand how to use it.
Thanks
Copy link to clipboard
Copied
Hi Sockit,
This is a pretty broad subject. With the information I just gave you, I think it would be best if you googled "how to use the histogram in Lightroom" because I think the video tutorials can do a much better job than I can here.
Welcome to the journey that you'll be on for the rest of your life, it's a grand journey!
Copy link to clipboard
Copied
Boy I have just been playing with the Histogram and photos of superb Autumn foliage. Your help has been amazing and I realised that I had the exposures and tints all wrong until you opened this door. Thanks for your insight and encouragement. I have a lot to learn
Sockit
Copy link to clipboard
Copied
Hi Sockit,
I'm in the Pacific Time Zone so I apologise for my lagging to get to this and your next question.
What the blackest black or the whitest white shows you is what, as things sit in your image, is the blackest and whitest sections in your image. If you move the Highlights, Shadows, and Exposure sliders (as well as the Black and White sliders), you can see what is out of range. What you will find is that a raw image has much more to work with than a JPG.
While it's not always desirable to have areas that are off the chart, so to speak, it's not wrong either depending on what you want in the image. There was a time when I was trying to remove all shadows (because I could) until a friend (in fact a good friend) pointed out, "shadows are good, they give an image depth."
(Everthing in the following paragraph is the same for black regions just the opposit)
So, to your question: what does under-saturated mean? It means that the light was soooo bright in that region, there's no information, it's past full white. Think of it this way: the litest pixel that can be recorded is 255 (the darkest pixel 0). So, (say) 250 is not as white as 255. But how do you record 260? You can't. in an 8-bit image, 2^8 power ((2x2x2x2x2x2x2x2) is 256 and zero to 255 totals up to 256) So if the light was brighter than 255, it's gone because there's no information. If you take an over-exposed image, there will be a lot of information gone and cannot be retrieved.
So what the red and blue are showing you is information that cannot be shown either at the settings you have AND/OR that available in the image.
Copy link to clipboard
Copied
Thanks for that explanation. I can see how the red value can show areas that have an intensity value over 255 but I can't see how the blue areas can show areas where the values are less than 0 unless the value can become negative ? Thanks for your explanation it is very helpful
Sockit
Copy link to clipboard
Copied
There is no "over 255" and no "under 0" In an 8bit system the image does not record over/under these values.
R255,G255,B255 is pure White. R0,G0,B0 is pure Black.
Here are two video links that may be helpful-
Clipping-
A 'raw' image file may however allow the edited version to visually recover areas that at first appear 'clipped'.`
https://jkost.com/blog/2015/05/quick-tip-shadow-and-highlight-clipping-warnings-in-lightroom.html
Bit Depth-
https://www.youtube.com/watch?v=Eq4FlnmKjkU
Copy link to clipboard
Copied
Wobert, that was my point.
Copy link to clipboard
Copied
Another way to put it: these warnings are about losing differentiation.
There are three numbers where this can happen - the red, the green or the blue values of the pixels; though in understanding this one can take one of those numbers as an example.
Consider two Raw derived starting values A and B, where B is higher than A but both are low values. If the image's current processing means that B presents at or very close to full black (0), then A definitely gets full black also. So no differentiation can be seen (with this processing) between them: black-clip warnings show for all areas of the image whose starting Raw values are at or around a B value, or lower. A and B still are genuinely different in the original, but this particular processing acts to effectively "smush" that difference away.
And it works similarly for white clipping.
Copy link to clipboard
Copied
Richard Thanks for the example. It is very helpful
Copy link to clipboard
Copied
This tutorial on using how to use the LR Basic panel Tone Controls should be helpful.
https://helpx.adobe.com/lightroom-classic/help/tone-control-adjustment.html
What you see in the Histogram is the raw data with a camera profile applied. To determine if a raw image file has actual clipped highlight or shadow pixels you'll need to use an app that can read and measure the raw image data such as RawDigger.
Copy link to clipboard
Copied
I see that the histogram has a lot of additional functions built in.Thanks for pointing them out. The whole discussion has been really valuable and it has given me a great overview of what I need to do. It is really amazing what can be done.
Thank you every one.


