• Global community
    • Language:
      • Deutsch
      • English
      • Español
      • Français
      • Português
  • 日本語コミュニティ
    Dedicated community for Japanese speakers
  • 한국 커뮤니티
    Dedicated community for Korean speakers
Exit
0

Astrophotography processing.

New Here ,
Aug 01, 2020 Aug 01, 2020

Copy link to clipboard

Copied

I have a problem when I process in Lightroom RAW astrophotography pictures. When I export the photo for a JPG format with 100% quality the result is that the stars are less bright and with less detail. The same problem I have with the lightstreets in night city photography.  Maybe I am not adjusting correctly some parameters of the programme. Your help on this matter would be much appreciated.

Carlos Stehli

Views

145

Translate

Translate

Report

Report
Community guidelines
Be kind and respectful, give credit to the original source of content, and search for duplicates before posting. Learn more
community guidelines
Community Expert ,
Aug 02, 2020 Aug 02, 2020

Copy link to clipboard

Copied

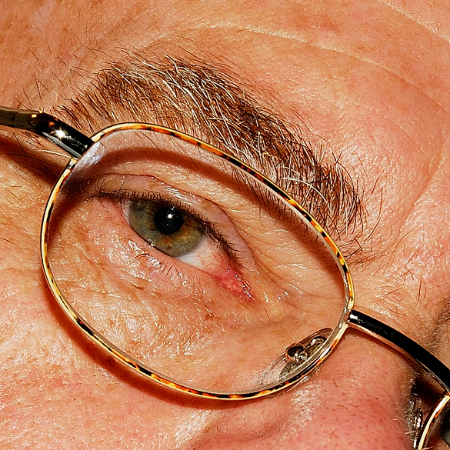
To see a true representation of the image, you have to view it at 1:1 (100%), where one image pixel is represented by one screen pixel. Any other view will be inaccurate and misleading because the image has been scaled.
This applies to any image, in any application, including exported files.


It is also vital that you apply sharpening and noise reduction at 1:1 view in Lightroom.
If you have done this in Fit view, there's a chance that you have applied too much sharpening and not enough noise reduction. If you then add output sharpening on Export, the image will be grossly over sharpened. 


The sharpening you do in Lightroom (which is called Capture sharpening) should make the image reasonably sharp (at 1:1), but not too sharp. If in doubt, sharpen less.
Use the Masking slider to protect flat, typically noisy areas of the image, like the sky from sharpening. Press the Alt key while dragging the slider to see the effect. The image will change to black and white – white areas will be sharpened, black areas will not be sharpened.

You add the final touch to sharpening with Output sharpening in the Export dialog. Using Standard sharpening for screen should result in an exported image that's crisp and sharp when viewed at 1:1 without being over sharpened.


Also note that different applications use different algorithms for scaling, which will produce different results, even when viewing at the same magnification. The exception is 1:1, which will always produce identical results.

Votes

Translate

Translate

Report

Report
Community guidelines
Be kind and respectful, give credit to the original source of content, and search for duplicates before posting. Learn more
community guidelines
LEGEND ,
Aug 02, 2020 Aug 02, 2020

Copy link to clipboard

Copied

LATEST

Without seeing screen shots of what you are seeing on your screen, along with the settings you are using, it is hard to help you with your problem.

We have no idea what settings you are using that could casue your problem.

Votes

Translate

Translate

Report

Report
Community guidelines
Be kind and respectful, give credit to the original source of content, and search for duplicates before posting. Learn more
community guidelines