 Adobe Community
- Home
- Lightroom Classic
- Discussions
- Re: Color/Brightness shift between Library/Develop
- Re: Color/Brightness shift between Library/Develop
Color/Brightness shift between Library/Develop
Copy link to clipboard
Copied
I'm having a major problem with the color shifting and dimming when switching between Library and Develop modes. The original picture in Library mode is beautiful and bright and when switched to Develop mode is is dark and dingy looking. When I export the jpg looks exactly like the Develop mode. I know this problem has been around for years and most solutions are that it's a corrupt color profile.
I went through the color calibration process and it was originally set to sRBG. I tried to create a custom profile, tried adjusting white balance, even tried Adobe and Nikon color profiles and they all have similar results. It says nothing about the color profile being corrupt. What else can I try? Should I purchase a color calibrating hardware device? Is there something I'm missing? I want the original image that is displayed in Library mode.
2019 iMac
OSX Catalina
Nikon D850
Lightroom LRC CC
Copy link to clipboard
Copied
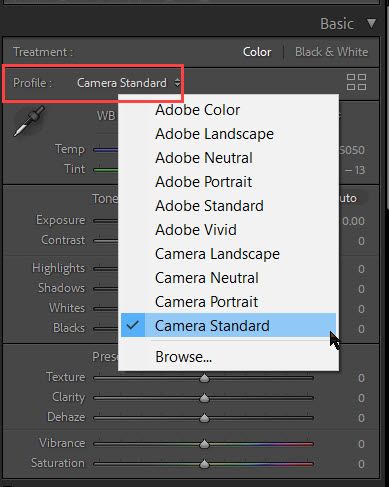
You have the Import module Build Previews set to use the Embedded Preview. This is the in-camera rendering, which can contain numerous styles and other settings that will look quite different than the selected camera profile in LrC. Try changing it to build Standard Previews and set the Develop module's Basic panel Profile selector to Camera Standard.
Copy link to clipboard
Copied
I tried the suggestions that you made and while it did help slightly, there is still a significant difference between Library and Develop mode. None of the "profile" settings were as bright as the Library mode. When I selected "standard preview" it changed the Library Mode and made it dull to match the Develop Mode. Is there a way to keep the brightness and colors from the Library Mode and have the Develop Mode change to match it?
Copy link to clipboard
Copied
You said, “Is there a way to keep the brightness and colors from the Library Mode and have the Develop Mode change to match it?”
The initial Library Mode is displaying the imbedded preview from the Camera, that is produced by the proprietary software of the Camera Manufacturer and is not available to Adobe.
What you see in the Develop Module is the raw data cooked by the “Adobe Chef” you can use the Adobe Camera Matching Profiles to get a similar rendition.
Copy link to clipboard
Copied
You can change the profile to get a better match as suggested, but you can automate the process. In Preferences, go to Presets. In the Raw Defaults section, change Global to Camera Settings. Future imports will match the in camera settings to the Adobe version of the profile. This won't include customizations, but will get you close. Previously imported shots need to be done manually
Copy link to clipboard
Copied
Thanks for the detailed info. I tried that and while it did improve the differences they were still noticeably there. I guess I'll just have to go with that method as a best solution. Thanks again.
Copy link to clipboard
Copied
"I tried the camera standard profile and while the differences weren't quite so drastic they were still noticeable."
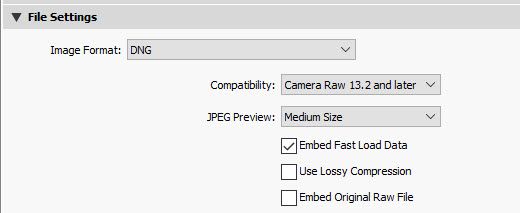
That's most likely due to other settings applied in-camera, which are not read or applied to the image file inside LrC. I'll be glad to check one of the files. Please Export to DNG file format using the below settings in the LrC Export module and then upload the DNG file to Dropbox or other file sharing site.
Copy link to clipboard
Copied
In addition to Todd's valuable information, the Library Previews he mentions are cached AdobeRGB files, whereas in Develop you're reading the raw file directly using a ProPhotoRGB variant which has more colours, mean you can see colour shifts between Library and Develop.
Copy link to clipboard
Copied
As you have an embedded preview, I assume you are working with a RAW photo. Being as you have a Nikon, that would be a .nef file.
So, what modifications in the develop module are you accomplishing.?
I ask this because:
The original picture in Library mode is beautiful and bright and when switched to Develop mode is is dark and dingy lookingInitially the image you see in the develop nodule, before edits, will most likely look flat, most likely look a bit off. As you are using an embedded preview, the Library module view will look more like, well exactly like, the embedded file in the RAW file, that you took in camera. Turning that embedded off, then that changes. If you compare a 1:1 view in develop to the image in library, they should be close, but not identical (as color space is different)
Copy link to clipboard
Copied
I went through the color calibration process and it was originally set to sRBG.and
Should I purchase a color calibrating hardware device? So, how are you calibrating?
Copy link to clipboard
Copied
Those two images you attached. Those png files with the white backgrounds. How were they created? Were you in LrC when you created them?
Copy link to clipboard
Copied
I created those images with a screen capture to get the most accurate representation of the differences I was seeing. Yes they are RAW .nef files in LrC.
Copy link to clipboard
Copied
Screen capture of LrC Library, and screen capture of LrC Develop?
The large amount if white background is not normal when viewing in LrC, but possible. It causes curiosity as to procedure.
Could be better if more of LrC screen was included.
In screen captures of Develop module, it is helpful to include histogram panel ( a wonky histogram, for example oddly tinted can give a clue), Basic adjustments panel, upper and lower bars (to see filters on/off, etc), filmstrip (badges, etc) and Navigation panel (can occasionally give a clue, for example, if blank)
In screen captures of Library mode, histogram and quick Develop, Navigation panel, and had you issues with file locations, the Folders panel.
Copy link to clipboard
Copied
First, are those screen captures color managed? If not, we can't comment but yes, the two modules should be very 'close' if viewed at 1:1. Yes, the color space between Develop and all other modules differ but that alone shouldn't make a big visual difference, again when viewing both at 1:1 or greater when comparning. Did you try disabling GPU to see if the visual differences change?
The dcp profile shouldn't help with a module mismatch, again when properly vewing the two. You might wish to recalibrate and profile your display again, always having the host software build a V2, not V4 version ICC display profile, might help.
To build a proper viewable screen capture, you'll need to tag it with your display profile, then (ideally) convert to sRGB and upload to view.
Copy link to clipboard
Copied
"When I selected "standard preview" it changed the Library Mode and made it dull to match the Develop Mode."
As I suggested in my reply please try selecting the 'Camera Standard' profile as shown below. The 'Camera' named profiles emulate the in-camera picture style setting and should provide a close match to what you are seeing when you selected 'Embedded Preview' for Import preview building. If Camera Standard doesn't match try Camera Landscape.
Copy link to clipboard
Copied
I tried the camera standard profile and while the differences weren't quite so drastic they were still noticeable.


