 Adobe Community
- Home
- Lightroom Classic
- Discussions
- How does Lightroom build previews when processing ...
- How does Lightroom build previews when processing ...

Copy link to clipboard
Copied
Using LR Classic CC to try and sort out a problem my camera (Panasonic Lumix G80) has with the colour orange.It handles every other colour perfectly with the exception of shiny red which is almost right (just a slight purple tint on bright highlights).But oranges of a particular shade (I'm not sure which ones in particular,it seems a bit random) come out scarlet,vermilion or even almost red in some cases.I can of course correct this using the HSL sliders in Lightroom and have made a series of presets I just have to click on to correct it.
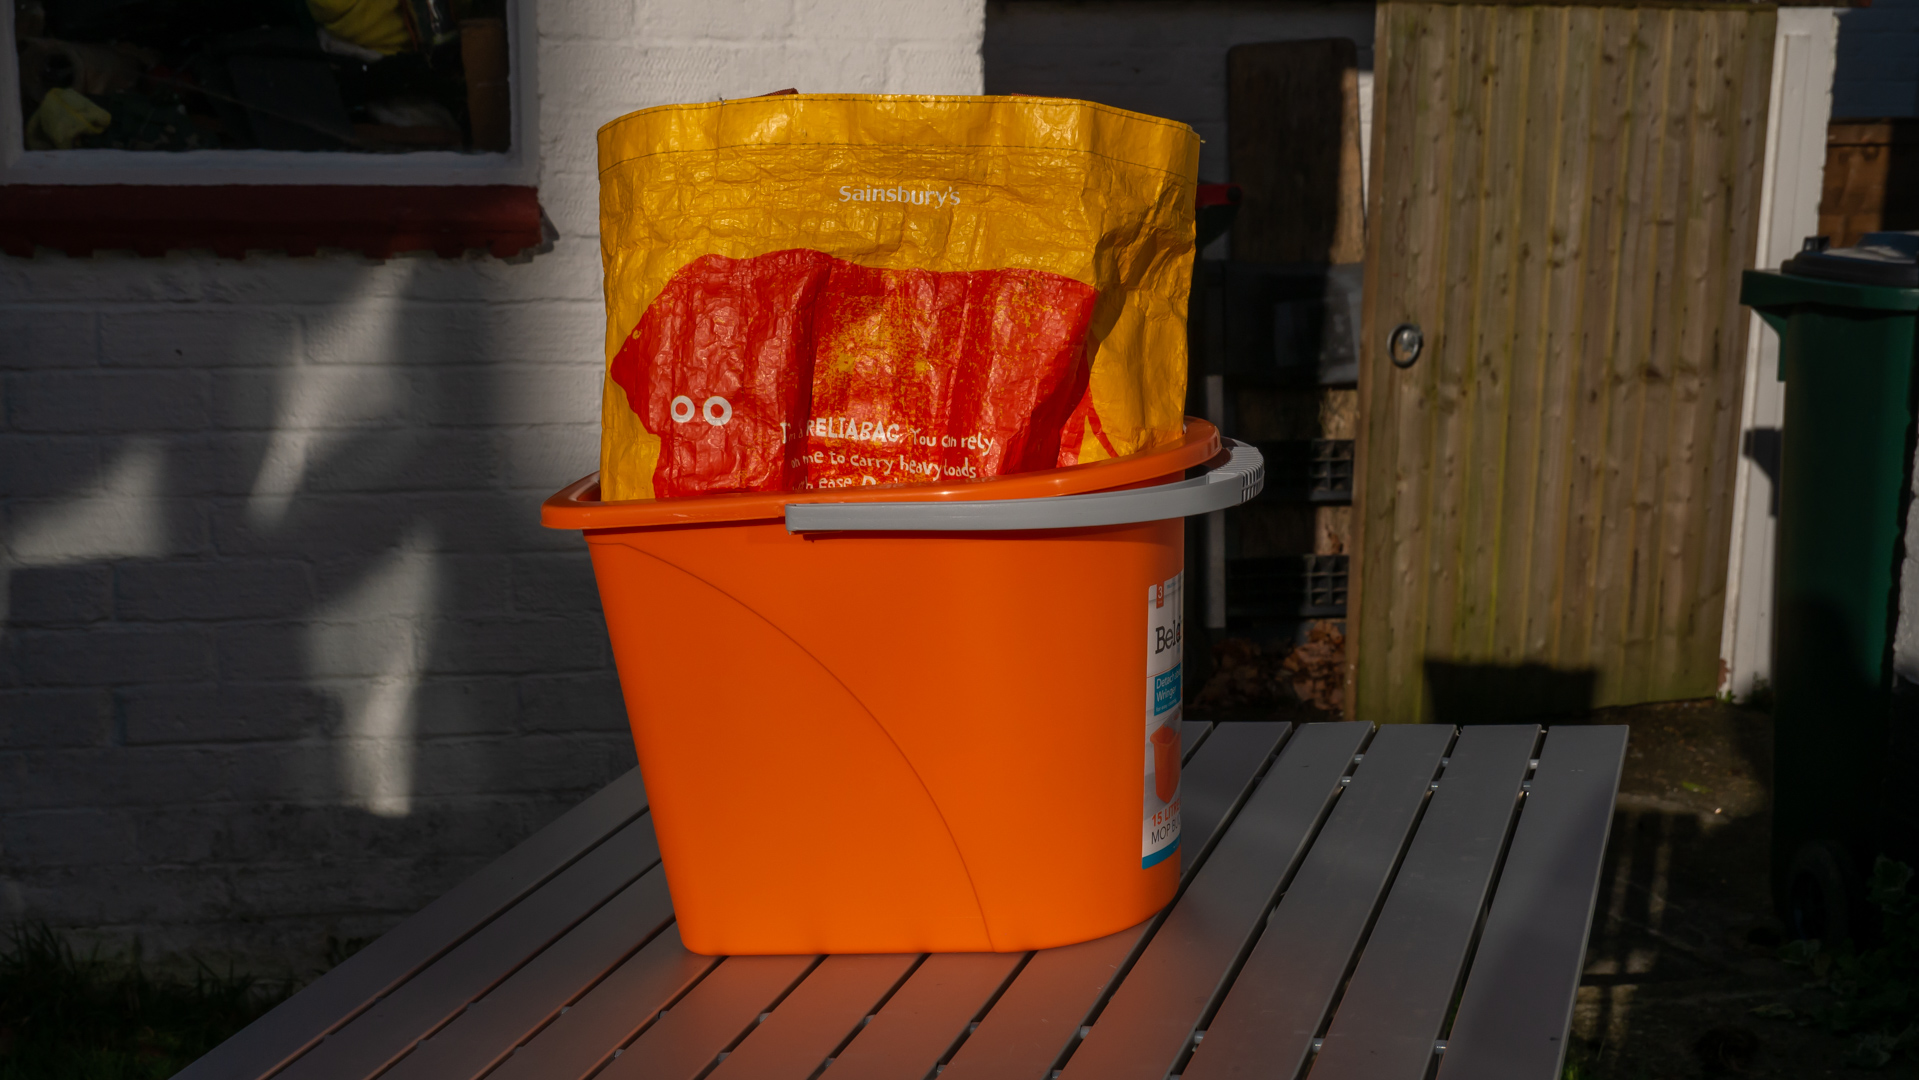
I'm trying to make a preset I can apply on import,so decided to take some test photos of an orange bucket I'd bought just for this task.
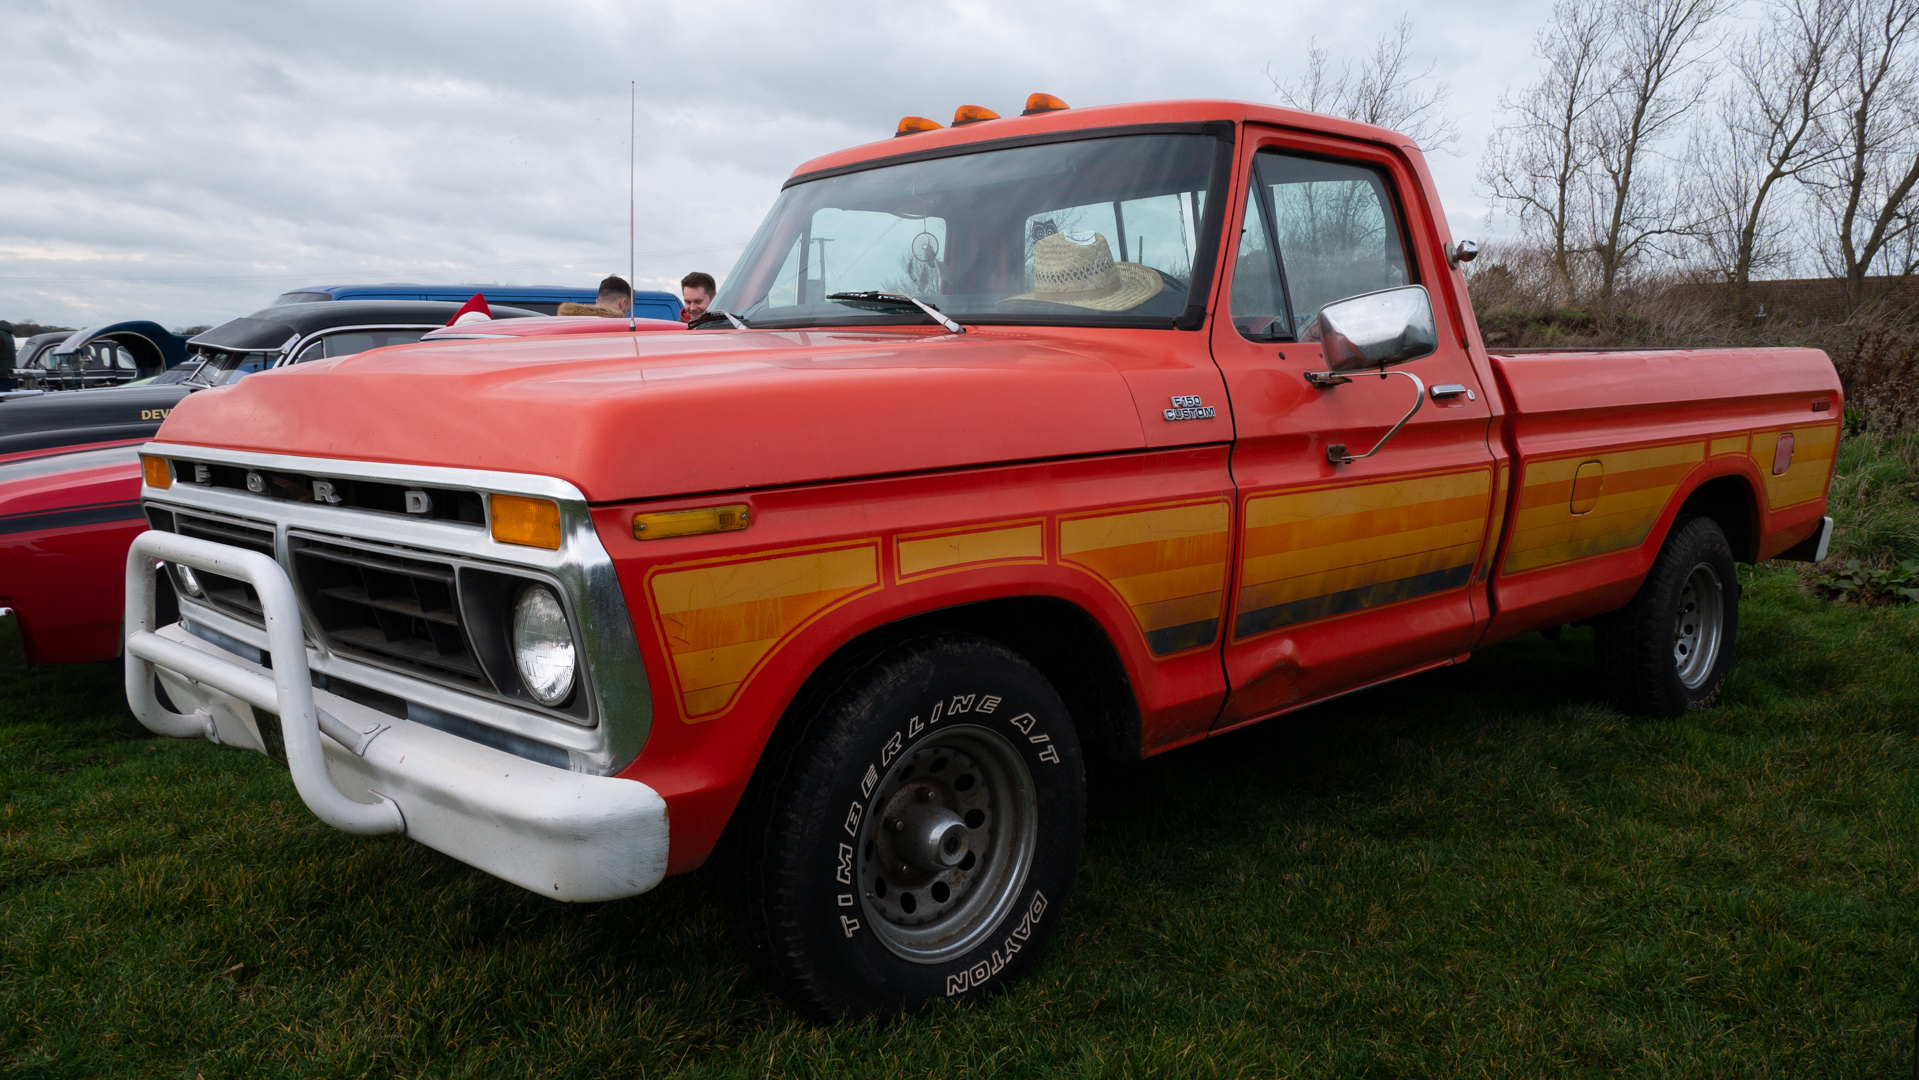
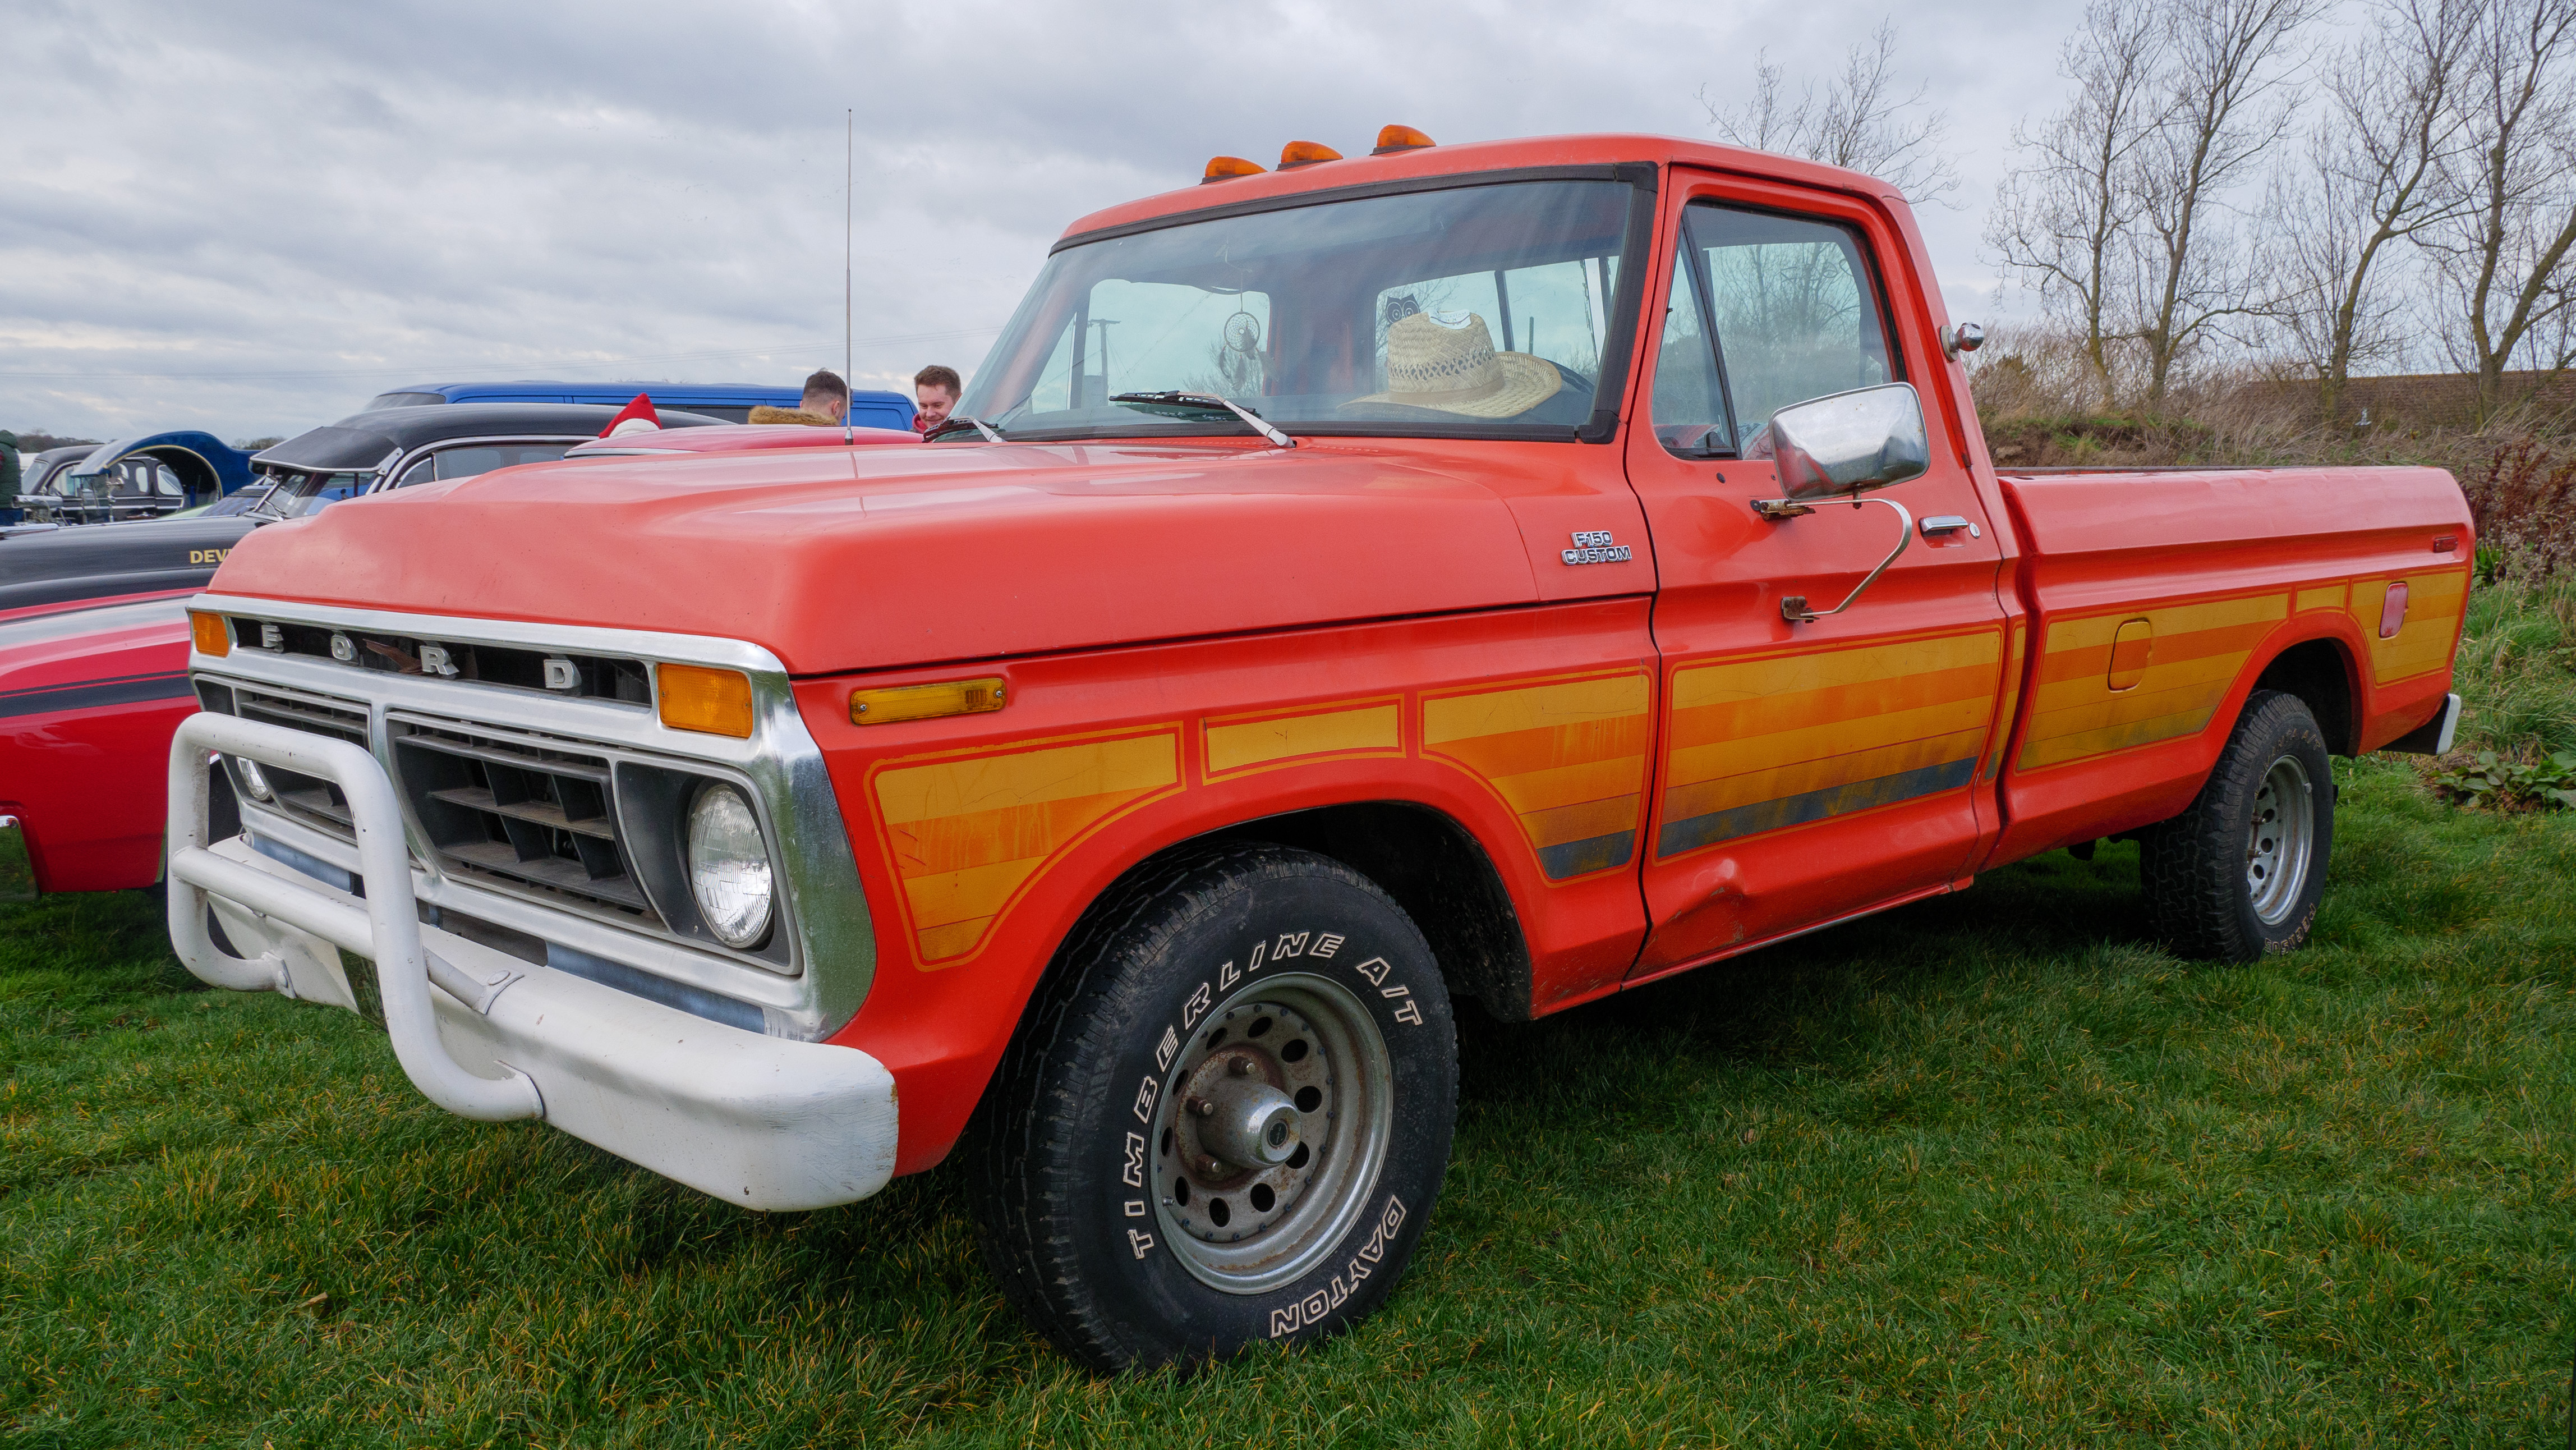
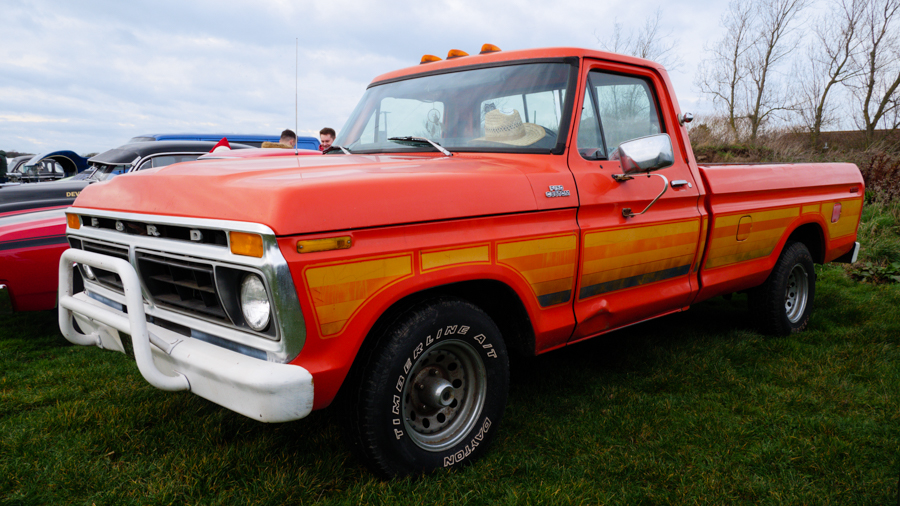
This pickup should be near as damn it the same colour as the bucket,no processing other than what was applied on import.....
This (the bucket) is the sort of colour it normally has trouble with.I took a series of photos using every photo style my camera has,all saved as cropped RAW images.The above image is as it came out of the camera with no colour correction and is 100% perfect,i.e. the bucket and bag really are exactly that colour.Now as I understand the process when you import into LR using RAW images it converts them to DNG based on the embedded profile from the photo style that was set when the photo was taken.Every image I see after import and moving to the develop module looks exactly the same,including the two that were monochrome on import are now the exact same as all the others in full colour.The only processing it applies to all the images is cropping down to 16:9,colour temperature to 5000K (I guess based on the camera's white balance setting) and sharpening.How is it applying just these and not the selected photo styles,or am I just not understanding how this is supposed to work,i.e. does it get this embedded profile from somewhere else and not from the photo styles?


 1 Correct answer

Imagewerx wrote
They were taken in 'proper' stills mode,but cropped in camera to 4K/16:9 as this is how I view them on a 4K TV set.I have to do it this way as I won't always be able to tell how to frame them otherwise.
Gottcha. The in-camera crop is just raw file metadata that LR reads and applies. For other purposes (prints) you can remove the 16:9 crop and reveal the full image area using the LR Develop module Crop Overly tool.
 45
Replies
45
45
Replies
45
Copy link to clipboard
Copied
Imagewerx wrote
Using LR Classic CC to try and sort out a problem my camera (Panasonic Lumix G80) has with the colour orange.It handles every other colour perfectly with the exception of shiny red which is almost right (just a slight purple tint on bright highlights).But oranges of a particular shade (I'm not sure which ones in particular,it seems a bit random) come out scarlet,vermilion or even almost red in some cases.I can of course correct this using the HSL sliders in Lightroom and have made a series of presets I just have to click on to correct it.
What makes you think you're camera has a problem? What model monitor are you using and has it been adjusted using a hardware calibrator such as an i1 Pro or Spyder device?
Imagewerx wrote
This pickup should be near as damn it the same colour as the bucket,no processing other than what was applied on import.....
The only processing it applies to all the images is cropping down to 16:9, colour temperature to 5000K (I guess based on the camera's white balance setting) and sharpening.
The pickup picture was shot on a cloud covered overcast day, which will have a color temperature a lot higher than 5000K! Try increasing the WB Temp slider to something in the 6500-7500K range.
Imagewerx wrote
How is it applying just these and not the selected photo styles,or am I just not understanding how this is supposed to work,i.e. does it get this embedded profile from somewhere else and not from the photo styles?
Some good learning resources here if you are a LR beginner or intermediate user.
Buy Adobe Photoshop Lightroom Classic CC | Desktop photography software
Copy link to clipboard
Copied
Sorry but I can't see a quite button,so will have to do it manually.Quote from Todd Shaner......
'What makes you think you're camera has a problem? What model monitor are you using and has it been adjusted using a hardware calibrator such as an i1 Pro or Spyder device?'
Because my last camera (Canon EOS 80D) reproduced all colours (including orange) just perfectly on both monitors.I'm using just a cheap Acer and Samsung 55inch HDTV to do my editing on.Photography is just a hobby for me and I can not justify or afford using fancy calibration hardware when the money is better spent going out and taking photos.They are checked for colour accuracy using photos of readily available coloured household objects which for what they are,are more than good enough for what I need.
'The pickup picture was shot on a cloud covered overcast day, which will have a color temperature a lot higher than 5000K! Try increasing the WB Temp slider to something in the 6500-7500K range.'
The white balance is set manually for what ever lighting conditions exist on that day.Surely if the WB was wrong,it would affect all the colours?
Copy link to clipboard
Copied
Imagewerx wrote
Because my last camera (Canon EOS 80D) reproduced all colours (including orange) just perfectly on both monitors.I'm using just a cheap Acer and Samsung 55inch HDTV to do my editing on.Photography is just a hobby for me and I can not justify or afford using fancy calibration hardware when the money is better spent going out and taking photos.They are checked for colour accuracy using photos of readily available coloured household objects which for what they are,are more than good enough for what I need.
OK, this may confirm what you're seeing, but it refers to the camera's JPEG file rendering (not raw file)
https://www.imaging-resource.com/PRODS/panasonic-g85/panasonic-g85A5.HTM
"Hue. The Panasonic G85 shifts orange toward yellow, yellow toward green, and cyan toward blue moderately, but most other hue shifts are quite minor. The yellow to green shift along with the desaturation can unfortunately produce some dingy-looking yellows as we've seen from some prior Lumix models."
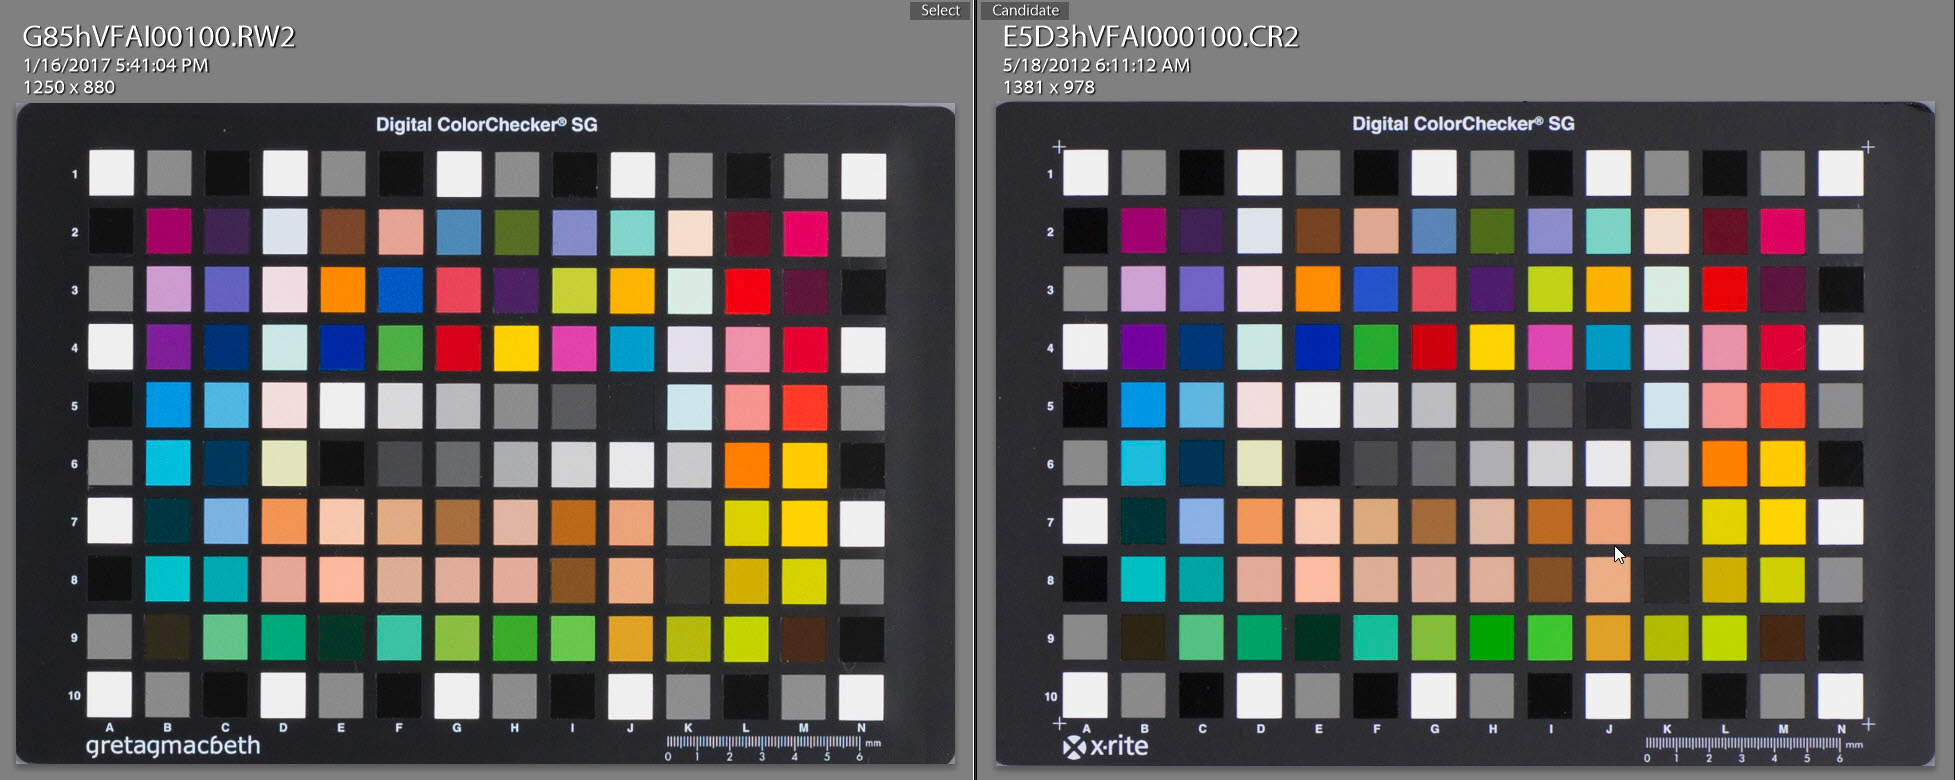
Raw files should produce more accurate rendering in LR using the Adobe Standard and Adobe Color profiles. Here's the Panasonic G85 (G80 same) next to the Canon 5D MKIII using Adobe Standard, images white balanced, and exposure matched. The orange color patch renderings are very similar. If anything G85's patch M5 is more saturated orange than the 5D MKIII.
(click on image to see full-size)
Imagewerx wrote
'The pickup picture was shot on a cloud covered overcast day, which will have a color temperature a lot higher than 5000K! Try increasing the WB Temp slider to something in the 6500-7500K range.'
The white balance is set manually for what ever lighting conditions exist on that day.Surely if the WB was wrong,it would affect all the colours?
Yes, and it would make ALL of them more accurate in color. Did you try my suggestion, "Increase the WB Temp slider to something in the 6500-7500K range? If you can upload the pickup truck raw file to Dropbox or other file sharing I can take a look at it on my calibrated monitor and provide other suggestions.
Copy link to clipboard
Copied
Quote (still can't see the proper way to do quotes)......
'Yes, and it would make ALL of them more accurate in color. Did you try my suggestion, "Increase the WB Temp slider to something in the 6500-7500K range? If you can upload the pickup truck raw file to Dropbox or other file sharing I can take a look at it on my calibrated monitor and provide other suggestions.'
Ok I'll read that review when I get time,didn't see that before I bought the camera.
Yes I did try the WB shift thing,but it didn't really make a significant difference to the colour of the pickup.
Dropbox link to RAW file of pickup truck........
How does Dropbox display the RAW image if my browser can't?
Copy link to clipboard
Copied
Imagewerx wrote
Quote (still can't see the proper way to do quotes)......


Copy link to clipboard
Copied
"Now as I understand the process when you import into LR using RAW images it converts them to DNG based on the embedded profile from the photo style that was set when the photo was taken."
Huh??? Where did you get that.
First off on import LR converts to DNG only if you tell it to. Your choices are Copy as DNG, Copy, Move, Add.
https://photographylife.com/how-to-import-photographs-in-lightroom
Second, only two cameras bring in camera settings other than exposure and WB into LR. Those being the Nikon Z6 and Z7. Settings like the photo style in camera (photo style, picture style, picture control, film simulation, profile, different camera different words)
Flat Dull Images When Importing into Lightroom? — Corbell Photographic Workshops
https://www.outdoorphotographer.com/tips-techniques/photo-editing-tips/raw-workflow-lightroom-part-o... (a bit dated)
Yes, the embedded JPEG inside the RAW file show up at the beginning in the film strip, but go away once the standard previews are generated.
Copy link to clipboard
Copied
Quote davidg36166309......
'Huh??? Where did you get that.'
From a distant and hazy memory,obviously it's wrong.
'First off on import LR converts to DNG only if you tell it to. Your choices are Copy as DNG, Copy, Move, Add.'
OK I understand that now,it was set to 'Add'
'Second, only two cameras bring in camera settings other than exposure and WB into LR. Those being the Nikon Z6 and Z7. Settings like the photo style in camera (photo style, picture style, picture control, film simulation, profile, different camera different words)'
How then is mine getting colour temperature,cropping and sharpening data into the preview image?
'Yes, the embedded JPEG inside the RAW file show up at the beginning in the film strip, but go away once the standard previews are generated.'
I see a pale and washed out image first that is not cropped,then after a few seconds it changes to a cropped fully saturated image.I shoot only in RAW,so where does the embedded JPEG come from if I don't save as RAW + JPEG? I would guess in this case as every preview is the same,I must be seeing the RAW image?
Copy link to clipboard
Copied
As to the sharpening and noise, Lightroom applies that as default to all RAW images other than Z6, Z7
Has nothing to do with in camera settings, other than those two.
Copy link to clipboard
Copied
As to embedded JPEG in RAW:
In camera, you take a RAW pic, and for simplicity let’s stick to RAW only.
The camera saves the RAW data, it saves Metadata, and it saves a small rendering of the RAW data in a file. This rendering is a small JPEG image that the processor creates. This is the embedded JPEG image in that file saved to the SD card.
When you look at the image you took on the back of the LCD or thru the electronic viewfinder, what you see is that embedded JPEG. You never ever see the RAW data.
Now, staying with the camera. That embedded JPEG is built using the RAW data AND the camera settings. Not just shutter speed, aperture, ISO (forgot ISO in previous statement), and WB, but also everything you can alter, photo style (if that’s Panasonic’s word fir it), sharpening, noise reduction, color mods, etc.
Also, staying with the camera, Metadata includes everything that camera can produce, camera model, serial number, lens model, serial number, camera owner if imputed, exposure, focal length, date, time, etc etc etc.
Next moving to Lightroom. You never ever see the RAW data, except at the very beginning of import, you always see previews, and those are JPEG’s (even after export?? to non RAW non DNG??) . When you first start an import, and you see the filmstrip get populated, those are the embedded JPEG files.
Now the visibility of those embedded JPEG files do not last long as Lightroom creates previews Upon import and the little filmstrip images get replaced.
Now a bit of a detour. What Lightroom creates in terms of previews can be changed by the user, most of what I am saying is based on default settings.
Also, another detour, in the past those embedded JPEG files were very very small. Newer cameras are starting to use larger ones, a a strategy exists to take advantage of that (not your camera and fir a different discussion)
Getting back on track. While Lightroom can read all the Metadata in the file (and it probably knows more than what the Library module will display) it does not use much of that. Oh, it needs to know the camera make and model, it needs exposure info, it needs WB info, apparently It might use the image size info (crop). Bit not much more.
Lightroom reads the file, saves, or copies the file (perhaps with some DNG conversion if requested) it uses one of the basic Adobe profiles (Adobe Color?) to translate the RAW data to a raster output. Applies a bit of sharpening, a bit of noise reduction, and that’s it. Ends up displaying a preview image.
Now, that default sharpening and noise reduction if undesired can be backed off by using the Lightroom Classic Preset General Zeroed (just a bonus tip, and some words not correct, st an iPad not a PC)
And that default profile, probably showing up as Color, can be changed to one you want, and after import, that is very much advised as your first step (some confusion about Adobe Color vs Adobe Standard at initial import), select one of the camera specific ones if available.
I left out the calibration version, basically leave that alone unless you want to revert to much older LR menus.
One caviat: With the exception of one or two cameras that save TIFF instead if JPEG (I forget what ones)
Copy link to clipboard
Copied
By the way, a little experiment. While shooting RAW only, select a Photo Style that is some form of Black & White, or Monochrome.
Take some shots. Look at them in camera.
What the heck, they are Bkack & White. You are seeing the embedded JPEG
Import them into LR, watch the filmstrip, at first Bkavk and a White, then color. Embedded JPEJ, then previews ignoring metadata as to Photo Style.
Added bonus, some of us RAWshooters will intentional shoot that way in the field, especially in Landscapes as to see contrast better.
Some street shoothers might select a color style that will reflect planed post production on purpose.
Also, as the embedded JPEG is so so small, much smaller than what the camera would save if shooting JPEG, many will shoot JPEG plus RAW as to review the larger JPEG image (compared to the embedded JPEG in the RAW) for a more complete idea on what we’ve got
Almost forgot, a bit of odd behavor, about that crop in camera transferring into the imported LR preview. In the back of my head, an experiment for another discussion, in my Fuji X-T3, when JPEG plus RAW a 1:1 did (fir the RAW) show up upon import, but it was not absolute, just the then current crop status, easily changed to full sensor ratio.
Copy link to clipboard
Copied
Ok, that all got long winded, and others will disagree. And apologies for spelling and gramer, and likely venting, an iPad is not the rig for me to be doing this on.
But that is what this forum is for, communication, debate, constructive argumentation, sharing, learning.
Copy link to clipboard
Copied
Ok thanks I understand now.I never really gave much thought to where the preview my camera shows me comes from.I sort of assumed the camera just made it every time you looked at the image files stored in it,rather than it being a separate file stored somewhere.My Xiaomi action camera creates it's thumbnails and stores them as another file with different extension to the main one,both of which are visible when you download from the memory card.
Copy link to clipboard
Copied
Imagewerx wrote
Now as I understand the process when you import into LR using RAW images it converts them to DNG based on the embedded profile from the photo style that was set when the photo was taken.
Yes and no. LR and ACR takes the proprietary raw and converts the metadata into DNG compliant metadata and then reads the raw file data and applies defaults based on the DNG metadata. However, it’s not really a “conversion” so much as it’s reading the metadata and interpreting it as though it’s a DNG. Which has little if anything to do with the preview (yes, the color temp 'as shot' metadata is used). The embedded JPEG in the raw is built by the camera and is proprietary. LR's rendering is proprietary too and based on the defaults and it's not at all unusual to see big differences between the two previews.
Copy link to clipboard
Copied
Ok thanks for that.I only recently found out that JPEGs can look surprisingly different between different camera manufacturers.I always assumed that JPEGs were a standard universal thing that were always created to a standardised algorithm.
Copy link to clipboard
Copied
Imagewerx wrote
Ok thanks for that.I only recently found out that JPEGs can look surprisingly different between different camera manufacturers.I always assumed that JPEGs were a standard universal thing that were always created to a standardised algorithm.
The format, the container for pixels are. How the pixels are rendered is totally proprietary and subjective. This has absolutely nothing to do with accurate color which often looks pretty awful**
** http://www.color.org/ICC_white_paper_20_Digital_photography_color_management_basics.pdf
What you are aiming for is pleasing color and that's subjective. Ever shoot transparency film? What's more accurate, Velvia, Kodachrome, Ektachrome? None. All are specific and proprietary renderings each film manufacture creates hoping the photographer buying the film will prefer over the others. The same is true with rendering raw data. To a JPEG in camera or with a raw file in anyone's raw processor.
Copy link to clipboard
Copied
thedigitaldog wrote
Imagewerx wrote
Ok thanks for that.I only recently found out that JPEGs can look surprisingly different between different camera manufacturers.I always assumed that JPEGs were a standard universal thing that were always created to a standardised algorithm.
The format, the container for pixels are. How the pixels are rendered is totally proprietary and subjective. This has absolutely nothing to do with accurate color which often looks pretty awful**
** http://www.color.org/ICC_white_paper_20_Digital_photography_color_management_basics.pdf
What you are aiming for is pleasing color and that's subjective. Ever shoot transparency film? What's more accurate, Velvia, Kodachrome, Ektachrome? None. All are specific and proprietary renderings each film manufacture creates hoping the photographer buying the film will prefer over the others. The same is true with rendering raw data. To a JPEG in camera or with a raw file in anyone's raw processor.
Kodachrome for me,because to my eyes it looked subjectively better than Fuji or Agfa that my friends used at the time.

Copy link to clipboard
Copied
I reported a similar issue on the Photoshop Family Forum for Lightroom.
I did some experimenting, and also found this seems to be apparent mostly in colours with red in them. I first noticed it with any bare earth areas, or autumnal colours, such as brown leaves i.e. browns. It was with the LR 8 update I first saw this, but all those colours seem to have a noticeable purple hue to them. I also found some yellows turning orange.
One of their guys did respond and looked at some of my images, but Adobe's stance is that they're within their criteria, so nothing much they would do about it. But I found the effect was too bad to be usable.
It does occur with any of my Raw images too, although my main ones have been ORF Raws from a few years back (E-1 to E-420), and now NEF from a D5100, as well as a few others on between. The effect happens on all Raws I've tried though.
It seems to be the new 'Adobe Color' profile they introduced last year (replacing 'Adobe Standard').
Eventually, I found that switching the colour profile for each camera has sorted it now. For the old Olympus ORF images I use the old ACR 4.4/4.5 profiles, and those now look much more natural. On the Nikon the 'Camera xxxx' files work best, I tend to use the Camera Neutral though.
Hope that helps.
Andy.
Copy link to clipboard
Copied
Thank you for that and something I'd never thought of before you mentioned it.I always used Photoshop with my Canon Cameras and only started using Lightroom when I bought the Panasonic camera.
If the problem is with my image processing software and not my camera,I'll have a play with different profiles and let you know how I get on.
Copy link to clipboard
Copied
Imagewerx wrote
Thank you for that and something I'd never thought of before you mentioned it.I always used Photoshop with my Canon Cameras and only started using Lightroom when I bought the Panasonic camera.
If the problem is with my image processing software and not my camera,I'll have a play with different profiles and let you know how I get on.
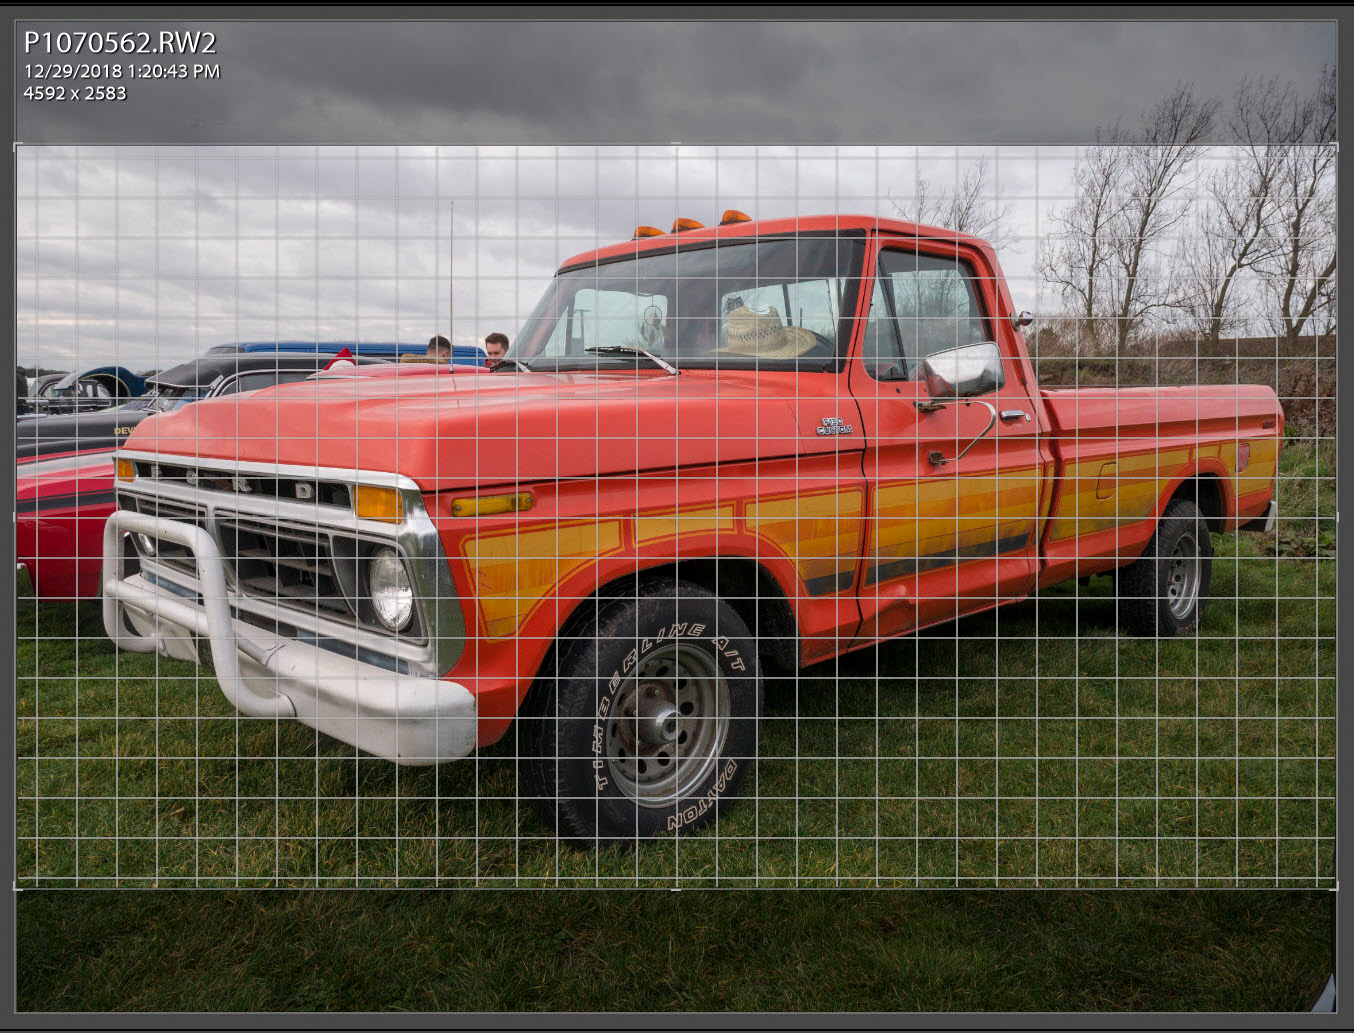
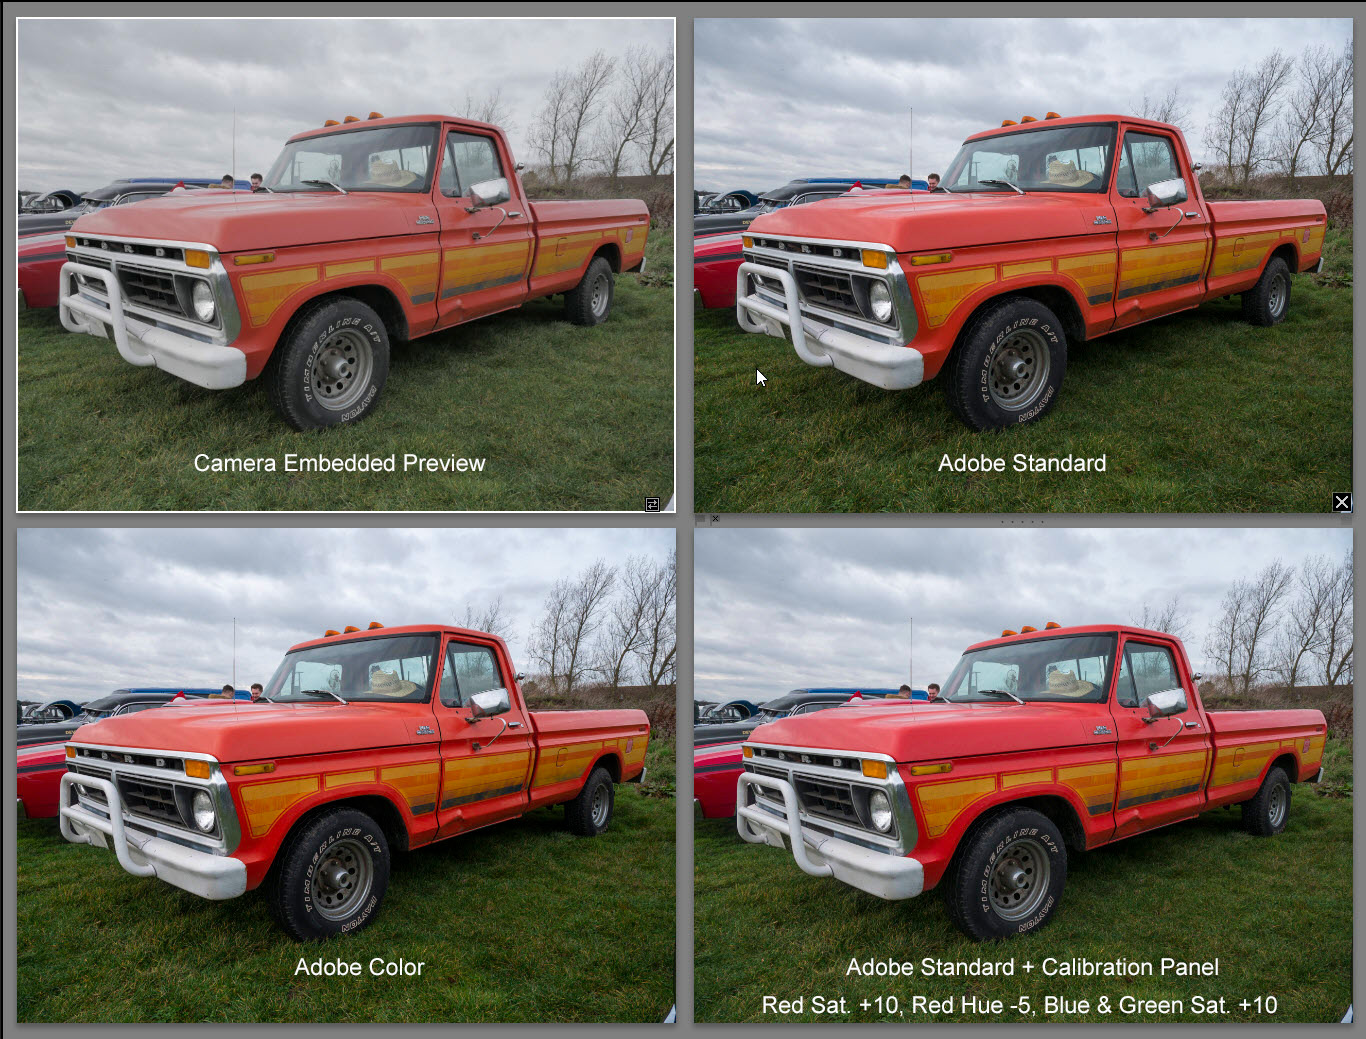
Continuing with the thedigitaldog's comments here's what I found using your RW2 raw file of the orange truck. As you can see the embedded preview (JPEG rendering) looks, pretty weak in all respects! The Adobe Standard profile is probably still not what you're looking for. Adobe Color gets better, but you can make your own "custom" adjustments using the LR Develop module Calibration panel. You can then apply the Camera Profile and Calibration settings using a preset or include it in the 'Default Develop Settings.'
Copy link to clipboard
Copied
Imagewerx wrote
Thank you for that and something I'd never thought of before you mentioned it.I always used Photoshop with my Canon Cameras and only started using Lightroom when I bought the Panasonic camera.
If the problem is with my image processing software and not my camera,I'll have a play with different profiles and let you know how I get on.
I thought I'd have a go at that too. Here's a bunch I tried out, using versioning.
Adobe Color profile with Auto adjust
Adobe Neutral profile with Auto adjust
Adobe Standard profile with Auto adjust
Camera Natural profile with Auto adjust

Camera Standard profile with Auto adjust
I used only the (Sensei based) Auto adjust settings and changed the profiles for these. I also did a set with no adjustments other than the profiles, but I think the adjusted ones just accentuate the differences better.
For me, the Adobe Neutral seems to come nearest a natural looking representation, but of course I've never seen the original scene.
Anyway, I've had fun with that, and it also confirms my own findings with my Raw images here.
It does seem strange though, until they updated the Process Version and the color profiles over the last year, I never had to think about this one.
If you want to see truly awful, have a play with the Landscape profiles too.
Cheers
Andy
Copy link to clipboard
Copied
Hope I did not step in it. Worked with your example.
- Place in the appropriate folder
- Synchronized
- Presets. /Classic-General/Zeroed
- Basic Panel/Profile, changes from Adobe Standard, to Camera Matching “Standard”
- Altered overall WB, used the selector tool (eyedropper) clicking on front bumper (R, G, B were within 1% of one another)
- Accomplished shift double click on Exposure (brought up a bit) Whites and Blacks (to get white/black point, i.e. just barely clipping or not) Resulted in 0.45 EXP, + 19 Whites, -5 Blacks
- Brought clarity +5
- Lens corrections, Chromatic aberration, seems to be none of note to correct. I se your rig applies a built-in lens profile
- Hmm, I notice you have a image size that does in fact come along with the RAW into LR and does get applied, but can be undone.
- Applied a Medium Tone curve and left it alone after that.
- Applied an Adjustment Brush, painting the sky (Auto Mask off) changed the range mask to Color and selected the sky in an area apparently not cloud, pressed O, and adjusted the amount slider to decrease the mask to sky only, had to erase some of the mask, dropped the temp down (Inquiry, was this a all cloudy day, as in the blue I just exposed was not true??)
- Placed an adjustment brush to the truck, auto mask off, change range mask to color, select the truck, erase the red car behind, tweaked Temp up 10
- Export to JPEG 100% sRGB, resized on long side to 900
- Never touched sharpening.
I suspect I have fouled up that sky
Copy link to clipboard
Copied
davidg36166309 wrote
Hope I did not step in it. Worked with your example.
9. Hmm, I notice you have a image size that does in fact come along with the RAW into LR and does get applied, but can be undone.
I think you are referring to the 16:9 Crop applied in-camera to the raw file. I'm guessing the OP may have been shooting in video mode and then taking some still shots, which would apply the video crop. It also may be applying other settings to the still image raw file that may be contributing to the color rendering issue. Just a guess as I'm not familiar with Panasonic cameras.
Copy link to clipboard
Copied
https://forums.adobe.com/people/Todd+Shaner wrote
davidg36166309 wrote
Hope I did not step in it. Worked with your example.
9. Hmm, I notice you have a image size that does in fact come along with the RAW into LR and does get applied, but can be undone.
I think you are referring to the 16:9 Crop applied in-camera to the raw file. I'm guessing the OP may have been shooting in video mode and then taking some still shots, which would apply the video crop. It also may be applying other settings to the still image raw file that may be contributing to the color rendering issue. Just a guess as I'm not familiar with Panasonic cameras.
They were taken in 'proper' stills mode,but cropped in camera to 4K/16:9 as this is how I view them on a 4K TV set.I have to do it this way as I won't always be able to tell how to frame them otherwise.
Copy link to clipboard
Copied
Imagewerx wrote
They were taken in 'proper' stills mode,but cropped in camera to 4K/16:9 as this is how I view them on a 4K TV set.I have to do it this way as I won't always be able to tell how to frame them otherwise.
Gottcha. The in-camera crop is just raw file metadata that LR reads and applies. For other purposes (prints) you can remove the 16:9 crop and reveal the full image area using the LR Develop module Crop Overly tool.

-
- 1
- 2

 AdChoices